Original link: http://www.ruanyifeng.com/blog/2022/06/cloud-server-getting-started-tutorial.html
Many students want to set up their own cloud services, which is inseparable from the cloud server.
Now there is a new kind of cloud hosting called “Lightweight Application Server”, which is suitable for newcomers. This article introduces its basic situation, demonstrates its usage, and helps you get started easily.

What I use to demonstrate is Tencent Cloud’s lightweight application server Lighthouse . My own server is in Tencent Cloud, I am familiar with it, and I know my classmates there.

Tencent Cloud recently held Techo Day, a technology open day, with the slogan “Simplify complexity, light and easy to use”, which happens to have relevant information, which is consistent with the theme of this article. I asked them to come over and put it at the end of the article.
1. Introduction
First of all, let me explain what a lightweight application server is and what it has to do with cloud hosting.
As we all know, compared with traditional virtual hosts, the biggest feature of cloud hosting is that it can scale in real time, expand and shrink arbitrarily, and has no resource restrictions.

In order to do this, each of its parameters is configured and charged separately: CPU, memory, hard disk, bandwidth, IP address, snapshots, security policies…
The picture below is the purchase page of Tencent Cloud’s cloud server CVM . Let’s see how many types are available, and this is only a part.

With so many configuration items, although it is very flexible, it is a bit too complicated for beginners. Sometimes, we just want to build a simple personal website, or have a server environment for learning and testing, preferably out of the box, without so many adjustable configurations.
Cloud service providers realized this problem and designed a simplified version of the cloud server, which is a lightweight application server.
2. What is a lightweight application server
A lightweight application server, in a nutshell, is a repackaging of the underlying resources of a cloud server, hiding the complexity as much as possible, making it easy to use and friendly to novices.
It has the following features.
(1) Package purchase. All configuration items are bundled into packages, as long as you select a package, various resources will be configured for you. The following are all the current plans of Tencent Cloud.

As you can see, the amount is quite sufficient. The smallest package also has two cores, 2GB of memory, 4Mbps bandwidth, and 300GB of traffic, which is enough for small websites.
(2) Out of the box. When installing the system, it provides images of many common applications, one-click installation, and direct use. For details, see the examples below.

(3) Full function. Most of the things that cloud servers can do, lightweight application servers can do, such as using cloud databases, COS storage, and security protection. There are only a few tasks with high computational load, high reading and writing, and requiring clusters, which are not suitable for it, so its playability is not bad.
(4) The price is cheaper . It is much cheaper than a cloud server with the same configuration. During the big promotion, the cheapest package is only a few dozen yuan a year. At such a price, you can experience a full-featured cloud host, which is still very cost-effective.
In short, the design concept of a lightweight application server is simplicity, ease of use, and lightness. It uses the same CPU, memory, hard disk and other underlying resources as cloud servers, and there is no difference in performance and usage. The difference is mainly reflected in the product form presented to users. It is more like a traditional virtual host, but its functionality, stability, and security are far superior to virtual hosts.
Third, the use of lightweight application servers
As a full-featured server, you can install any software you want on a lightweight application server.
In general, it is applicable to the following three scenarios.
(1) Small services with light load , such as enterprise official website/personal blog/forum community/e-commerce website, etc., WeChat applet/mini game backend service can also be placed.
(2) Personal tools , such as cloud disk, image bed, Docker, etc.
(3) Cloud development/testing/learning environment .
Fourth, open the server
Next, we will demonstrate how to open a lightweight application server.
4.1 Purchase Process
Log in to the lightweight application server console and enter the purchase page.
First, select the location of the computer room.

Then, choose a mirror. The so-called image is the installation template of the server. For demonstration, I choose “Pagoda Linux Panel”.

Note that the same page also has a Windows server, this tutorial will choose Linux.
In the end, choose a package, the cheapest one will do. Payment starts immediately.
4.2 SSH login
The first thing after opening is to complete the SSH login settings so that you can log in to the server.
The first step is to enter the console, select the “Key” menu on the left, and click the “Create Key” button.

In the second step, in the pop-up dialog box, you can select “Create New Key Pair” to generate a new key, or you can upload an existing public key (note, do not upload a private key).

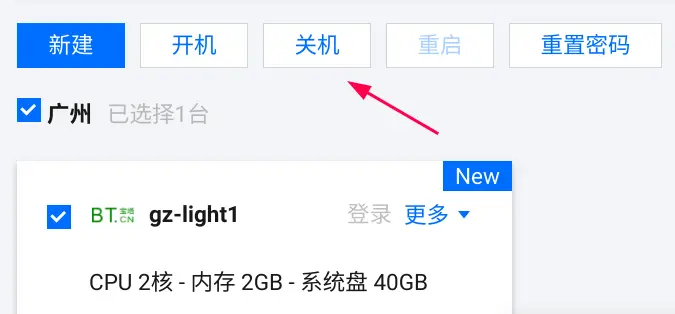
The third step is to bind the key obtained in the previous step with the host. Binding the key requires a shutdown operation, so first on the settings page, click the “shutdown” button.

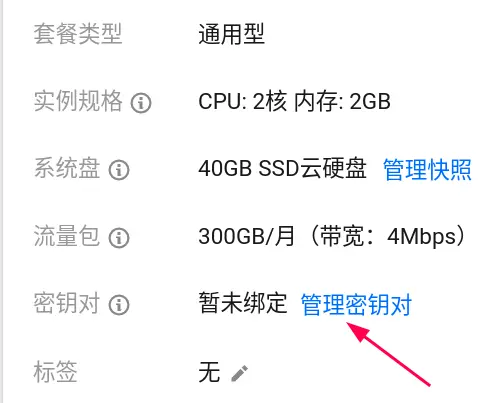
After shutting down, enter the detailed settings of the host and click “Manage Key Pair”.

Then, click “Bind Key Pair” to bind the key to the host.

The fourth step, after the binding is successful, reboot.
At this point, at the command line of the local computer, type the following command.
$ ssh root@[服务器的IP 地址]
After you have successfully logged in, you can then perform various command-line operations on the host. Students who are not familiar with SSH can refer to this tutorial .
Note that we are the root user at this time. It is best to create an ordinary user on the server after logging in, and log in with the ordinary user in the future, and prohibit the root user from logging in. For detailed operations, please refer to the “Preliminary Configuration Process of Linux Server” written by me.
4.3 Pagoda panel
During the front installation, the mirror image of the pagoda panel is selected. It is a management tool that manages hosts through a web interface. Let’s see how to use it.
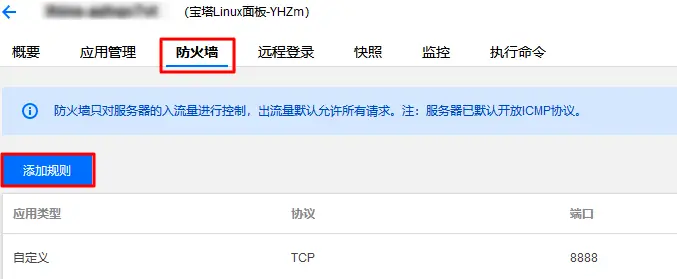
Its access port is 8888, which is not open by default and must be opened to the outside world first. The method is to enter the “Firewall” setting page of the host and click “Add Rule”.

The content of the new rule is to allow the server to expose port 8888 of the TCP protocol.

After the rule is added successfully, you can open the browser and visit http://[主机IP 地址]:8888 to see the prompt page.

The pagoda panel has a safe entrance by default, and it is impossible to enter at this time. For the specific method of logging in, please refer to the official documentation .
5. Application installation
After logging in to the server, you can install various applications on the command line by yourself.
In order to simplify the operation, for some common applications, the official “one-click installation” is provided. You can specify the application image to install at the time of purchase, or you can reinstall the system on an existing server (which will delete existing data).

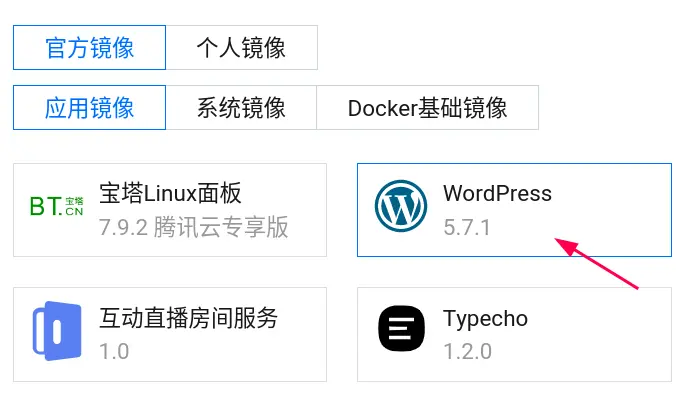
Here is an example of installing a WordPress mirror.

After selecting the WordPress image and clicking “OK”, the installation will be completed shortly. Next, visit the IP address of the server and you should see the following page.

This indicates that WordPress can be used normally, and its login password can be found on the “Application Management” page in the backend of the host.
Note that the WordPress database is installed on the server along with the image. If the data is more important, or multiple hosts use one database, I recommend purchasing a dedicated cloud database service.
In addition to WordPress, the installation methods of other official mirrors are similar. For example, select the image of the personal network disk Cloudreve, and you will get the following page after installation.

6. Docker application installation
The final demonstration is to install the Docker image on the lightweight application server. After all, most complex applications now provide a Docker image installation method.
At this time, the server needs to install docker application first. For demonstration purposes, I chose to reinstall the system as docker
CE image, this is relatively simple.

Note that every time the system is reinstalled, the SSH key needs to be re-bound with the server. After the binding is successful, use the following command to log in to the server.
$ ssh root@[主机IP 地址]
After logging in, docker should have been installed, you can try the following command.
# docker -v
In the above command, the preceding command prompt # indicates the current root user environment.
The following is an example of installing Fathom ‘s Docker image, which is a relatively simple website visit statistics tool.
# docker run -d -p 80:8080 usefathom/fathom:latest
Just run the above line of command. Under normal circumstances, after executing this command, the Fathom service has been installed and is running in the background.
At this time, the browser accesses the IP address of the host, and you can see the Fathom page.

In addition, you can also install the mirror of Gitea as your own code hosting server. The operation is basically the same as the above. You can refer to this article .

For some complex Docker images, you also need to install Docker Compose, which will not be demonstrated here. You can refer to the “Docker Getting Started Tutorial” and “Docker Microservice Tutorial” written by me.
7. Conclusion
Lightweight application server is generally a relatively simple cloud service, easy to use, cost-effective, suitable for individual users and small and medium-sized enterprises. If you are new to cloud development and want to try your first cloud server, you might as well start with a lightweight application server.
As mentioned at the beginning of this article, Tencent Cloud recently had a Techo Day technology open day event. The event happened to have a practical course, sharing how to quickly build your own cloud drive step by step by using the lightweight application server Lighthouse with application mirroring.
Tencent officially organized the introduction of these materials, courseware, and other lightweight cloud server products into a lightweight tool guide . I have requested this information. Interested friends can open this link on their mobile phones, or scan the code on WeChat and download it from Tencent Cloud.

(Finish)
document information
- Copyright statement: Free reprint – non-commercial – non-derivative – keep attribution ( Creative Commons 3.0 license )
- Date of publication: June 29, 2022
This article is reproduced from: http://www.ruanyifeng.com/blog/2022/06/cloud-server-getting-started-tutorial.html
This site is for inclusion only, and the copyright belongs to the original author.