As a more advanced and modern VPN protocol, WireGuard is more efficient and simpler to configure than traditional IPSec, OpenVPN, etc. It has been incorporated into the Linux kernel, making it more convenient to use. It is simply a fighter in VPN. More and more experts use WireGuard to achieve many strange needs. For example, domestic and foreign machines can tunnel through WireGuard to become a pseudo-IPLC dedicated line; or connect the local network with the Kubernetes cluster.
But WireGuard will encounter a fatal problem in the domestic network environment: UDP blocking/speed limiting . Although any IP-based protocol (TCP, UDP, ICMP, SCTP, IPIP, GRE, etc.) can be transmitted within the tunnel through WireGuard, the WireGuard tunnel itself communicates through the UDP protocol, and domestic operators simply do not have the ability and energy to The difference between TCP and UDP is to deeply customize different QoS policies, and almost all adopt a one-size-fits-all approach: speed limit or even block UDP .
Mr. Lu Xun once said: The wool comes from the sheep! The breakthrough is still on the operator: although it is not friendly to UDP, it is unable to deeply detect the authenticity of the TCP connection .
This is easy to handle, since you turn a blind eye to the TCP connection, then I will be fooled by disguising the UDP connection as a TCP connection. The mainstream tools that currently support masquerading UDP traffic as TCP traffic are
udp2raw , I believe many friends are familiar with this tool, but unfortunately, the protagonist of today is not it, but another new tool that is more powerful than it:
Phantun .

Introduction to Phantun
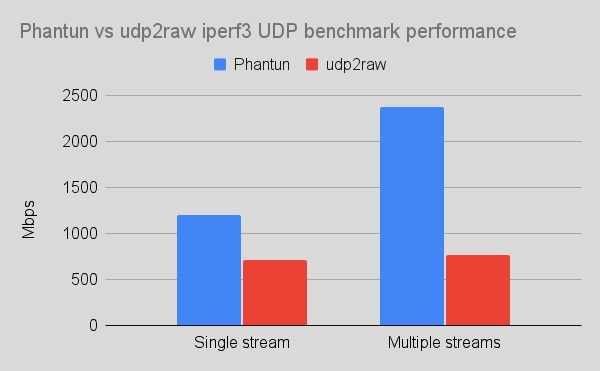
The entire project of Phantun is completely implemented in Rust , and the performance is smashed by udp2raw. Its original intention is similar to udp2raw, both to implement a simple user-mode TCP state machine to camouflage UDP traffic. The main purpose is to make UDP traffic look like TCP without being affected by TCP retransmission or congestion control.
It needs to be stated that the goal of Phantun is not to replace udp2raw . From the very beginning, Phantun hopes to be designed to be simple and efficient enough. Therefore, the functions of ICMP tunneling, encryption, and replay prevention supported by udp2raw are not implemented by Phantun.
Phantun assumes that the UDP protocol itself has solved these problems, so the entire forwarding process is a simple plaintext header plus some necessary TCP state control information. For the WireGuard I use every day, the design of Phantun is safe enough, because the WireGuard protocol has better implemented these security functions.
Phantun uses TUN interface to send and receive Layer 3 packets, and udp2raw uses Raw Socket + BFP filter. Personally, I feel that the implementation based on TUN is slightly more elegant, and it is easier to port across platforms.
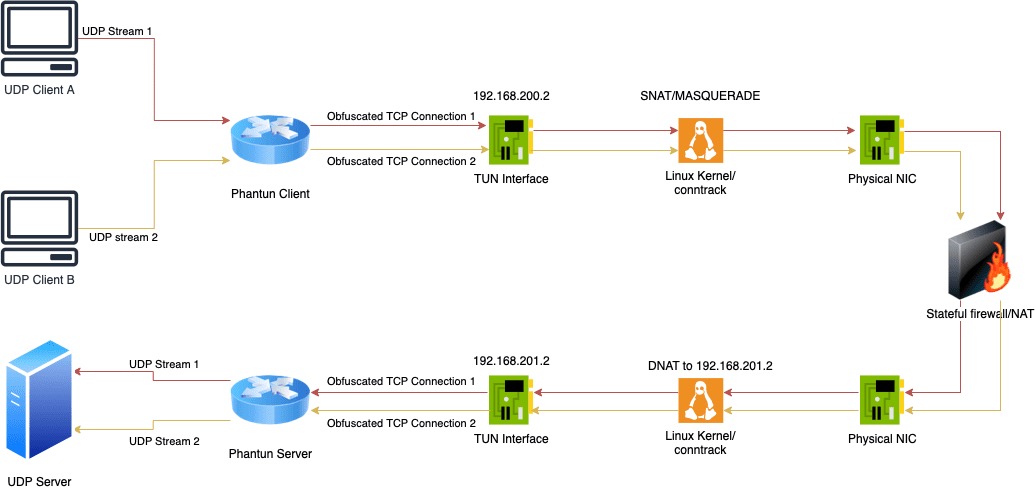
The TCP connection of Phantun is created on demand. Only starting the Client will not actively connect to the server. It will be created on demand after the first data packet arrives. Each UDP stream has its own independent TCP connection. This is very different from udp2raw, all UDP connections of udp2raw share a single TCP connection. The disadvantage of this is that udp2raw requires additional header information to distinguish connections, which increases the overhead of the header. Compared with pure UDP, Phantun has an extra header overhead of 12 bytes per packet, and udp2raw reaches 44 bytes according to my tests.
The following is a detailed comparison of Phantun and udp2raw:
| Phantun | udp2raw | |
|---|---|---|
| UDP over FakeTCP obfuscation | ✅ | ✅ |
| UDP over ICMP obfuscation | ❌ | ✅ |
| UDP over UDP obfuscation | ❌ | ✅ |
| Multithreading | ✅ | ❌ |
| Throughput | Better | Good |
| Layer 3 Forwarding Mode | TUN interface | Raw sockets + BPF |
| Tunnel MTU Overhead | 12 bytes | 44 bytes |
| Each UDP stream has its own separate TCP connection | Client/Server | Server only |
| Prevent replay, encrypt | ❌ | ✅ |
| IPv6 | ✅ | ✅ |
How Phantun Works

Phantun is divided into a server and a client. The server listens to a port, such as 4567 (specified by the --local parameter), and forwards UDP packets to the UDP service (here refers to the listening port and address of the server WireGuard, specified by the --remote parameter).
The client also listens on a port, such as 127.0.0.1:4567 (specified by the --local parameter), and establishes a connection with the server (such as 10.0.0.1:4567 ) through the --remote parameter.
Both the client and the server will create a TUN network card. The default IPv4/IPv6 addresses assigned by the client’s TUN network card are 192.168.200.2 and fcc8::2 respectively, and the default IPv4/IPv6 addresses assigned by the server’s TUN network card are 192.168.201.2 and 192.168.201.2. fcc9::2 .
Both the client and the server need to enable IP forwarding and create corresponding NAT rules. The client needs to perform SNAT on the IP 192.168.200.2 before the traffic leaves the physical network card; the server needs to set the IP DNAT to 192.168.201.2 before the traffic enters the network card.
Phantun Configuration Steps
Next I’ll walk through an example of how to use Phantun to masquerade WireGuard’s UDP traffic as TCP. We need to install phantun on the server and client respectively, you can go to
Download it from the release page , it is recommended to download the static compiled version phantun_x86_64-unknown-linux-musl.zip .
Server
Assume that the public IP address of the server is 121.36.134.95 , and the listening port of WireGuard is 51822 . First modify the configuration file /etc/wireguard/wg0.conf and add the following configuration in [Interface] :
MTU = 1300 PreUp = iptables -t nat -A PREROUTING -p tcp -i eth0 --dport 4567 -j DNAT --to-destination 192.168.201.2 PreUp = RUST_LOG=info phantun_server --local 4567 --remote 127.0.0.1:51822 &> /var/log/phantun_server.log & PostDown = iptables -t nat -D PREROUTING -p tcp -i eth0 --dport 4567 -j DNAT --to-destination 192.168.201.2 PostDown = killall phantun_server || true
You need to replace eth0 with the name of your server’s physical NIC. Regardless of the MTU value, I will tell you the debugging method later.
PreUp = iptables -t nat -A PREROUTING -p tcp -i eth0 --dport 4567 -j DNAT --to-destination 192.168.201.2
This iptables rule means to DNAT the inbound traffic of port 4567 as the IP address of the TUN network card.
PreUp = RUST_LOG=info phantun_server --local 4567 --remote 127.0.0.1:51822 &> /var/log/phantun_server.log &
This will start phantun_server, listen on port 4567 , and forward UDP packets to WireGuard.
The complete WireGuard configuration on the server side:
# local settings for Endpoint B [Interface] PrivateKey = QH1BJzIZcGo89ZTykxls4i2DKgvByUkHIBy3BES2gX8= Address = 10.0.0.2/32 ListenPort = 51822 MTU = 1300 PreUp = iptables -t nat -A PREROUTING -p tcp -i eth0 --dport 4567 -j DNAT --to-destination 192.168.201.2 PreUp = RUST_LOG=info phantun_server --local 4567 --remote 127.0.0.1:51822 &> /var/log/phantun_server.log & PostDown = iptables -t nat -D PREROUTING -p tcp -i eth0 --dport 4567 -j DNAT --to-destination 192.168.201.2 PostDown = killall phantun_server || true # remote settings for Endpoint A [Peer] PublicKey = wXtD/VrRo92JHc66q4Ypmnd4JpMk7b1Sb0AcT+pJfwY= AllowedIPs = 10.0.0.1/32
Finally restart WireGuard:
$ systemctl restart wg-quick@wg0
client
Assume that the client’s WireGuard listening port is 51821 . First modify the configuration file /etc/wireguard/wg0.conf and add the following configuration in [Interface] :
MTU = 1300 PreUp = iptables -t nat -A POSTROUTING -o eth0 -s 192.168.200.2 -j MASQUERADE PreUp = RUST_LOG=info phantun_client --local 127.0.0.1:4567 --remote 121.36.134.95:4567 &> /var/log/phantun_client.log & PostDown = iptables -t nat -D POSTROUTING -o eth0 -s 192.168.200.2 -j MASQUERADE PostDown = killall phantun_client || true
You need to replace eth0 with the name of your server’s physical NIC.
PreUp = iptables -t nat -A POSTROUTING -o eth0 -s 192.168.200.2 -j MASQUERADE
This iptables rule says to MASQUERADE outbound traffic from 192.168.200.2 (TUN NIC).
PreUp = RUST_LOG=info phantun_client --local 127.0.0.1:4567 --remote 121.36.134.95:4567 &> /var/log/phantun_client.log &
This will start phantun_client, listen on port 4567 , establish a connection with the server, and transmit the disguised TCP packets to the server.
In addition, you also need to modify the Endpoint of the WireGuard peer to 127.0.0.1:4567.
Endpoint = 127.0.0.1:4567
Client complete WireGuard configuration:
# local settings for Endpoint A [Interface] PrivateKey = 0Pyz3cIg2gRt+KxZ0Vm1PvSIU+0FGufPIzv92jTyGWk= Address = 10.0.0.1/32 ListenPort = 51821 MTU = 1300 PreUp = iptables -t nat -A POSTROUTING -o eth0 -s 192.168.200.2 -j MASQUERADE PreUp = RUST_LOG=info phantun_client --local 127.0.0.1:4567 --remote 121.36.134.95:4567 &> /var/log/phantun_client.log & PostDown = iptables -t nat -D POSTROUTING -o eth0 -s 192.168.200.2 -j MASQUERADE PostDown = killall phantun_client || true # remote settings for Endpoint B [Peer] PublicKey = m40NDb5Cqtb78b1DVwY1+kxbG2yEcRhxlrLm/DlPpz8= Endpoint = 127.0.0.1:4567 AllowedIPs = 10.0.0.2/32 PersistentKeepalive = 25
Finally restart WireGuard:
$ systemctl restart wg-quick@wg0
View the log of phantun_client:
$ tail -f /var/log/phantun_client.log INFO client > Remote address is: 121.36.134.95:4567 INFO client > 1 cores available INFO client > Created TUN device tun0 INFO client > New UDP client from 127.0.0.1:51821 INFO fake_tcp > Sent SYN to server INFO fake_tcp > Connection to 121.36.134.95:4567 established
View the wg0 interface:
$ wg show wg0 interface: wg0 public key: wXtD/VrRo92JHc66q4Ypmnd4JpMk7b1Sb0AcT+pJfwY = private key: ( hidden ) listening port: 51821 peer: m40NDb5Cqtb78b1DVwY1+kxbG2yEcRhxlrLm/DlPpz8 = endpoint: 127.0.0.1:4567 allowed ips: 10.0.0.2/32 latest handshake: 1 minute, 57 seconds ago transfer: 184 B received, 648 B sent persistent keepalive: every 25 seconds
Test connectivity:
$ ping 10.0.0.2 -c 3 PING 10.0.0.2 ( 10.0.0.2 ) 56 ( 84 ) bytes of data. 64 bytes from 10.0.0.2: icmp_seq = 1 ttl = 64 time = 13.7 ms 64 bytes from 10.0.0.2: icmp_seq = 2 ttl = 64 time = 14.4 ms 64 bytes from 10.0.0.2: icmp_seq = 3 ttl = 64 time = 15.0 ms --- 10.0.0.2 ping statistics --- 3 packets transmitted, 3 received, 0% packet loss, time 2005ms rtt min/avg/max/mdev = 13.718/14.373/15.047/0.542 ms
Client (multi-server)
If the client wants to establish a connection with multiple servers, the new server configuration is as follows:
PreUp = RUST_LOG=info phantun_client --local 127.0.0.1:4568 --remote xxxx:4567 --tun-local=192.168.202.1 --tun-peer=192.168.202.2 &> /var/log/phantun_client.log & PostDown = iptables -t nat -D POSTROUTING -o eth0 -s 192.168.202.2 -j MASQUERADE
The local listening port needs to choose a different port from the previous one. Similarly, the address of the TUN network card also needs to be modified. The final configuration is as follows:
# local settings for Endpoint A [Interface] PrivateKey = 0Pyz3cIg2gRt+KxZ0Vm1PvSIU+0FGufPIzv92jTyGWk= Address = 10.0.0.1/32 ListenPort = 51821 MTU = 1300 PreUp = iptables -t nat -A POSTROUTING -o eth0 -s 192.168.200.2 -j MASQUERADE PreUp = RUST_LOG=info phantun_client --local 127.0.0.1:4567 --remote 121.36.134.95:4567 &> /var/log/phantun_client.log & PreUp = RUST_LOG=info phantun_client --local 127.0.0.1:4568 --remote xxxx:4567 --tun-local=192.168.202.1 --tun-peer=192.168.202.2 &> /var/log/phantun_client.log & PostDown = iptables -t nat -D POSTROUTING -o eth0 -s 192.168.200.2 -j MASQUERADE PostDown = iptables -t nat -D POSTROUTING -o eth0 -s 192.168.202.2 -j MASQUERADE PostDown = killall phantun_client || true # remote settings for Endpoint B [Peer] PublicKey = m40NDb5Cqtb78b1DVwY1+kxbG2yEcRhxlrLm/DlPpz8= Endpoint = 127.0.0.1:4567 AllowedIPs = 10.0.0.2/32 PersistentKeepalive = 25
MTU Tuning
If you use tools such as ping or dig (small data packets) to test that the WireGuard tunnel works normally, but the browser or remote desktop (large data packets) cannot be accessed normally, it is likely to be a MTU problem, you need to change the MTU value Make it smaller.
Phantun officially recommends setting the MTU value to 1428 (assuming that the MTU of the physical network card is 1500), but there is a problem after my test. It is recommended to directly set the MTU to the lowest value of 1280 , and then gradually increase it until it can’t work properly. At this time, your MTU is the best value.
Have you lost your studies?
References
This article is reprinted from https://icloudnative.io/posts/wireguard-over-tcp-using-phantun/
This site is for inclusion only, and the copyright belongs to the original author.