Original link: https://blog.saky.site/post/pikpak-build-NSConflict-wkj123-mac12.3.1/
Github: https://github.com/mumuchenchen/pikpak
DEMO: https://mumuchenchen.github.io/pikpak/
For some reasons, PikPak cannot be accessed in China, and it is accessed using the Github+Cloudflare Worker inverse service.
Demo is an example for the author of the source code. It is for reference only and should not be used in the production environment.
Please prepare the following accounts before starting:
Cloudflare Workers Deployment
- Sign in to your Cloudflare
- Find
Workerson the right side of the home page - Click on
Workersto select a preset subdomain, and after clickingset up, we choose the free plan. - Click on
Workersand select创建Workers - (Not required) Make a name that is easy to remember and write in the service name, such as
pikpak, so that you can remember it easily. Remember the line written belowYour service will be deployed to:
https://pikpak.XXXXX.workers.devThe following
简介,HTTP处理程序choose any one, click创建服务 - After deleting everything in the code box on the left side of the page, paste the code here into the input box on the left side of the page to overwrite the original content.
- Click
保存并部署button, - Remember to use the worker’s domain name
pikpak.XXXX.workers.devin step 5.
GitHub deployment
Github Aciton
- Log in to your Github and enter the project
- Click
Forkin the upper right corner to fork the project to your own repository - Click the last button
settingsin the upper row to switch to the settings page - Select the
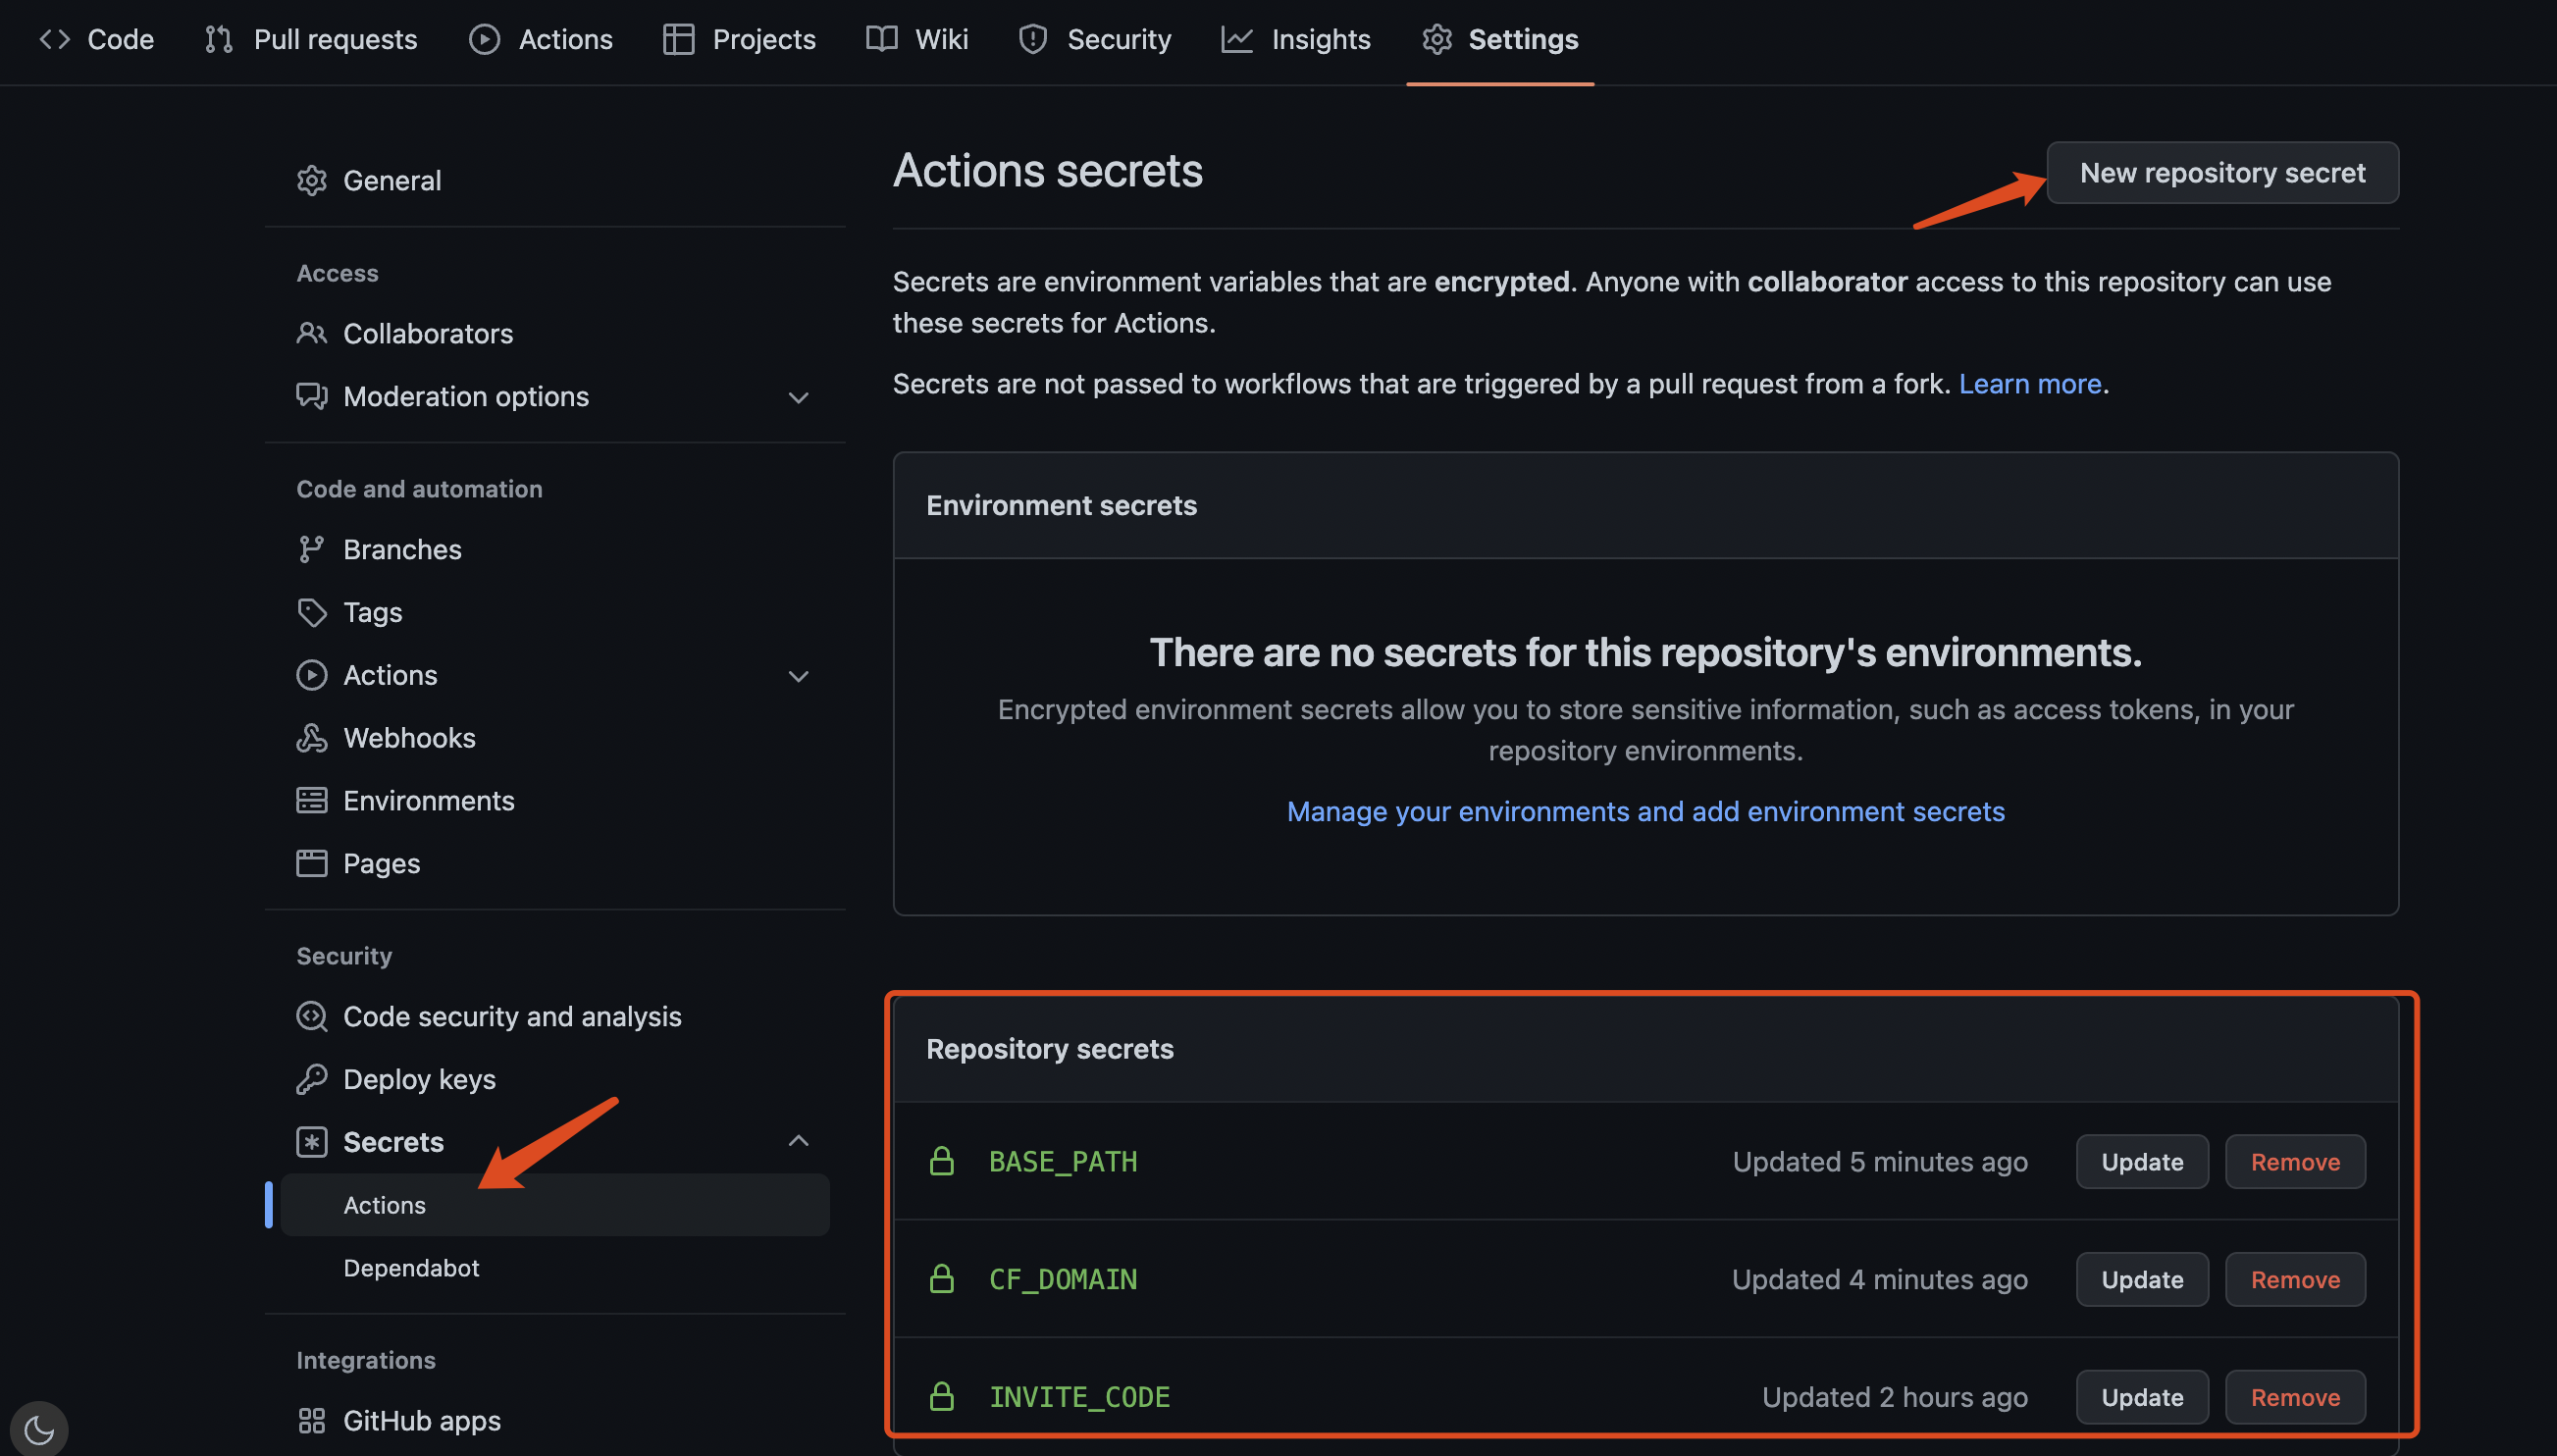
secrets–Actionsitem on the left, and clickNew repository secretsin the upper right corner - Fill
CF_DOMAINfor Name, and fill in your Worker’s domain name for Value (the one you remembered in Step 5 of Cloudflare Workers deployment, similar topikpak.XXXX.workers.devNote that it’s just the domain name itself, without a prefix such as https://) , clickAdd secret
- Perform this step if you have changed the repository name, otherwise go directly to step 7 below:
Click
New repository secrets, Name fillBASE_PATH, Value fill in your warehouse name such asxxxxxpikpak - Click the
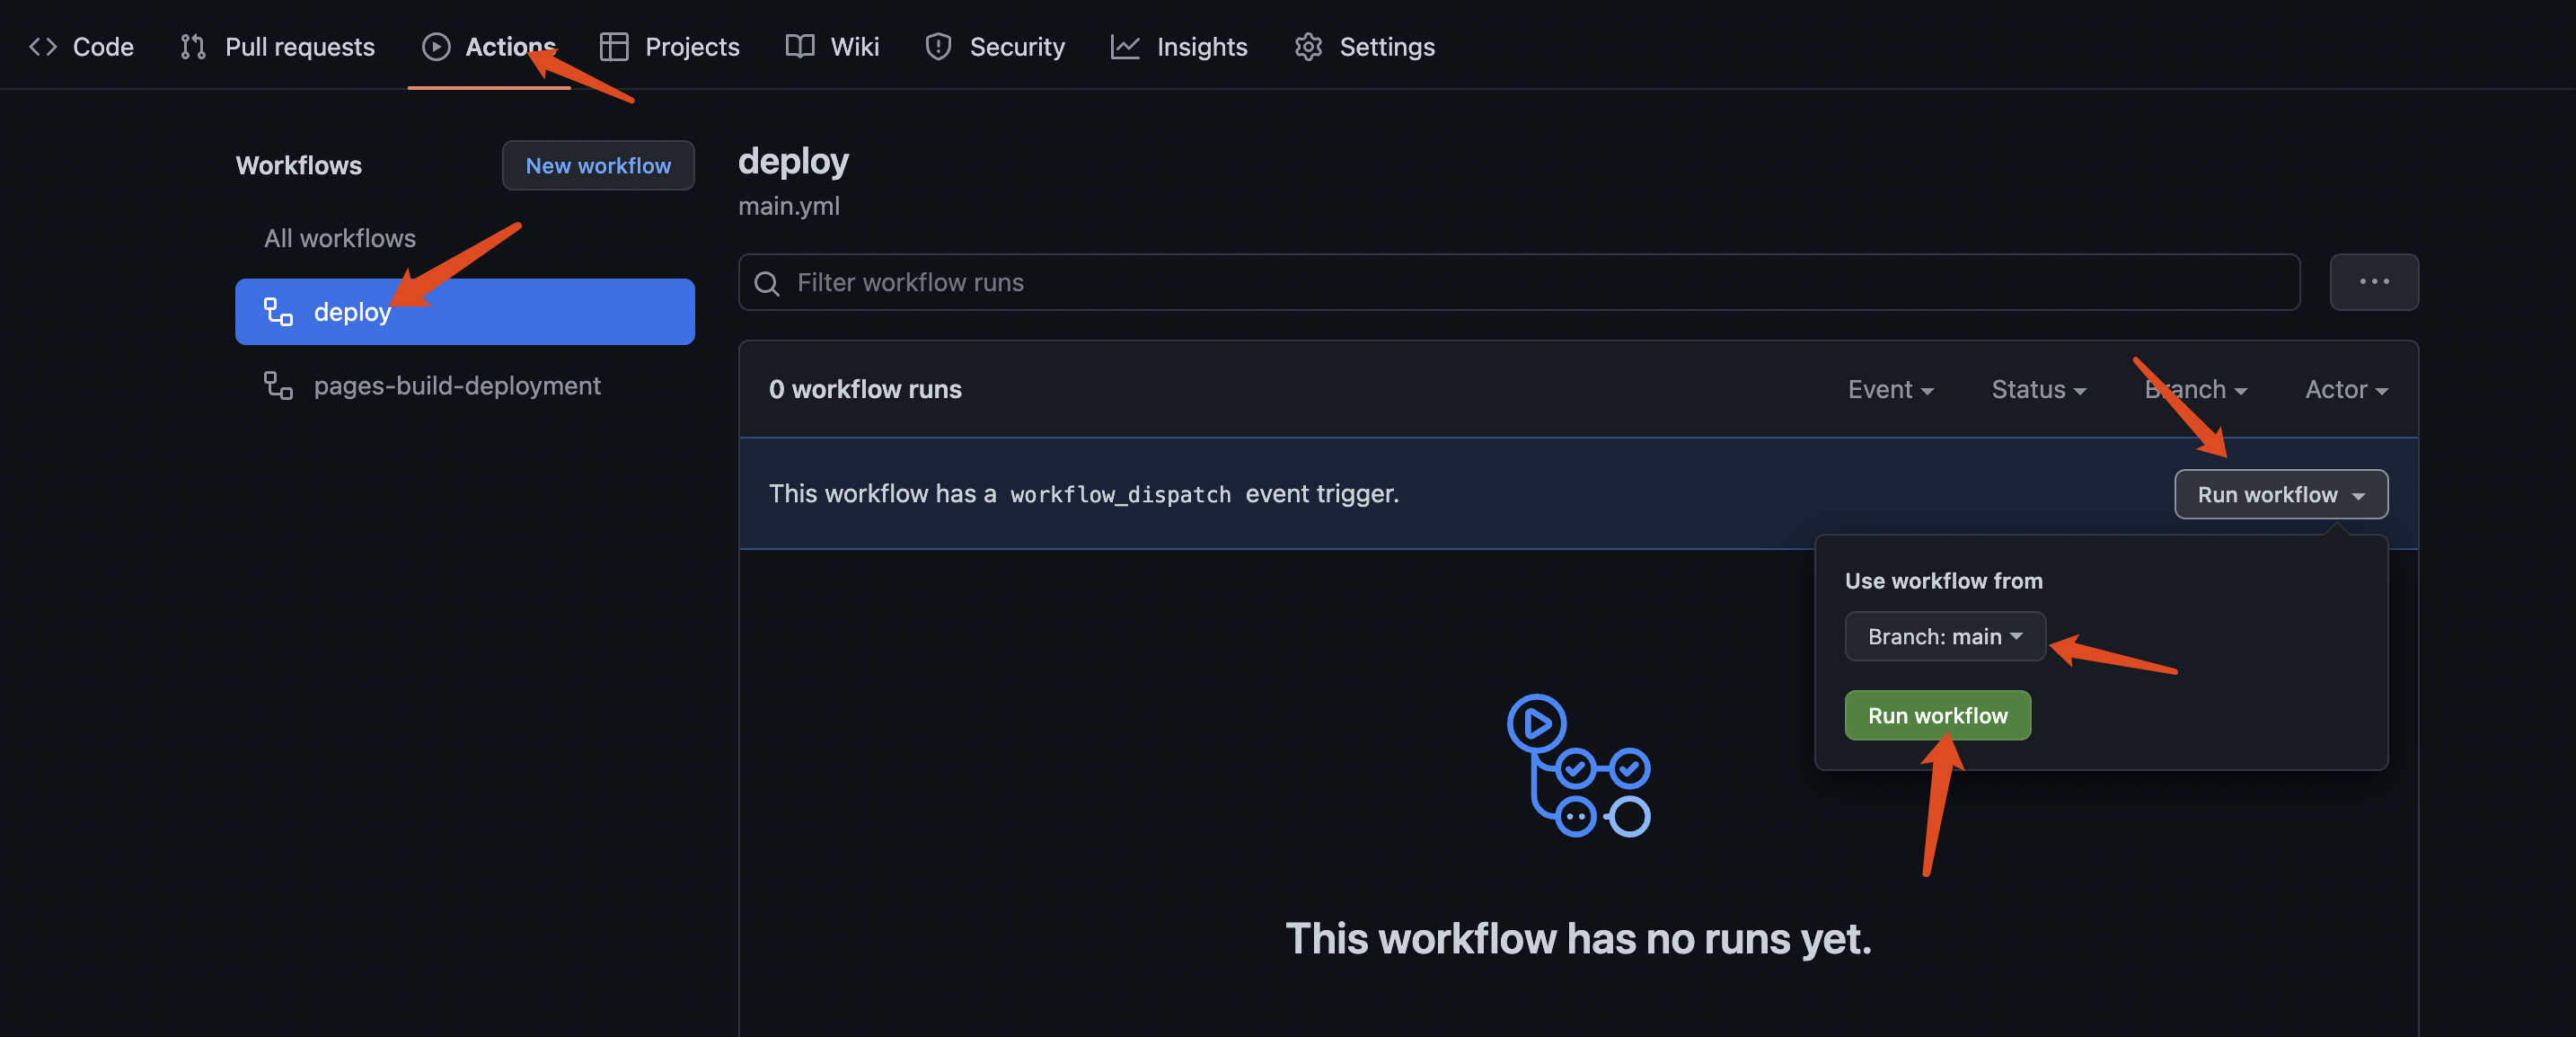
Actionsbutton in the upper row, clickI understand my workdlows, go ahead and enable themto indicate that you understand what you want to do. - Click
deployon the left, clickRun workflow ▽on the right to switch to the main branch, and select the green [Run workflow] button. Wait for the code to be built and run, if nothing goes wrong, you will see a green √ appear. (no more than 5 minutes)
Github Page
- Click the last [settings] in the upper row of buttons again to switch to the settings page
- Select [pages] on the left
- Switch the branch of the Source item to [gh-pages] [/(root)], and then click Save.
- Wait about 1 minute and you will be able to pass the display on the upper part of the page
Your site is published at https://xxxx.github.io/pikpak/Access your PikPak web client.
custom secrets
| Name | Value |
|---|---|
| CF_DOMAIN | CF reverse generation domain name (write DIRECT is not to go reverse generation) |
| BASE_PATH | custom repository name |
| INVITE_CODE | Set up your own invitation link |
| CNAME_DOMAIN | If you set CNAME here write your domain name |
proxy settings
Cloudflare Workers is limited. The free plan has a maximum of 1000 requests per minute and a maximum of 10W requests per day. If it exceeds the limit, an error will be reported. Here are some additional built APIs, please do not maliciously brush traffic.
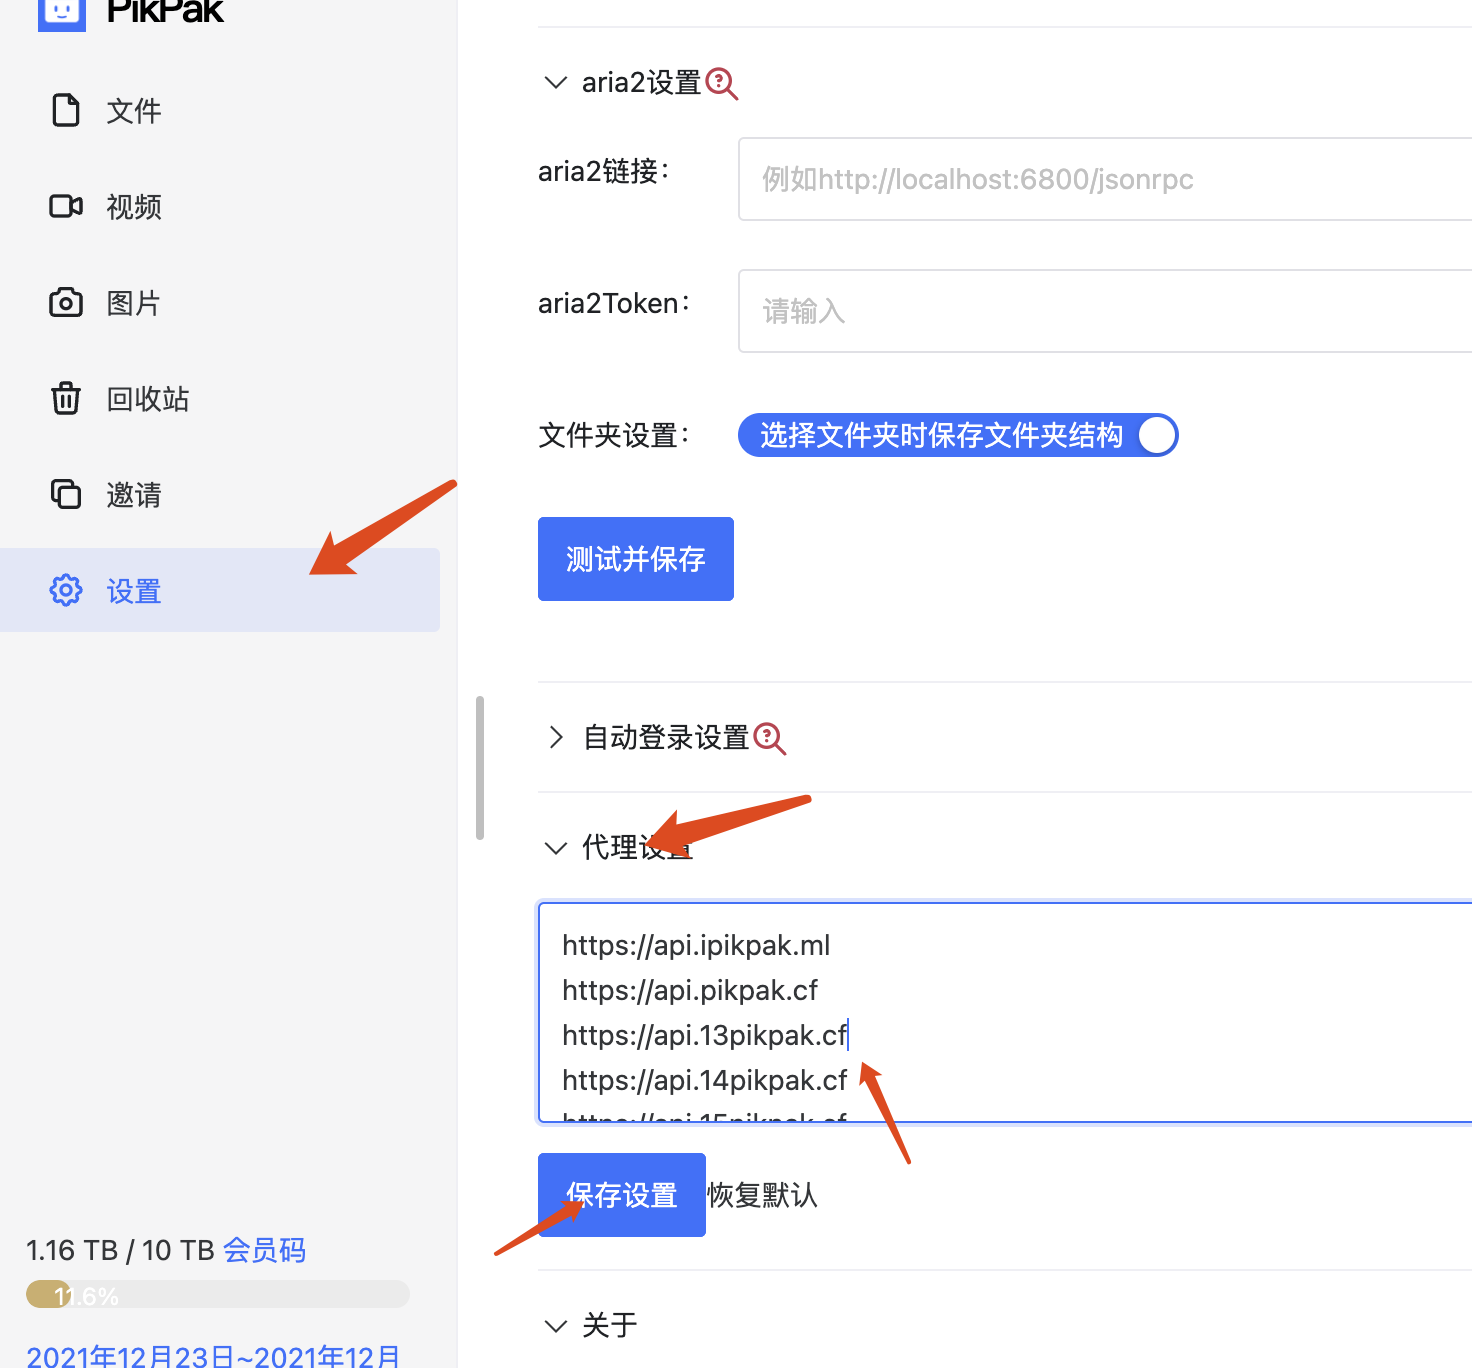
Visit your PikPak web client -> Settings -> Proxy settings, fill in the following  some of the APIs
https://api.pikpak.cf https://api.13pikpak.cf https://api.14pikpak.cf https://api.15pikpak.cf https://api.16pikpak.cf https://api.17pikpak.cf https://api.18pikpak.cf

later update
Because the web version is still under constant iteration, after the upstream code is updated, if you want to update, you need to update it like this
Update normal process
- Go back to your Github homepage and switch to the project.
- Click [Fetch upsteam ▽], if there is an update upstream, the [Fetch and merge] button will be clickable, select [Fetch and merge].
- Normally, if you haven’t changed the file yourself, there will be no problem. Github Aciton will automatically re-deploy and update it within a few minutes. If there are problems such as failure to merge, errors during deployment, etc., either you need to intervene in the file that caused the error, or use the update process to update it.
PS: Just merge the main branch, you do not need to merge the gh-pages branch. After merging the main, deploy will update the content of the gh_pages branch.
- Check whether index.js has been updated after you deployed it. If there is an update, update the updated code to your Workers and redeploy the Workers
Update the wrong solution
This operation is not the easiest, but it is the least error-prone way
- First of all, pay attention to whether index.js has been updated after you deployed it. If there is an update, update the updated code to your Workers, and redeploy the Workers (or just copy it without thinking, regardless of whether it is updated or not. deploy)
- Go back to your Github homepage, switch to the project, select [settings], pull to the end, find [Delete this repository] in the Danger Zone, and enter the XXXX/pikpak he requested in the input box to delete the entire repository.
- Then re-execute the GitHub deployment operation
some things that might need your attention
-
It is best to deploy and review the code yourself. After all, it involves a reverse generation. If you do something in the reverse belt, the reverse generation builder will easily know what you have saved. (Of course, there is more than one place where you can do things, there are many ways for people who want to do bad things)
-
There is no need to bind your own domain name, just use github.io. What about the binding of github, the broadcast is a bit slow. When binding a subdomain, the site will be inaccessible for a short period of time, especially if you have HTTPS set up.
-
Generally speaking, there is no need to change the warehouse name, keep it as
XXXX/pikpak, if you really want to change it, please create a new secrets, fillBASE_PATHfor Name, and fill in your warehouse name such as/xxxxpikpakfor Value. -
If you want to bind your own domain name, because after binding, the address changes from
xxxx.github.io/pikpak/to a state without subdirectories likepikpak.xxx.com, so for new secrets, fillBASE_PATHfor Name and fill in Value A/will do. -
There are many ways to deploy this. For example, you can use cloudflare page instead of GitHub page to deploy your website, or you can use your own server instead of Cloudflare Workers to do the reverse. . . And so many ways.
-
Recently, the official has launched an activity to invite new users to become members. Here is how to replace the invitation registration in the login page of the web version with your own:
– First get your invitation link in the official APP (similar to https://ift.tt/zLBIngy)
– Then create a new secrets, fill
INVITE_CODEfor Name, and fill in the number in the invitation link for Value, for example, mine is860983 -
The [Resource Library] is currently deleted from the source code, because the official is due to local legal risks (pikpak is a Singapore company, and some types of resources (such as adult content, pirated movies) are legal to hold (store) in the network disk, But spreading (sharing) will bring pikpak the risk of being visited by the police) It is not recommended to do this, so the big guy removed it.
This is an open source thing, and it is estimated that with a code base, you can understand how to change it back when you see the historical modification records.
src/router/index.ts(40~50行左右)、 src/views/layout/index.vue(120~130行左右)、 src/views/list.vue(1090~1010行左右)
This article is reprinted from: https://blog.saky.site/post/pikpak-build-NSConflict-wkj123-mac12.3.1/
This site is for inclusion only, and the copyright belongs to the original author.