Original link: https://ddadaal.me/articles/blog-updates-2/cn
Dove for 4 years of updates
In Blog Development 1 4 years ago, I mentioned several problems with the blog at that time. Later, I solved the problem of counting Chinese words in a very hack way ( fixing the wrong counting of Chinese words in the gatsby-transformer-remark plug-in , but the most important problem of refactoring the style and improving the UI design has been put on hold, and with the With the development of time and technology, the project also encountered many problems, such as
- The confusion of styles makes me always use the old bootstrap v4 version and cannot upgrade to the latest bootstrap version
- The gatsby ecological update is too fast, and many components I can’t understand what exactly they do
After the postgraduate defense at the end of May, my planned trip was directly postponed by Eryang the day before my departure. After the sun, basically can only stay in the dormitory. Staying is also staying, I think of the blog as “my facade”. The blog itself has basically not been updated in the past three years, and it is basically in a state of disrepair. So I decided to give my blog a major surgery.
Highlights of the new blog
- Written entirely in Next.js
I’m very familiar with Next.js since a project during graduate school ( PKUHPC/SCOW ) was written entirely in Next.js. And Next.js itself is also a very mature React framework, and it also supports the function of exporting as a static website , and many websites use Next.js as their homepage, blog and other information publishing platforms, so I am wondering whether Can reuse previous experience and use Next.js to build new websites. After a short operation, the whole experience is quite good, except for encountering some places that are not the same as Gatsby’s thinking.
- Fully Compatible with Existing Blogs
The new website and the original blog are completely consistent in terms of functionality, overall layout, and URLs of each page. All the original usage habits and URLs can be used directly, and all the original functions are still supported, including but not limited to multiple blogs. Language pages, multilingual articles, RSS, etc. This is the real meaning of rewriting : all code is completely rewritten, but it will not affect any existing user experience.
- Use Tailwind to write styles, remove CSS in JS solutions
This is the most important part of this rewrite. I was originally a fan of CSS in JS, thinking that all the convenience of writing a website in JS is the ultimate goal of web development. Now, although I still think that the flexibility brought by the CSS in JS solution is unmatched by all other solutions, I also realize that in many cases the style does not need such high flexibility. In addition, because the style finally reaches the CSS level, in the process of integrating CSS in JS with other third-party style solutions (such as the previous bootstrap), a lot of code is required to integrate two completely independent style systems . This is also the root cause of the extreme confusion in the previous style code.
For example, the navigation bar component in the original code uses the Navbar component of bootstrap at the same time, and customizes the style based on this component through styled-components. When customizing styles, style variables defined in TS are also referenced. Some components even refer to custom SCSS files in order to use bootstrap variables defined in SCSS . And because some variables are defined in SCSS and some are in TS code, many variables (such as color) need to be defined twice.
import { Navbar } from "reactstrap" ; const StyledNavbar = styled ( Navbar ) ` && { max-width: ${ widths . mainContent } px; margin-left: auto; margin-right: auto; padding: 4px 8px; transition: width 0.2s ease-in-out; } ` ;
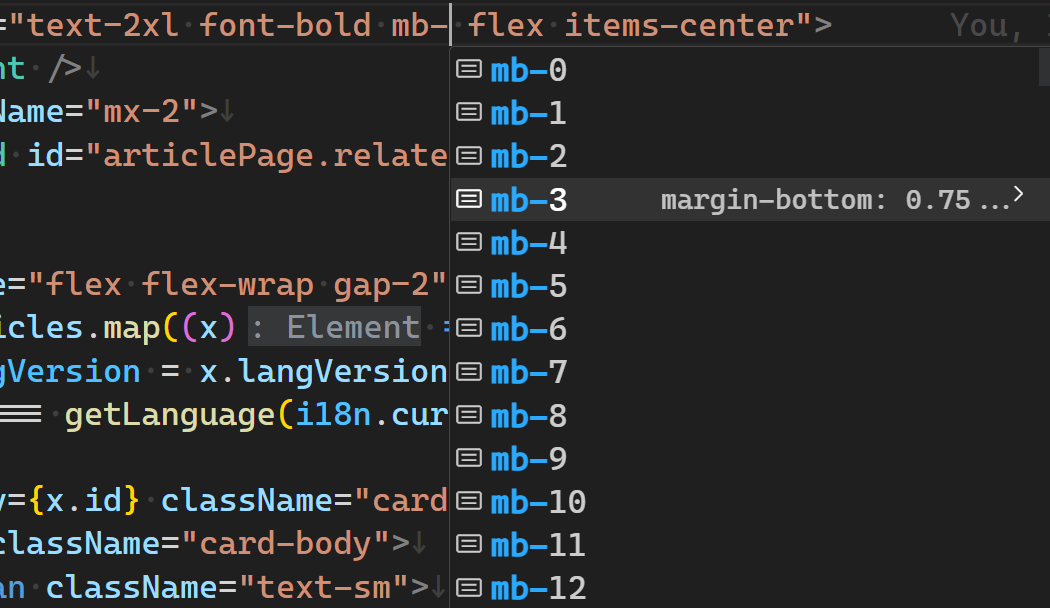
In addition, I also recognize some advantages of layout and styling in traditional HTML/CSS, such as decoupling the UI from the specific development framework, better performance, and even being able to display pages without enabling JS. At present, the traditional HTML/CSS-based style scheme based on tailwind is very popular. This time I also directly use tailwind and the pure HTML/CSS component library daisyui based on tailwind to write a new blog, and experience unprecedented Development efficiency and development experience. Directly writing semantic type names is indeed much more convenient than writing JS code.
accomplish
Fully adopted Next.js App Router
The App Router function of Next.js is highly anticipated. Although there are comments that this function (and the subsequent Server Actions) turn Next.js into PHP , it is undeniable that App Router has greatly improved the development experience and flexibility. Spend.
In the new blog, among the various advantages brought by App Router, the following two points are the most useful to me:
- React Server Component (RSC, server-side components)
React Server Component (RSC) is actually a concept of React, which was proposed in 2020 ( Introducing Zero-Bundle-Size React Server Components – React Blog ). Simply put, the original React components all run on the client side. The browser first downloads the project code, and then runs the code in the browser. These codes will draw the UI on the browser through the browser-side DOM API and handle user interaction. And React Server Component allows users to write React components that run on the server side . And Next.js 13 implements this concept for the first time.
This subverts the traditional front-end development model. The code runs on the server side, which means that the component can directly execute the code that can only be executed on the server side, such as accessing the database, without a separate set of APIs to realize the interaction between the client and the server.
In the new blog, all blog content is stored in the contents directory as local files. All pages will read the data they need, and then render the data.
Assuming that our webpage is not a static website, but a traditional React+backend model, then to realize this function, we first need to design an API to obtain backend data, in the backend, we write a server to implement this API, and then On the front end, we call this API through fetch , and render it on the UI after getting the data.
// 后端,编写API const app = express (); app . get ( "/articles/:id" , async ( req , res ) => { const content = await readContent ( req . params . id ); res . send ( content ); }); app . listen ( 5000 , () => {});
// 前端,通过fetch API获取数据export const Page = ({ id }) => { const [ data , setData ] = useState (); useEffect (() => { fetch ( "http://localhost:5000/articles/" + id ) . then (( x ) => x . json ()) . then (( x ) => setData ( x )); }, []); return data ? ( < ArticleContent data = { data } /> ) : < Loading />;
Then through RSC, we can directly use React to achieve this requirement:
export default async ({ params }: Props ) => { const data = await readContent ( params . id ); return ( < ArticleContent data = { data } /> ); };
The difference is simply too great. No longer need a separate back-end project, no more complicated API design, management, calling, maintenance, the process from getting data to rendering UI is very intuitive. Even if the ArticleContent component does not require user interaction, the user does not even need to download the code of this component, and the browser can access the webpage without enabling JS.
From a certain point of view, App Router really turns React into a traditional server-side rendering solution like PHP. However, after all, the front-end of the Web is a world of JS. PHP, etc. cannot directly use the back-end language to write the interaction logic of the front-end, and can only do some simple template replacement functions. Once some complex logic and interaction are involved, JS must be re-used , and this requires two different languages, two different tool chains and two different ecology, as well as the interaction between the front and back ends. On the other hand, Next.js is based on the front-end, integrates the front-end and back-end in a very natural way, and writes the entire chain from the front-end interaction to the back-end logic with the same set of ecology. In fact, it is a set that is completely different from the traditional one. plan.
- Colocation , that is, put files with similar purposes in close locations .
In the original pages directory, each file defines a page. For example, /pages/test.tsx and /pages/test/test2.tsx correspond to /test and /test/test2 respectively. However, in most cases, the code in one page cannot be completely written in one code. For some common components, such as layout header, footer, etc., we can put these codes in directories like layouts and components . These components do not involve any business logic and can be referenced and assembled by specific business pages.

But there are also some components, which are only useful under a specific page, such as components to complete a specific business logic. This kind of component is generally too complicated to write it directly in the page file, but if these components are placed directly next to the page component file, then they will be regarded as a new page.
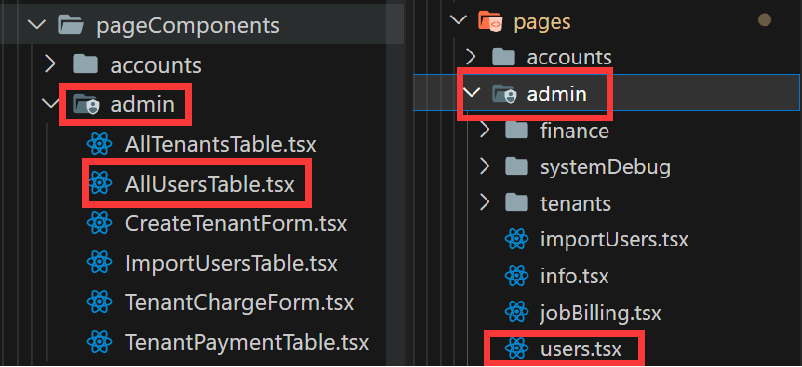
Because in the original event, I will create a pageComponents directory to store this component between the real basic component ( components ) and the page ( pages ). For example, in the figure below, pageComponents/admin/AllUsersTable.tsx is a relatively complex component related to business, and it will only be used in pages/admin/users.tsx .
In addition to this solution, I have also seen that some projects adopt Module concept similar to Angular , put all the code related to a certain function in a modules/模块名directory, and then refer to the page components under the module in pages directory .
But no matter what the solution is, it is actually patching the concept of one file = one path . This concept looks beautiful, but as long as the project complexity is slightly higher, the above problems will be encountered. For the same function, some codes are under pages and some are under pageComponents , which will make the file very confusing.
And App Router solves this problem. Under App Router , paths are defined by directories (rather files). In each directory, only some special files will be processed by Next.js (for example, page.tsx is the component of this page, layout.tsx is the public layout under this path, and other files are directly ignored by Next.js, and they are organized by themselves .This allows us to split out the components required by a page and place them in the same directory as the page.
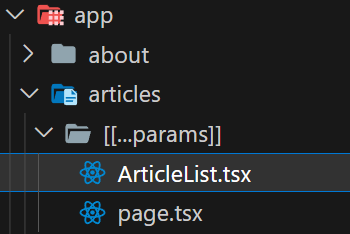
For example, in the current project, app/articles/[[...params]] includes the definition of the article list page, which requires a component ArticleList for the layout of the file list page. This component obviously needs to be split out. In the original practice, such components should be placed in pageComponents or components . But this component will actually only be used under this path, so after using App Router , we can put this component next to the file ( page.tsx ) of this page. In this way, we ensure that all business logic related to this page (public components do not contain business logic) are stored in this path, which is very beneficial to subsequent code maintenance and multi-person cooperative development.
The advantages brought by App Router are far more than these two points. Since this blog is a static blog and the overall layout is relatively simple, the dynamic function of Next.js is not used, but in my other projects, the nested layout ( Nested Layout ) of App Router and Server Actions bring The ability to call back-end logic directly in front-end code greatly improves the efficiency of website development.
Next.js static generation
static website
The projects I used before using Next.js were all traditional front-end applications, that is, traditional Next.js projects compiled as front-end + an Express backend that provides server-side rendering (SSR) capabilities. But Next.js has always supported the ability to directly generate static websites that only include HTML/CSS/JS.
A traditional single-page application (SPA) compiles the entire application into one (or more) JS bundles and a template HTML that doesn’t actually contain the real UI. This HTML is downloaded when the user visits any path. The only role of this HTML is to provide a root DOM component and reference the compiled JS Bundle. The JS Bundle will be automatically downloaded, implement the routing function on the browser side through the browser’s History API, and be responsible for rendering the user’s UI through the DOM API.
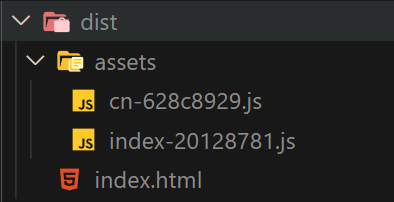
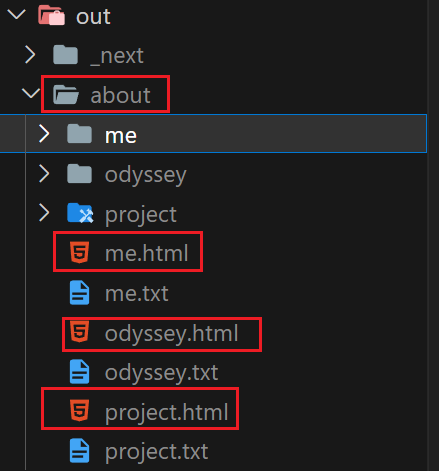
The static website generated by Next.js is the same as static website generators such as Gatsby and Hugo. It will obtain the data required by this path for each path at compile time, and render the data into HTML. In the rendered result, each path has corresponding HTML. For example, in the figure below, about/me.html corresponds to /about/me path, and it contains the UI rendered on the server side. When the user accesses the path, the HTML will be obtained directly, and the rendered content can be rendered directly, without waiting for the process of downloading and executing the JS Bundle.
Differences from Gatsby
When I rewrote ddadaal.me last time, I chose Gatsby, because Gatsby’s ecology was more mature at that time, and there were a large number of ready-made templates, plugins and tutorials for use and reference. A few years later, the static generation function of Next.js is also very mature, and it also provides a lot of APIs to realize the function of static website rendering. But unlike the Gatsby project, Next.js has a different idea of providing an API for static website rendering.
Gatsby lets developers access data primarily through GraphQL ( Gatsby and GraphQL ). The developer can declare the GraphQL query of the data required by the page in the page, and access the read data and render the UI through props in the page. At compile time, gatsby will take care of running these queries and passing the data to the components that need it. For accessible data, you can add data nodes to the back-end GraphQL server through plug-ins or custom gatsby-node.ts scripts.
// https://github.com/ddadaal/ddadaal.me/blob/57fe926eb0/src/pages/slides.tsx // 声明需要的数据export const query = graphql ` query Slides { allSlide(filter: {type: { eq: "dir" }}) { nodes { name html_url type } } } ` ; interface Props { data : { allSlide : { nodes : { name : string ; html_url : string }[]; }; }; } const Slides : React . FC < Props > = ( props ) => { // 通过Props读取获取到的数据 const { data : { allSlide : { nodes } } } = props ; // 使用这些数据渲染UI };
Of course, in order to access data and create pages more flexibly, developers can also write scripts executed on the node side during compilation through gatsby-node.ts . This script is run in Node.js with the compiler, so it can access any local data. Gatsby also provides a large number of Gatsby Node APIs to help users create pages, GraphQL data, and more.
createPage ({ // 生成页面的路径 path : "/articles/" + pageIndex , // 页面所对应的React组件 component : indexTemplate , // 组件所需要的数据 context : { limit : pageSize , skip : pageIndex * pageSize , pageCount , pageIndex : pageIndex , ids : notIgnoredGroups . slice ( pageIndex * pageSize , pageIndex * pageSize + pageSize ) . map (( x ) => x . frontmatter . id ), }, });
Overall, Gatsby completely separates UI and data through GraphQL and Gatsby Node API. Users define the data types required by each page. On the one hand, write scripts or plug-ins to convert various data sources into data required by pages such as GraphQL, and on the other hand, write React code to render these data into UI.
However, in the current Next.js project using the App Router, the methods for obtaining data and rendering pages are different. The routing of Next.js has always been based on the file path. There is no API similar to Gatsby Node API and gatsby-node.ts script can be used to manually create each page. replaced by
- Define path by file path
- Get all possible path parameters through the
generateStaticParamsfunction - Simultaneously achieve data acquisition and rendering through RSC
For example, the /about path in my blog contains three paths: /about/me , /about/odyssey , and /about/project , corresponding to three articles. To implement /about path, I need
- Define
app/about/[id]directory - In
generateStaticParams, return all possible values ofidparameter[ "me" , "odyssey" , "project" ] - In
app/about/[id]/page.tsx(actually not this path), define an RSC, get the ID parameter of the path, and then get the corresponding article content, and render the UI according to the file content at the same time
It can be seen that through Next.js, we no longer need GraphQL to separate data and pages, but can directly use RSC to complete the functions of reading data and rendering UI at the same time. All possible paths are listed through generateStaticParams , and then its corresponding RSC is rendered for each path, and the page of each path is generated, thereby compiling the entire webpage.
Custom markdown rendering process
When using Gatsby before, I directly used some off-the-shelf gatsby plugins (such as gatsby-plugin-remark ) to help me complete the process of rendering markdown into HTML, so I have little understanding of the process of markdown rendering. But there are no these plugins in Next.js, so I need to learn the knowledge of markdown rendering by myself, and complete the markdown rendering by myself.
Currently, the project uses remark and rehype ecology to implement markdown rendering. remark is an ecology that analyzes and converts markdown, including a large number of plug-ins. It can analyze markdown files and convert them to AST, and supports the analysis and conversion of this AST through various plug-ins. And rehype is similar to remark , except that rehype is for HTML. The entire rendering process can be connected through unifiedjs .
Now, when the blog renders markdown, it goes through the following steps:
- remark-parse : Convert markdown to remark AST
- remark-gfm : parse AST in GitHub Flavored Markdown format
- remark-rehype : convert remark AST to rehype AST
- rehype-raw : make the naked HTML tags in markdown display normally in the end
- rehype-slug : add the corresponding id to each title tag
- @stefanprobst/rehype-extract-toc : Analyze each title tag in HTML and generate a corresponding tree structure
- rehype-react : Generate the corresponding React component tree according to the rehype AST
- rehype-pretty-code : Beautify the code style, add code highlighting, etc.
Understanding the markdown rendering process has brought me several benefits:
First, I can customize the rendering process by myself
Before, for some functions not supported by existing plug-ins, I used some hacks to complete them. For example, the Table of Contents of the article is dynamically generated by analyzing the elements such as h1/h2/h3 in the page through the DOM API after rendering. Now, I can find a plugin that can parse TOC (@stefanprobst/rehype-extract-toc), insert it into the rendering process, and finally get the result and complete the rendering process by myself. For another example, I want to add an icon in front of the rendered title, click this icon to get the URL that jumps to this title. With rehype-react , I can easily achieve this.
. use ( rehypeReact , { // ... components : { // ... // 使用自定义的React组件渲染h1/h2/h3组件 h1 : (( props ) => < HeadingWithLink element = "h1" props = { props } />) satisfies ComponentType < JSX . IntrinsicElements [ "h1" ] > , h2 : (( props ) => < HeadingWithLink element = "h2" props = { props } />) satisfies ComponentType < JSX . IntrinsicElements [ "h2" ] > , h3 : (( props ) => < HeadingWithLink element = "h3" props = { props } />) satisfies ComponentType < JSX . IntrinsicElements [ "h3" ] > , }, })

Second, I can completely control the RSS rendering process by myself
Before, I used gatsby-plugin-feed plugin to generate RSS streams by defining GraphQL and some custom parameters. Since the rendering result of markdown could not be controlled at that time, it felt very unnatural when generating RSS. In addition, this plug-in does not support running during development, so I cannot test the compiled results of RSS during development. Now, I can create a Route Handler for app/rss.xml/route.ts by myself, and manually create RSS information and the rendering results of each article in RSS just like rendering an article page.
Static image generation
In the process of writing the entire website, the biggest challenge was how to generate the images needed for the blog content .
In all the articles and projects that can be found to write blog websites using Next.js (such as the Next.js official blog-starter template ), static files such as pictures are referenced through the public directory . At compile time, files in public directory will be copied directly to the build directory, and after deployment, these files will be directly accessible via / .
But this doesn’t meet my needs. Because in my blog, blog posts and pictures are placed in the same directory under contents . contents directory cannot be accessed publicly.
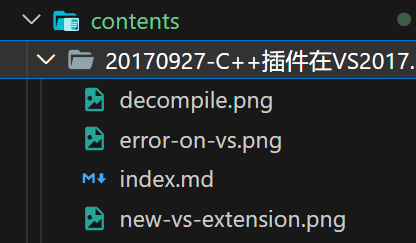
<!-- 在Markdown中通过和md文件的相对路径访问--> ![图片注释] ( ./decompile.png )
A simple and crude solution is to write a script, copy all static files from contents to public after compilation, and modify all image paths to the compiled path when compiling markdown. But this approach is too inelegant. Is there any better solution that does not require a custom compilation process?
The answer is Route Handler .
Route Handler allows developers to write custom processing logic for a certain route. Through the Route Handler, I can define a path dedicated to fetching static files. I defined a route handler for /articles/asset/[...path] . When using the GET method to access this path, the handler will read the content of the file corresponding to this path and return it in the form of a stream . Route handler also supports generateStaticParams . Through this method, I traverse all static files under contents . In this way, when compiling, Next.js will pass the path of all files under contents to this Route Handler and run it, and store the result of the handler (that is, the content of the file) in /articles/asset/contents/{文件相对于contents的路径} , the image can be accessed through the URL /articles/asset/contents/{相对路径} after publishing.
export async function GET ( request : NextRequest , { params }: { params : { path : string [] }}) { const fullPath = params . path . join ( "/" ); const fileStat = await stat ( fullPath ); // 读取文件流并返回 const stream = createReadStream ( fullPath ); // @ts-ignore return new NextResponse ( Readable . toWeb ( stream ), { headers : { "Content-Type" : lookup ( fullPath ) ?? "application/octet-stream" , "Content-Length" : fileStat . size , }, }); } export async function generateStaticParams () { // 遍历所有路径 const paths : { path : string [] }[] = []; async function rec ( dir : string []) { const dirents = await readdir ( dir . join ( "/" ), { withFileTypes : true }); for ( const dirent of dirents ) { if ( dirent . isDirectory ()) { await rec ( dir . concat ( dirent . name )); continue ; } paths . push ({ path : dir . concat ( dirent . name ) }); } } await rec ([ "contents" ]); return paths ; }
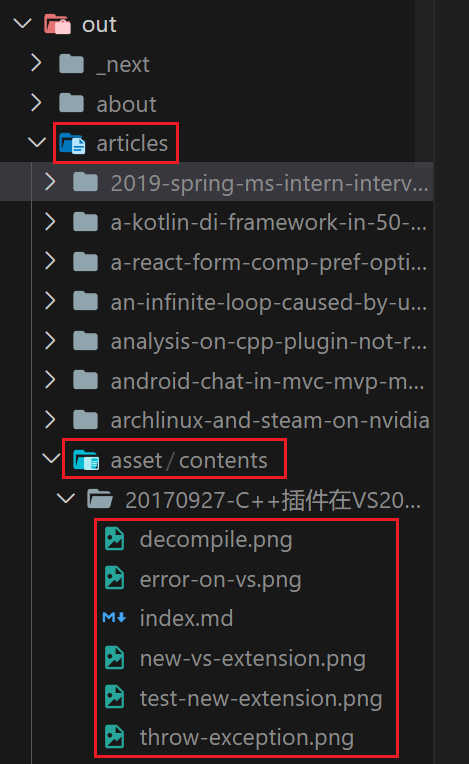
Now that the picture is available, the next step is to modify the reference address of the picture in markdown to the real compiled address. This is actually very simple. Use rehype-react to render the HTML <img> using your own component, and then modify src attribute in your own component to the real image path.
. use ( rehypeReact , { // .. components : { // 使用自己的Image组件渲染HTML中的<img> img : (( props ) => < ArticleImageServer article = { article } props = { props } />) satisfies ComponentType < JSX . IntrinsicElements [ "img" ] > ,
We use the <Image> component that comes with Next.js to display images (in ArticleImage ). This component has many friendly functions, such as preventing Layout Shift by specifying the size of the image, and supporting loading smaller images first to display the interface faster in supported environments, etc. By combining <Image> with a custom markdown process, we have achieved the need to display images.
multi-theme
The biggest visible update in terms of style in this update is the support for multiple themes . At present, the website has opened 12 themes to choose from. Of course, my aesthetic ability is far from enough to design so many themes by myself. All the themes are provided by daisyui .
Daisyui first defines some fixed color variables , so that when coding, the colors of all elements can be specified by color variables instead of hard-coded color values. For example, the following code specifies a ul component whose background color is base-200 and text color is text-content .
< ul className = "bg-base-200 text-base-content" > </ ul >
After that, daisyui obtains the theme selected by the current user by identifying data-theme data attribute of <html> component, and modifies the CSS variable of the corresponding color to the value of the corresponding color variable of the corresponding theme through the CSS selector. To switch themes, just modify data-theme data attribute of the <html> component.
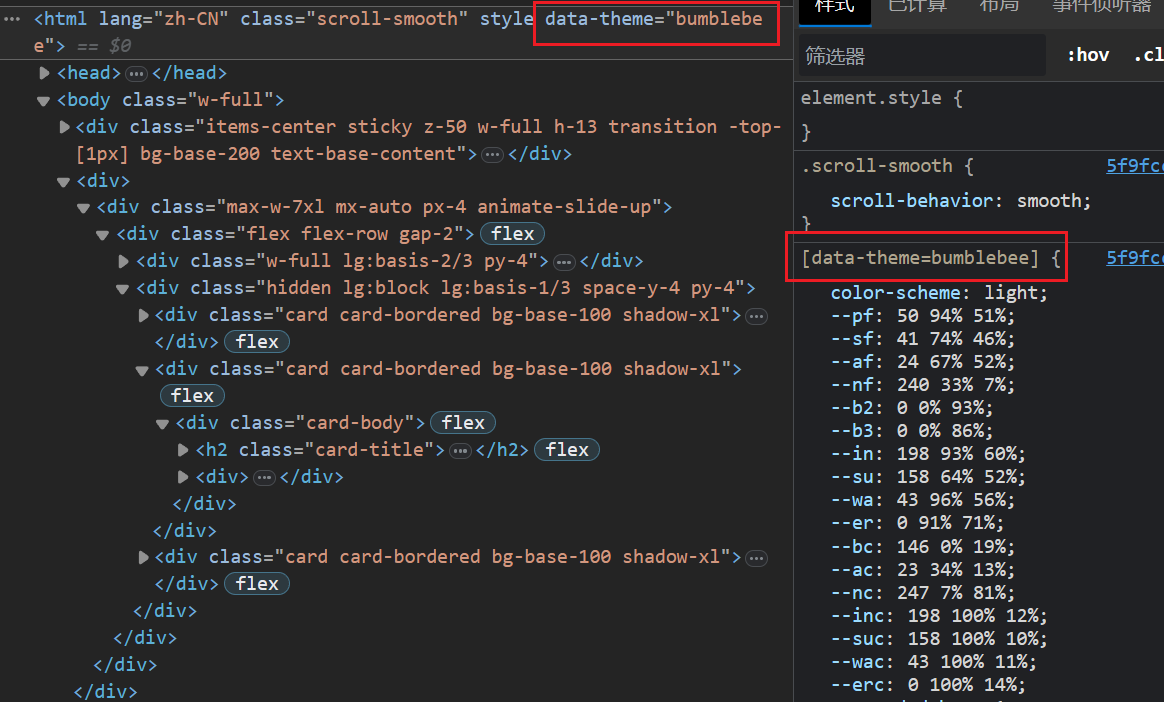
Since the color styles of each theme are very different, the code background of my original blog cannot be used. The new homepage background had to be able to adapt to completely different color styles. For this to work, the new background must be dynamically generated using CSS.
So I found a wonderful website on the Internet. This page provides dozens of background animations implemented purely with CSS. I selected the third Floating Squares. The background color of this animation and the color of each square are defined by CSS. What I need to do is to replace the basic color with the CSS variable of the currently used theme, so that the new background can automatically match The currently used theme matches.
.area { /* 使用daisyui的颜色变量*/ background: linear-gradient (to bottom , hsl ( var ( --p )), hsl ( var ( --pf ))); width: 100 % ; height: 100 vh ; } .circles li { position: absolute ; display: block ; list-style: none ; width: 20 px ; height: 20 px ; /* 使用daisyui的颜色变量*/ background: hsl ( var ( --a )); animation: animate 25 s linear infinite ; bottom: -150 px ; }
Summarize
Originally, I didn’t plan to completely rewrite the entire project, but planned to make some minor repairs to the existing code. But when I really opened the code and started to modify it, I found that the dependencies between the various components in the original code seemed to form a spider web, and I couldn’t start at all. Changing any existing code at will will involve a huge amount of other codes, which can be said to affect the whole body. I recall that when I started writing Gatsby’s ddadaal.me in 2018, one of the driving forces was that the original shit mountain was really beyond maintenance. And 5 years later, the new code of that year became a new shit mountain, and was replaced by the updated code. Sure enough, like everything else in the world, technology is developing, and codes are often new, and we need to keep up with the pace of the times. The rewritten blog function is the same as before, but it is lighter, faster, and easier to maintain. It is also a successful refactoring practice.
This article is transferred from: https://ddadaal.me/articles/blog-updates-2/cn
This site is only for collection, and the copyright belongs to the original author.