Today I will share a private ChatGPT web application – ChatGPT Next Web, allowing you to use ChatGPT anytime, anywhere!
1. Brief introduction of ChatGPT Next Web (from GitHub)
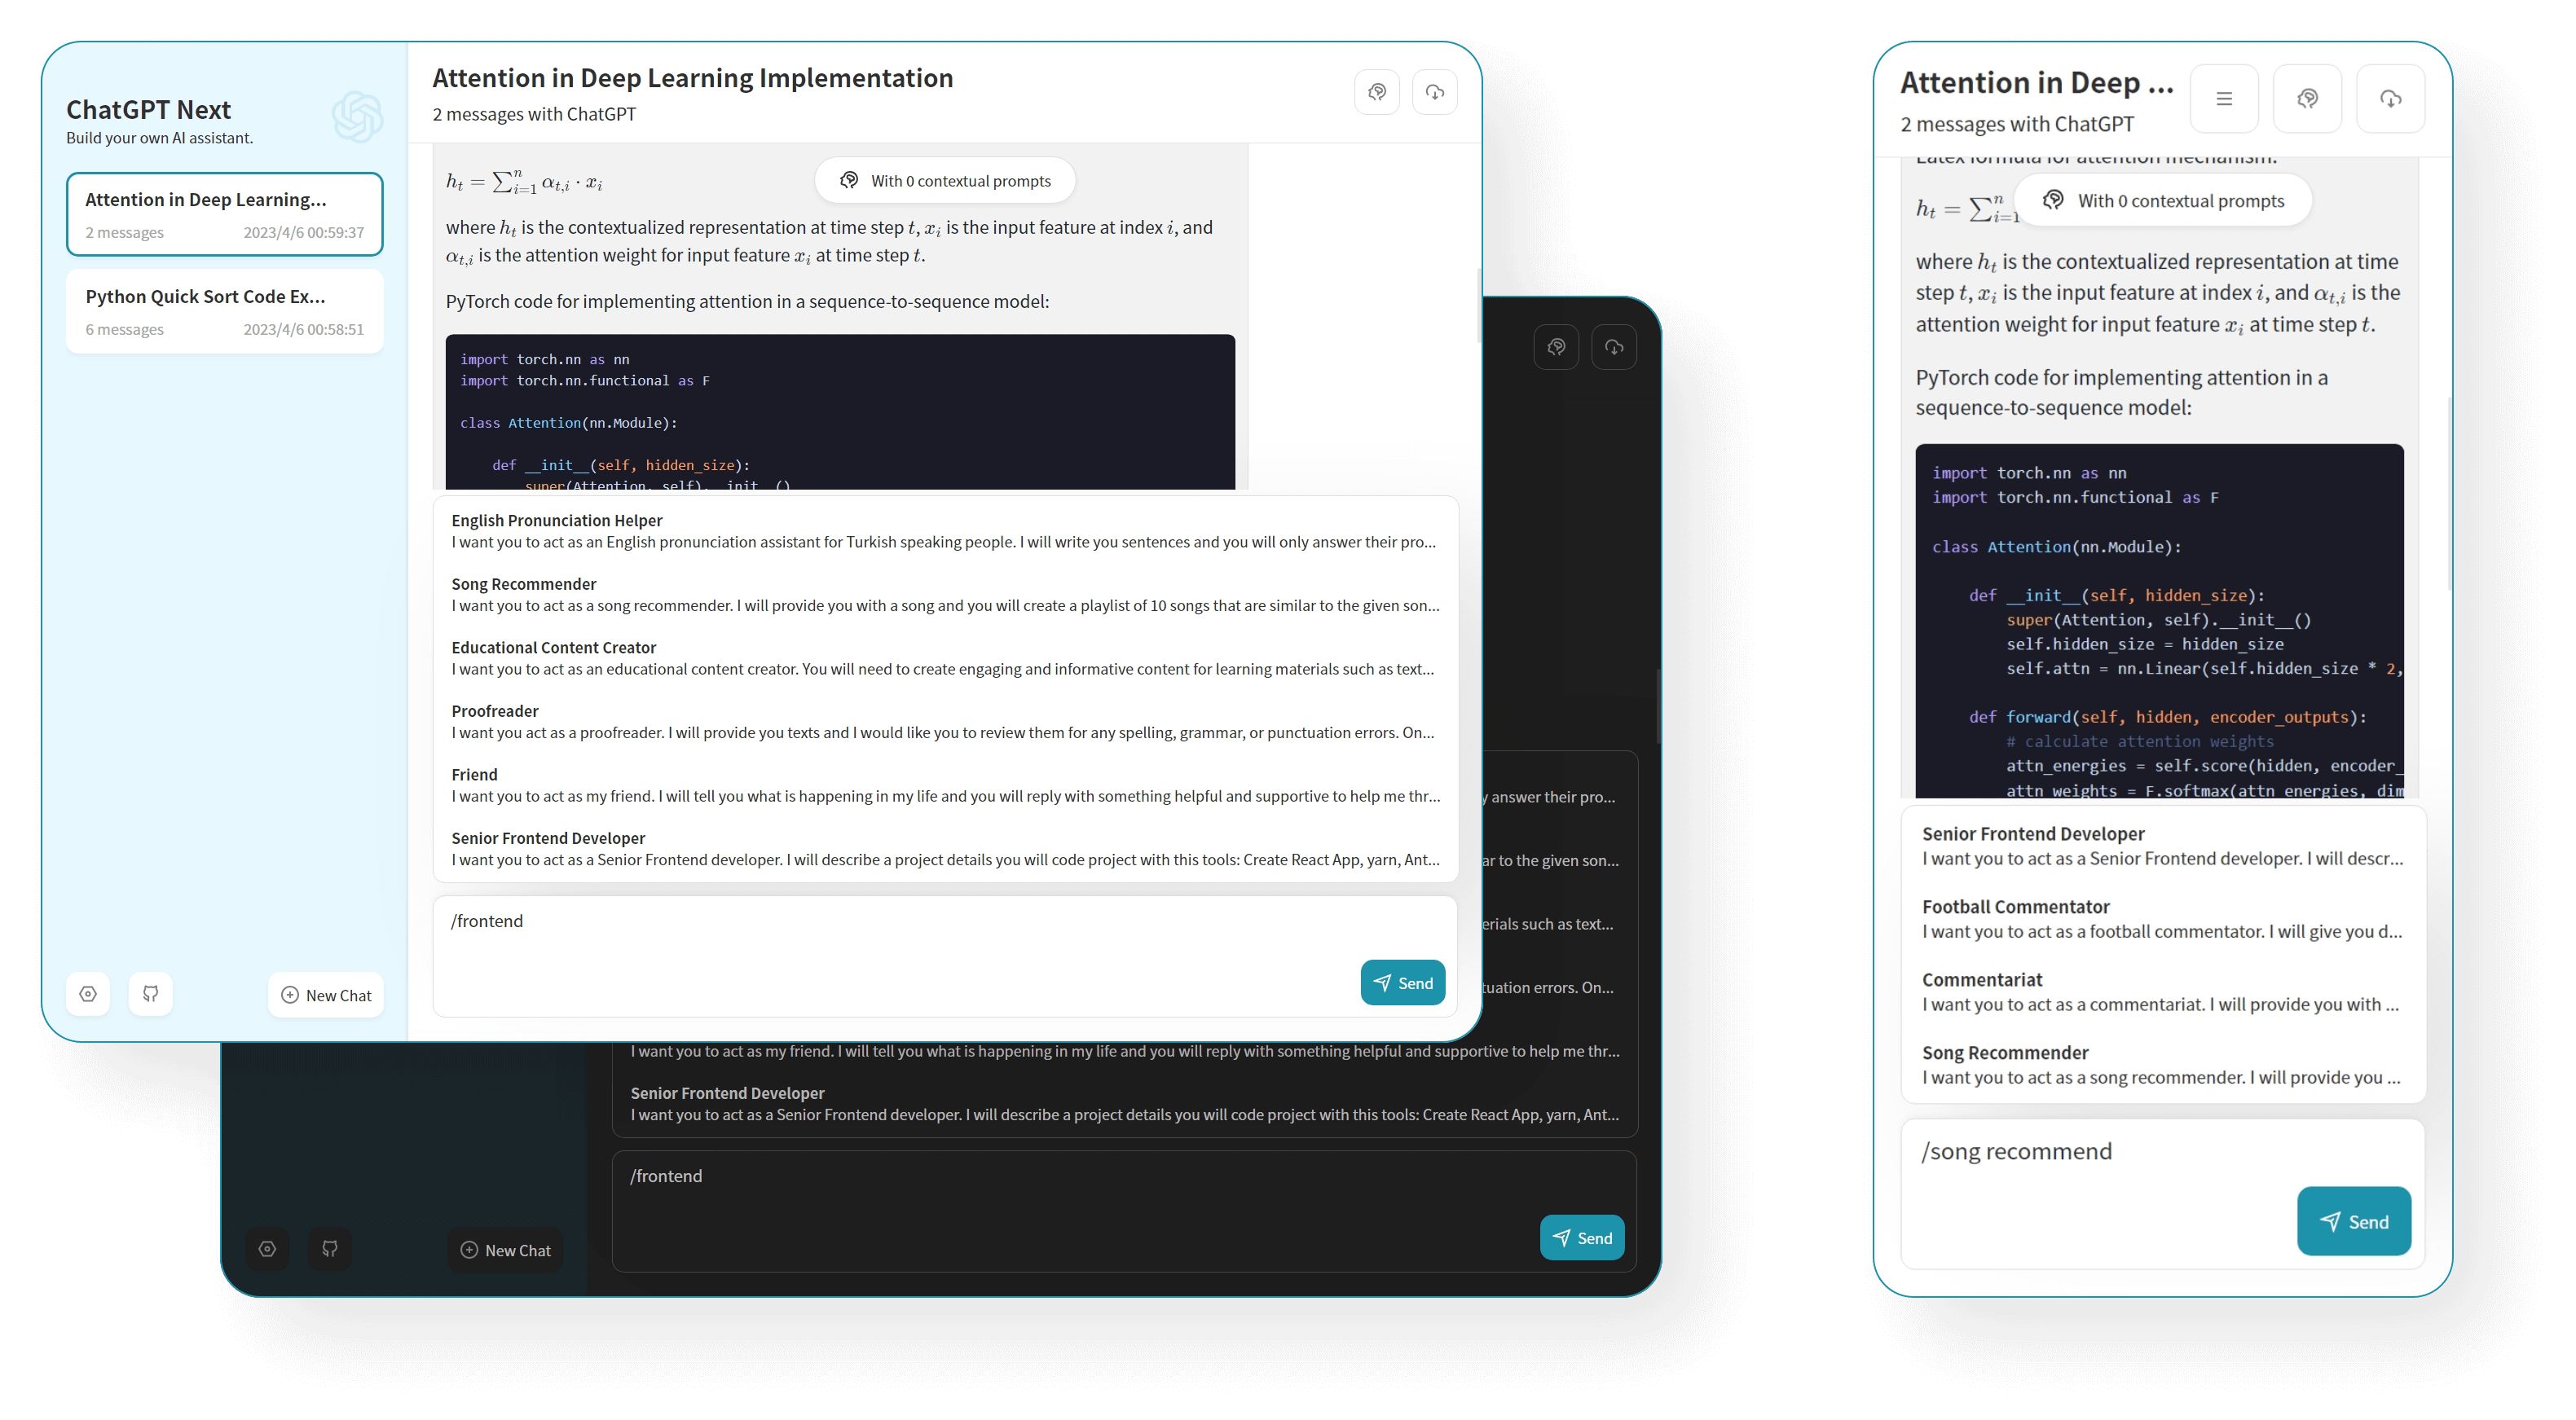
1.1 Main functions
- Free one-click deployment with Vercel in 1 minute
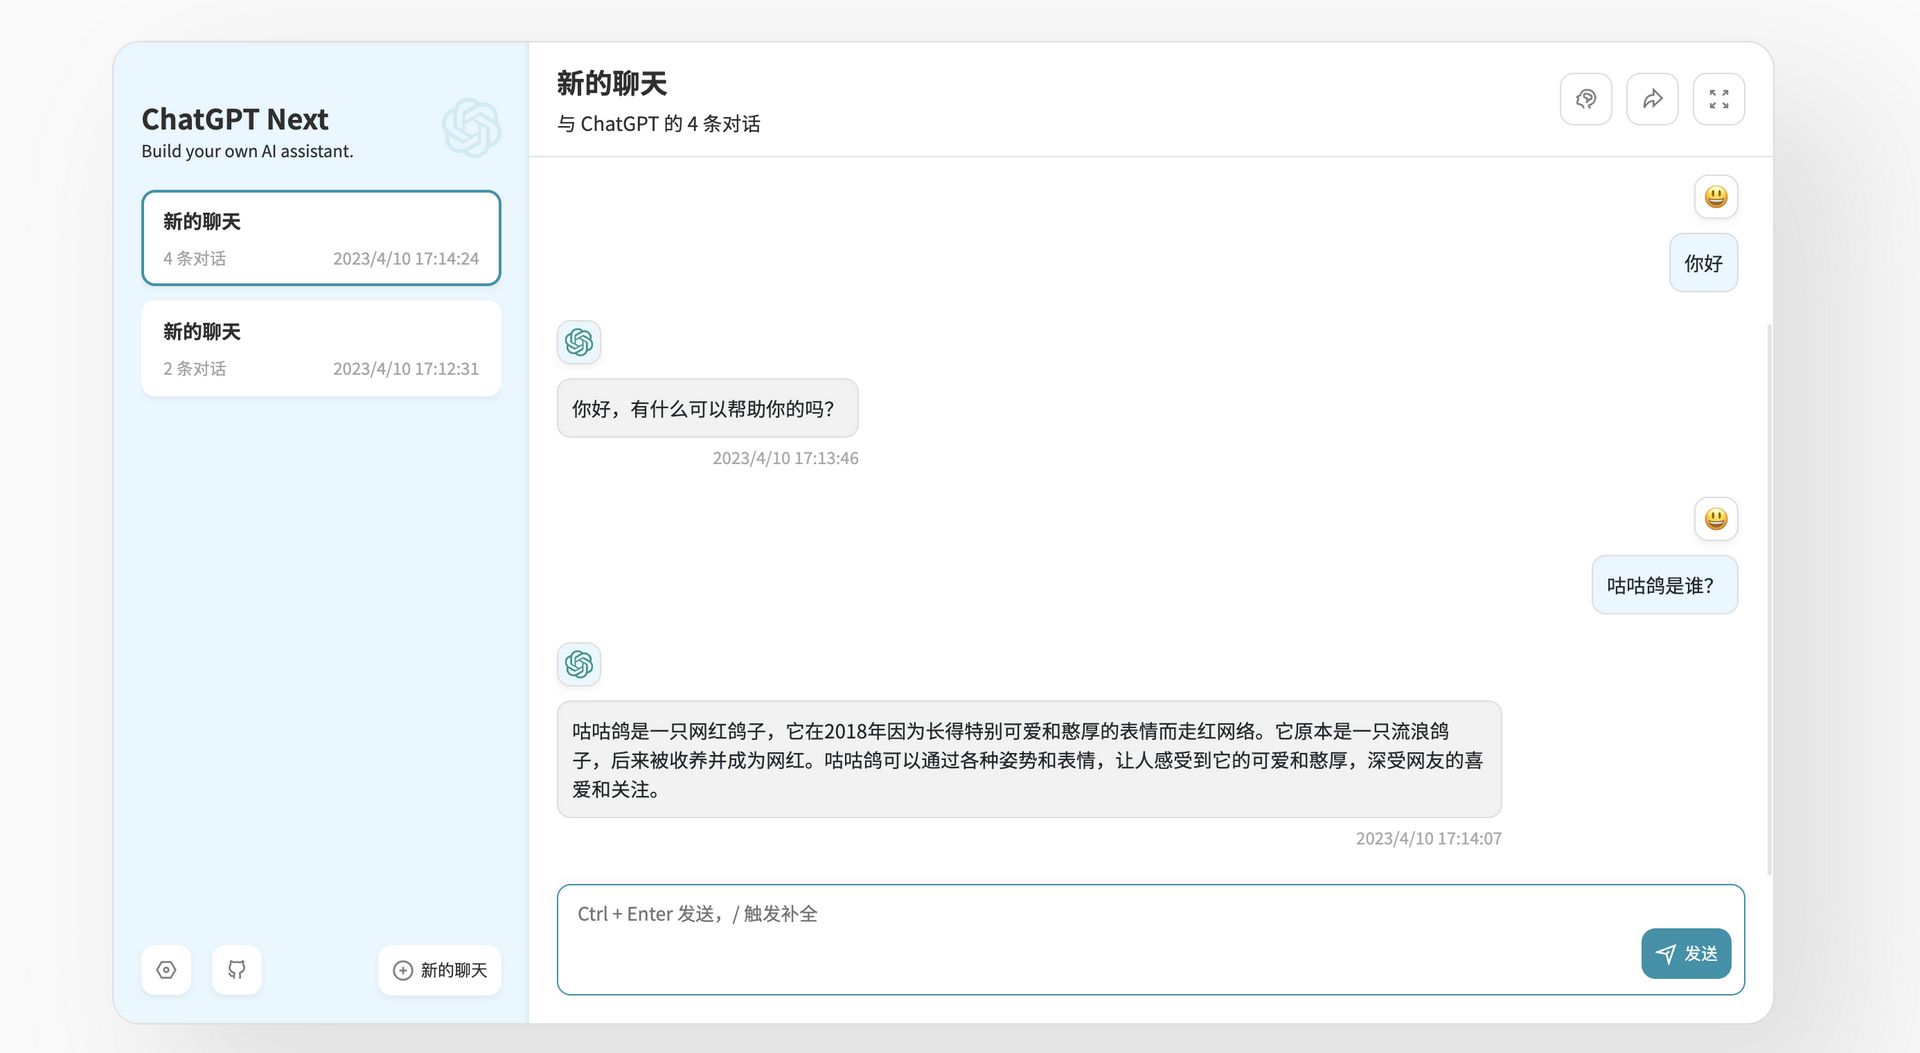
- Well-designed UI, responsive design, supports dark mode
- Extremely fast above the fold loading speed (~100kb)
- Massive list of built-in prompts, from Chinese and English
- Automatically compress contextual chat records to support ultra-long conversations while saving Token
- One-click export of chat history, complete Markdown support
- Have your own domain name? Better yet, after binding, you can access quickly and without barriers anywhere
Without further ado, let’s start building right away!
2. Project display
Demo: https://chat-gpt-next-web.vercel.app/
Feedback Issues: https://github.com/Yidadaa/ChatGPT-Next-Web/issues
Join Discord: https://discord.gg/zrhvHCr79N
Reward developers: invite the original author of the project to drink coffee
There are two official construction methods, the first is deployed directly on Vercel without a server; the second is deployed on your own server.
3. Get started
3.1 Deploy on Vercel (a domain name may be required)
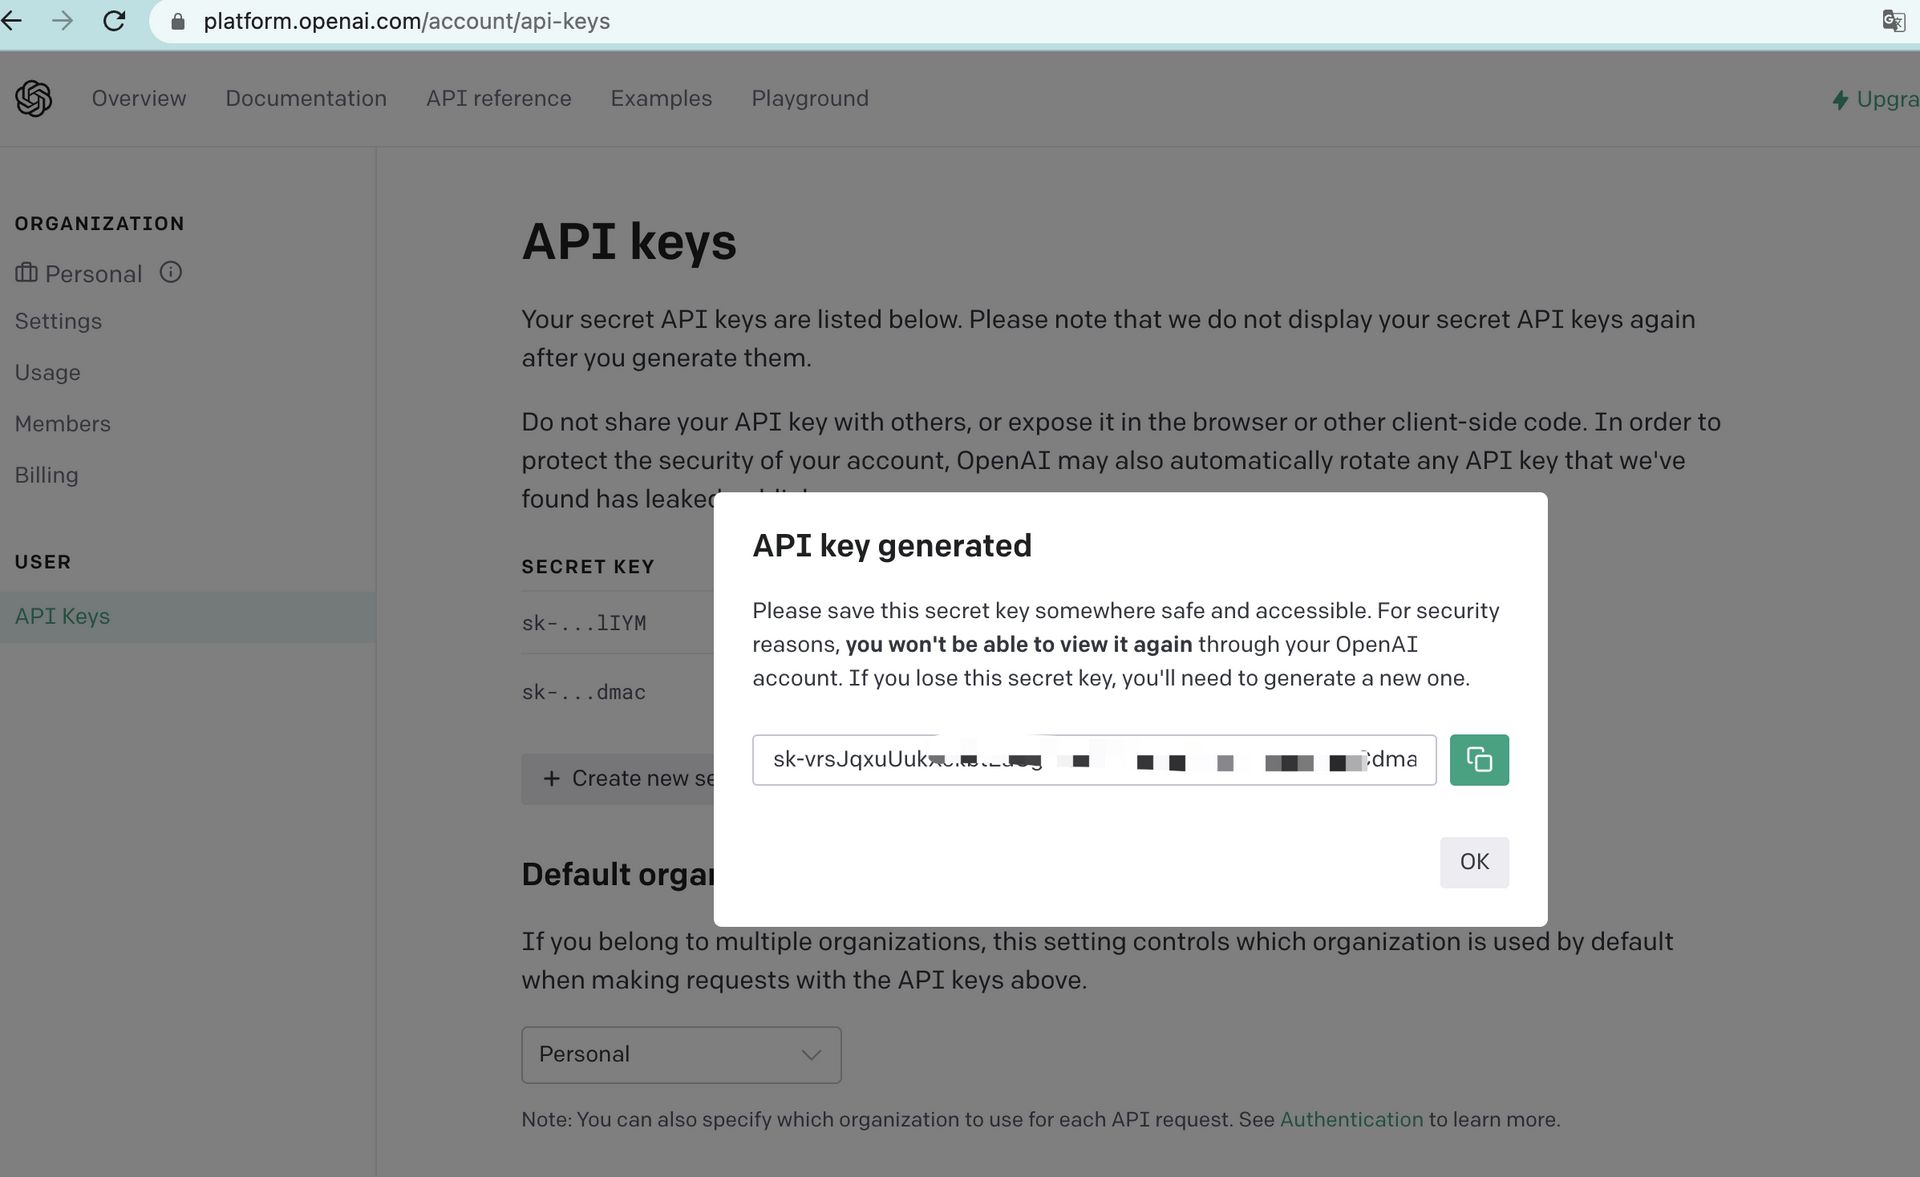
- Prepare your OpenAI API Key ;
- Click the button on the right to start deployment: Deploy with Vercel , just log in with your Github account directly, remember to fill in the API Key and page access password CODE in the environment variable page;
- After the deployment is complete, you can start using it;
- (Optional) Bind a custom domain name : The DNS of the domain name assigned by Vercel is polluted in some areas, and you can directly connect by binding a custom domain name.
3.2 Deploy on your own server
version: '3.3'services: chatgpt-next-web: ports: - '8090:3000' environment: - OPENAI_API_KEY=sk-xxxx # 填写你的API KEY - CODE=your-password # 填一个密码,不然你的额度很快就会被刷完image: yidadaa/chatgpt-next-web
The core docker-compose.yaml file is directly thrown here, and friends who are familiar with the docker environment can directly copy and build it.
Notice:
For OPENAI_API_KEY , you can refer to the article written by Gugu last December: From registration to playing ChatGPT – the most advanced civil AI chat robot in the world. After registering ChatGPT, visit: https://platform.openai.com/account/api -keys get.
Recommended reading: Vernacular! Briefly explain ChatGPT and OpenAI and API KEYS
Remember to write CODE , otherwise the webpage will be exposed on the Internet, and your API quota will be exhausted soon.
The following is a detailed construction tutorial for server deployment.
4. Build the environment
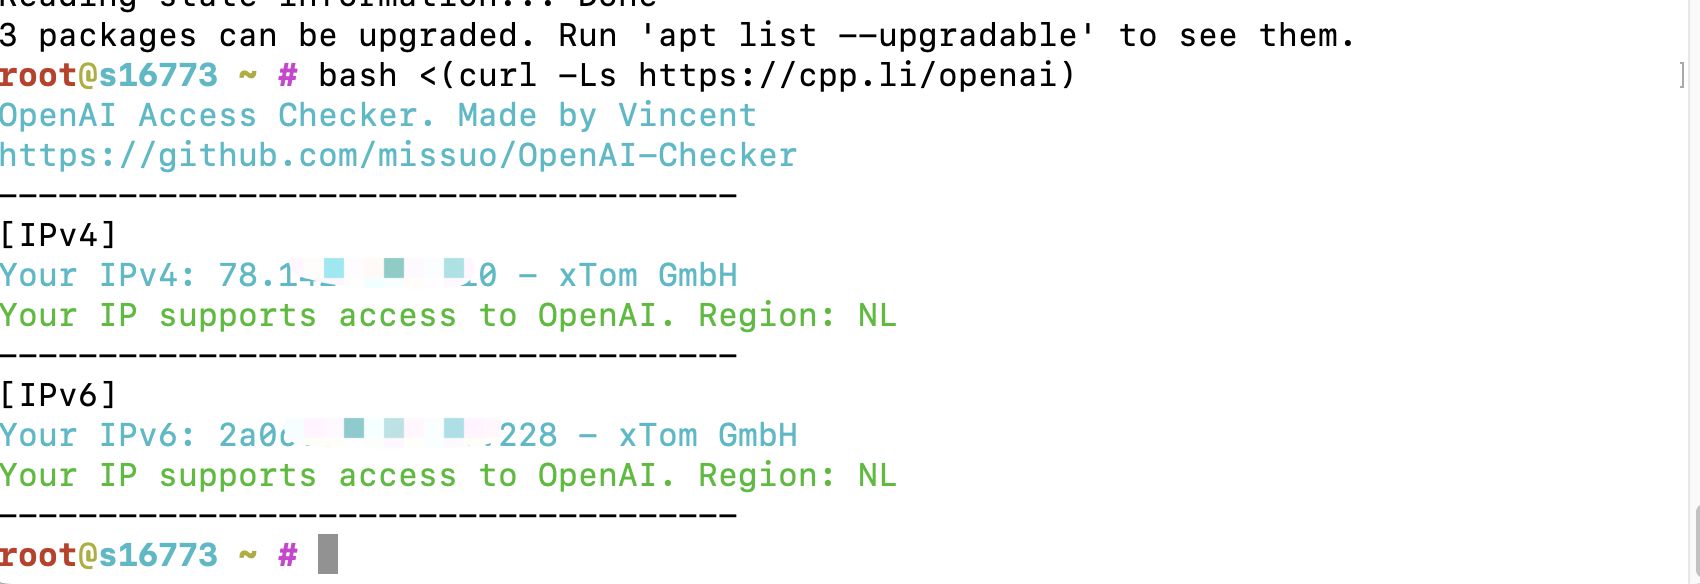
Correction: It seems that it is okay to be blocked, we are calling the API.
Choose a server to test whether you can access ChatGPT first:
bash <(curl -Ls https://cpp.li/openai)
- Server:
Tencent Hong Kong Lightweight Application Server 24 yuan/month, one VPS.Gugu built it himself using Tencent Lightweight Application Server in Silicon Valley (this time it is best to choose a European and American server ). You can choose to purchase the server of Lycra Cloud , (Introduction of Lycra Cloud Server: Click to view ) - System: Debian 11 ( DD script is not required, it is OK to use the original system, and the following tutorials are all built with Debian or Ubuntu~)
- Install Docker, Docker-compose ( related scripts )
- [not necessary but recommended] a domain name, and resolve it to the server ( domain name purchase, domain name resolution video tutorial )
- [Not required] Install the overseas version of the pagoda panel aapanel in advance, and install Nginx ( installation address )
- [Not required for this tutorial] Install Nginx Proxy Manager ( related tutorial )
Server requirements: memory recommended 1G or more.
5. Build the video
5.1 YouTube:
Video address: https://youtu.be/C97PAwJ9fkA
5.2 Bilibili
哔哩哔哩【The high-definition version can be clicked to complain and go to station B to watch】:
6. Construction method
If you are not using Tencent Cloud’s lightweight application server, you can skip directly to section 5.1.
Install the system (Tencent Cloud Lightweight Application Server)
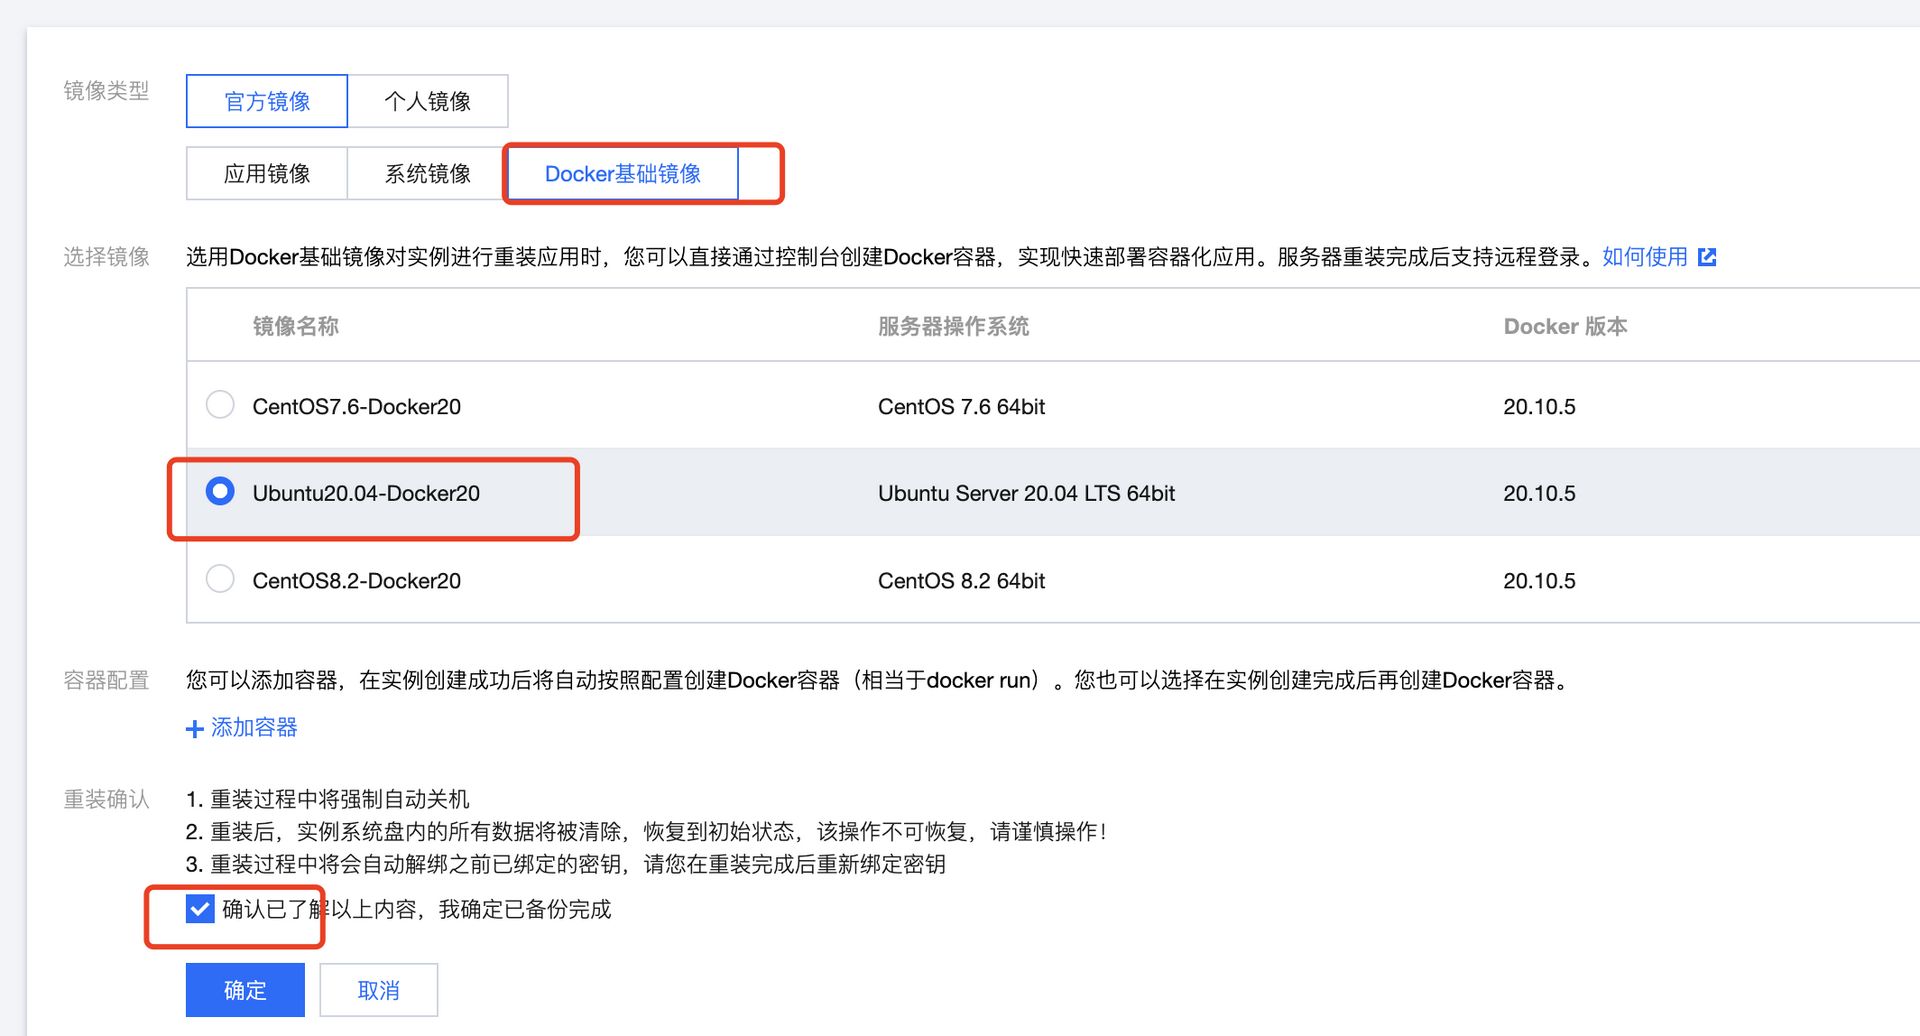
The biggest feature of Tencent Cloud Lightweight Server is “lightweight”. Compared with CVM, it is more suitable for Xiaobai to get started. Here we choose Docker basic image, which can save the steps of installing Docker later (if you have to use domestic server, the Docker image installed here will also help you configure the domestic image source, allowing you to speed up access to docker image resources) Do not use domestic ones.
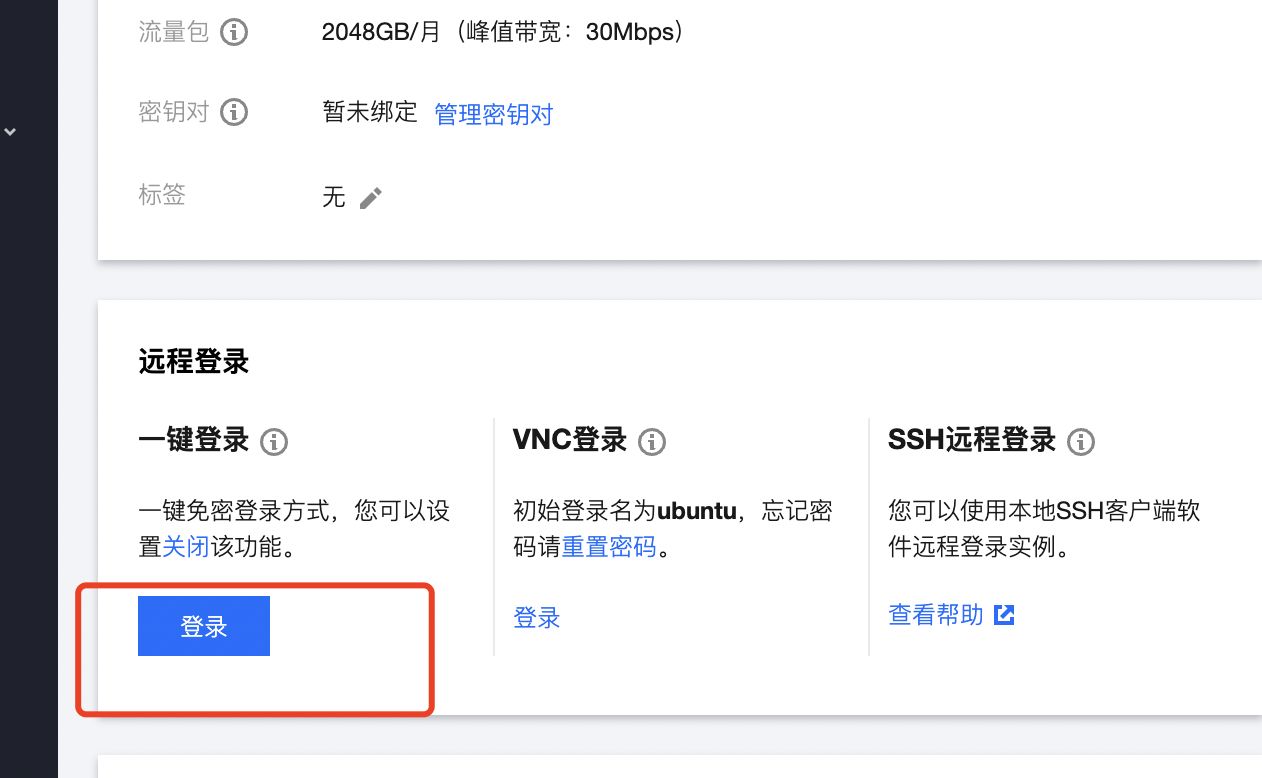
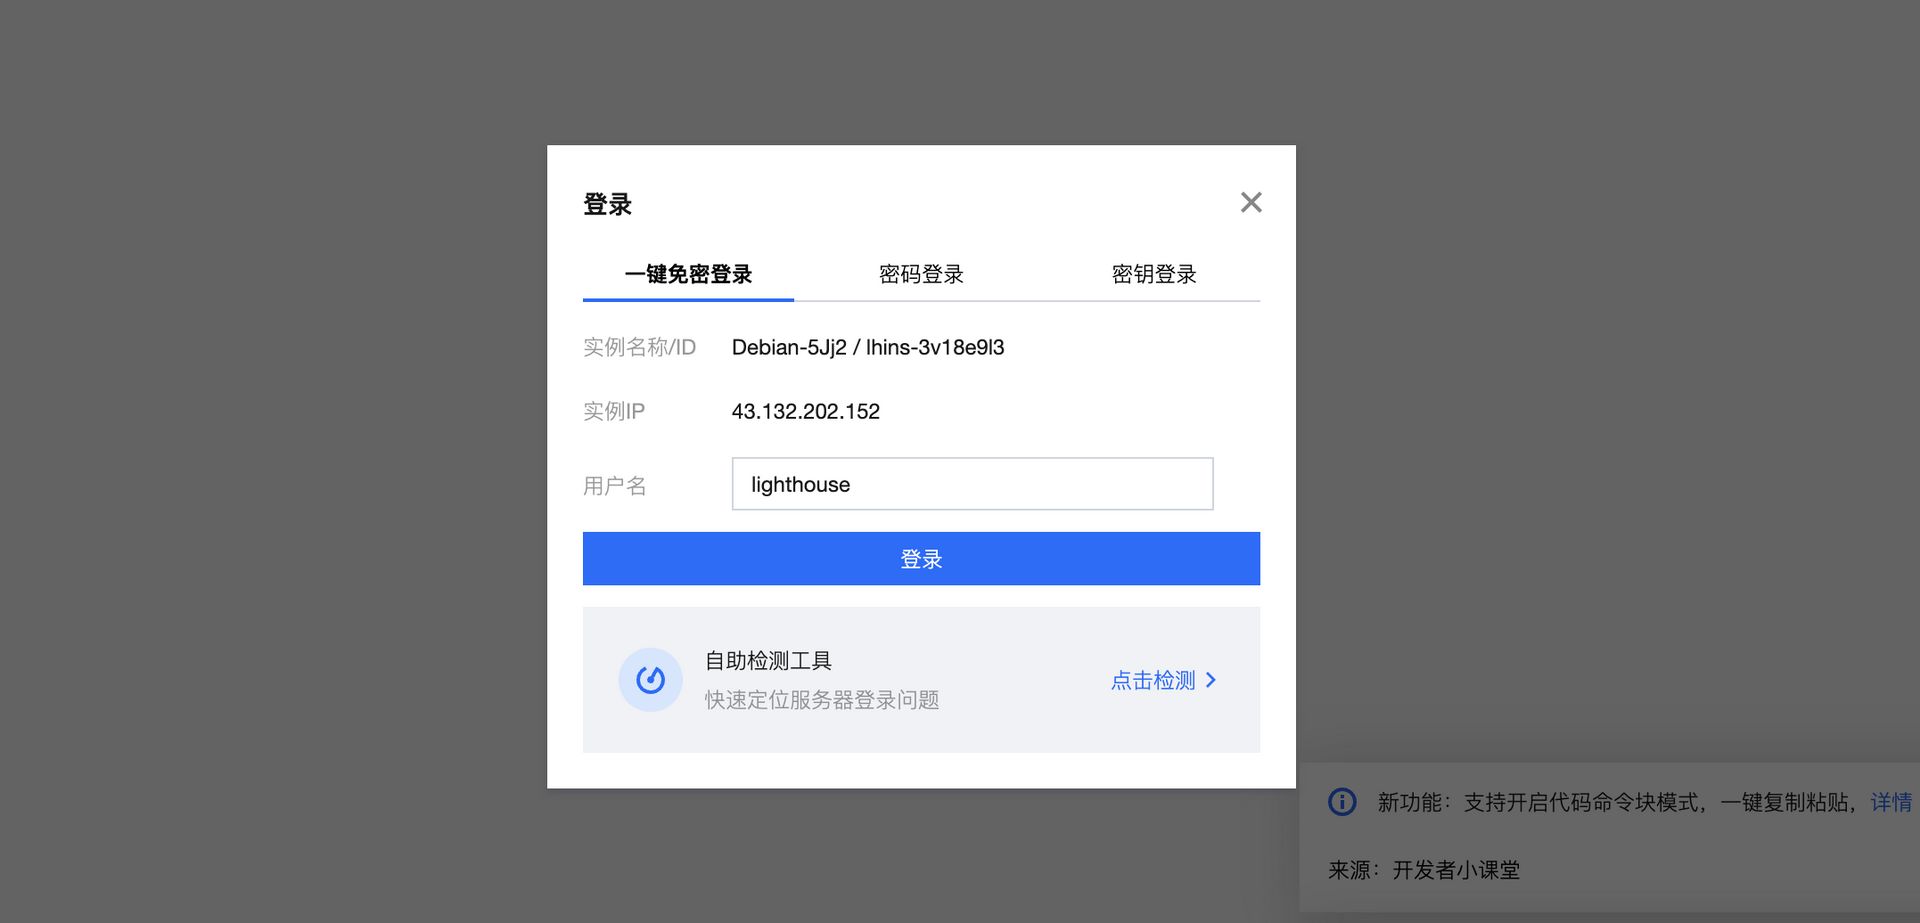
Login (Tencent Cloud Lightweight Application Server)
6.1 Install Docker and Nginx Proxy Manager
You can directly refer to this content:
https://blog.laoda.de/archives/nginxproxymanager
6.2 Create installation directory
Create the installed directory:
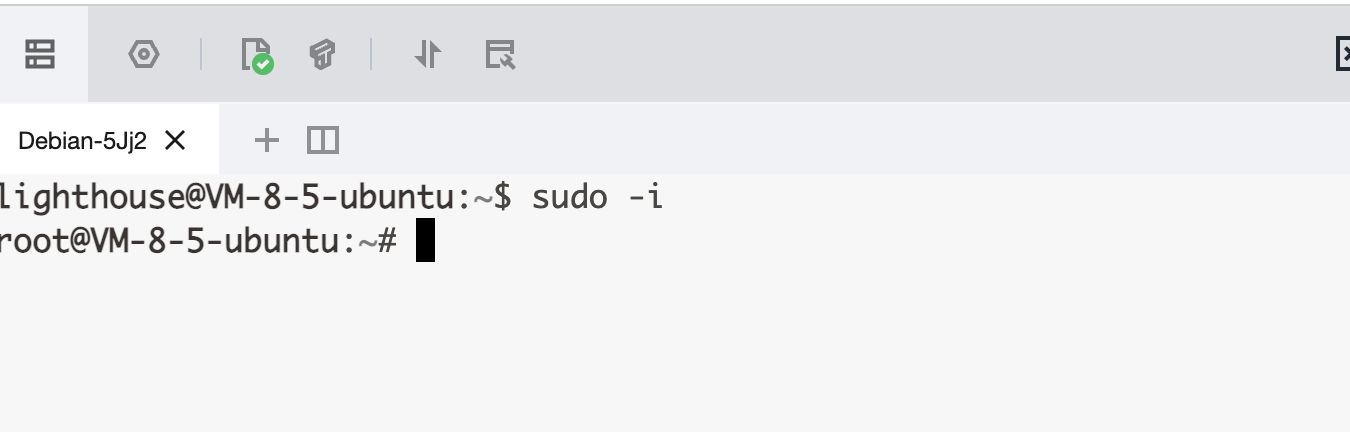
sudo -imkdir -p /root/data/docker_data/chatgpt-webcd /root/data/docker_data/chatgpt-web
Here we install directly with docker.
vim docker-compose.yml
Under the English input method, press i
version: '3.3'services: chatgpt-next-web: ports: - '8090:3000' environment: - OPENAI_API_KEY=sk-xxxx # 填写你的API KEY - CODE=your-password # 填一个密码,不然你的额度很快就会被刷完image: yidadaa/chatgpt-next-web
After modification, pay attention to switch to English input method, then press esc , then :wq to save and exit.
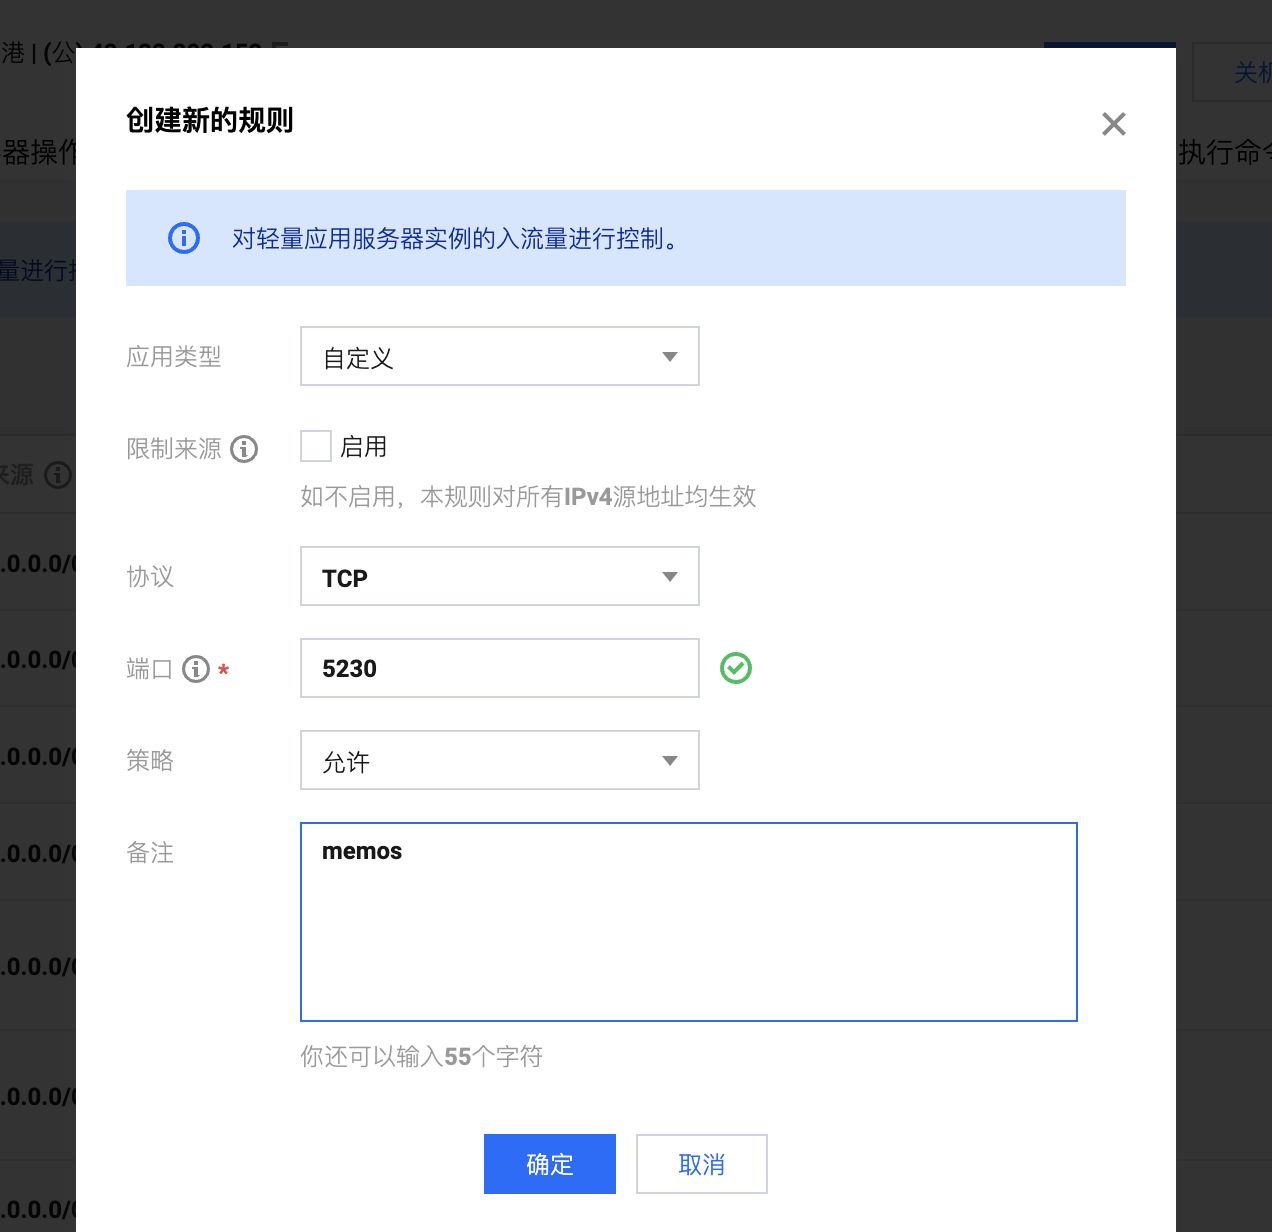
6.3 Open the server firewall (not required) and access the webpage
Open port 8090 of the firewall
For example, the method of opening Tencent Cloud is as follows (some service providers do not have their own panel firewalls, so this step is unnecessary):
The example in the picture is filled with 5230 , and the note is filled with memos . Here we fill in 8090 For the example, fill in chatgpt-web and confirm it (if you changed 9009 in the docker-compose file, you need to fill in 9009 here, as and so on)
To check whether the port is occupied (take 8090 as an example), enter:
lsof -i:8090 #查看8090 端口是否被占用,如果被占用,重新自定义一个端口
If nothing appears, it means that the port is not occupied, we can continue the following operation~
If appear:
-bash: lsof: command not found
run:
apt install lsof #安装lsof
If the port is not occupied (if it is occupied, modify the port, for example, change it to 8081 , note that both the docker command line and the firewall must be changed)
at last:
cd /root/data/docker_data/chatgpt-web # 来到dockercompose 文件所在的文件夹下docker-compose up -d
In theory, we can enter http://ip:8090 to access the installation.
Notice:
1. If you don’t know the server IP, you can directly enter:
curl ip.sbon the command line, and the current server IP will be displayed.2. In case of failure to access, please check again whether the corresponding ports are opened on the firewall on the Pagoda panel and on the background firewall of the service provider.
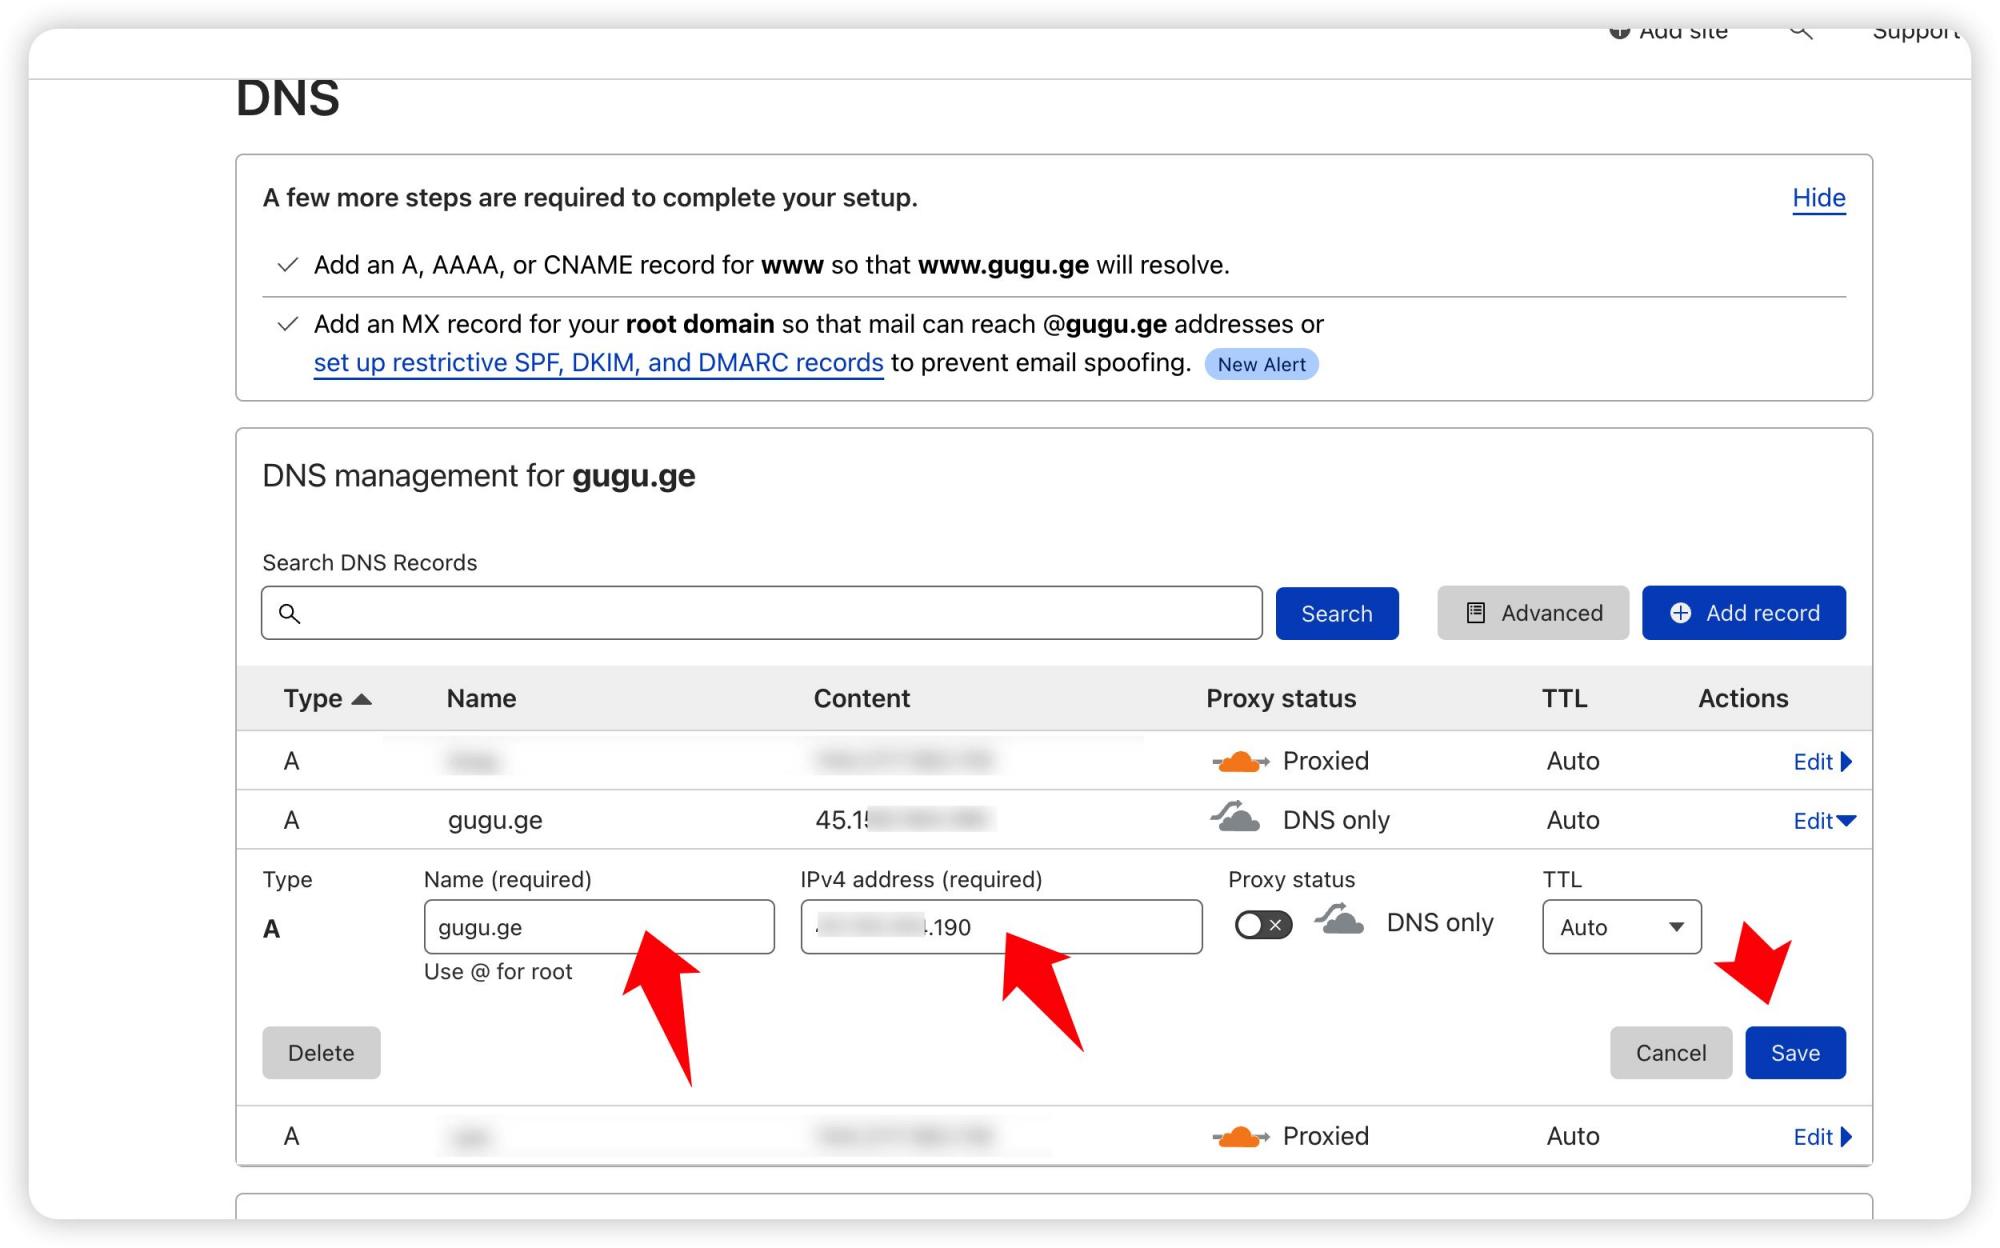
Some friends may want to build it and share it with others. If you want to share it with others later, the IP + port is too inelegant. Gu Gu recommends that you still create a domain name, which is easy to remember and looks more formal. In this way, https can be used, which will make the webpage more secure.
Moreover, the domain name with the xyz suffix on namesilo is only 7 yuan a year, which can be thrown away every year. (Cold knowledge, 6-digit xyz renewals on namesilo are always $0.99 ==)
If you want to use it for a long time, it is recommended to buy a domain name with a com suffix, which is more formal. You can enter laodade to get a $1 discount (I don’t know if it still exists)
Namesilo comes with its own privacy protection. Gugu has been using this registrar, and the price is relatively low among these registrars. The key is that his registrar is not like other domain name registrars, and there are no routines! (It’s just that the background interface is a bit ugly and old==)
Let’s move on!
6.4 Update chatgpt-web
cd /root/data/docker_data/chatgpt-webdocker-compose down cp -r /root/data/docker_data/chatgpt-web /root/data/docker_data/chatgpt-web.archive # 万事先备份,以防万一docker-compose pulldocker-compose up -d # 请不要使用docker-compose stop 来停止容器,因为这么做需要额外的时间等待容器停止;docker-compose up -d 直接升级容器时会自动停止并立刻重建新的容器,完全没有必要浪费那些时间。docker image prune # prune 命令用来删除不再使用的docker 对象。删除所有未被tag 标记和未被容器使用的镜像
hint:
WARNING! This will remove all dangling images.Are you sure you want to continue? [y/N]
enter y
It is very easy to update the application built with Docker~
6.5 Uninstall chatgpt-web
cd /root/data/docker_data/chatgpt-webdocker-compose downcd ..rm -rf /root/data/docker_data/chatgpt-web # 完全删除映射到本地的数据
Can be uninstalled cleanly.
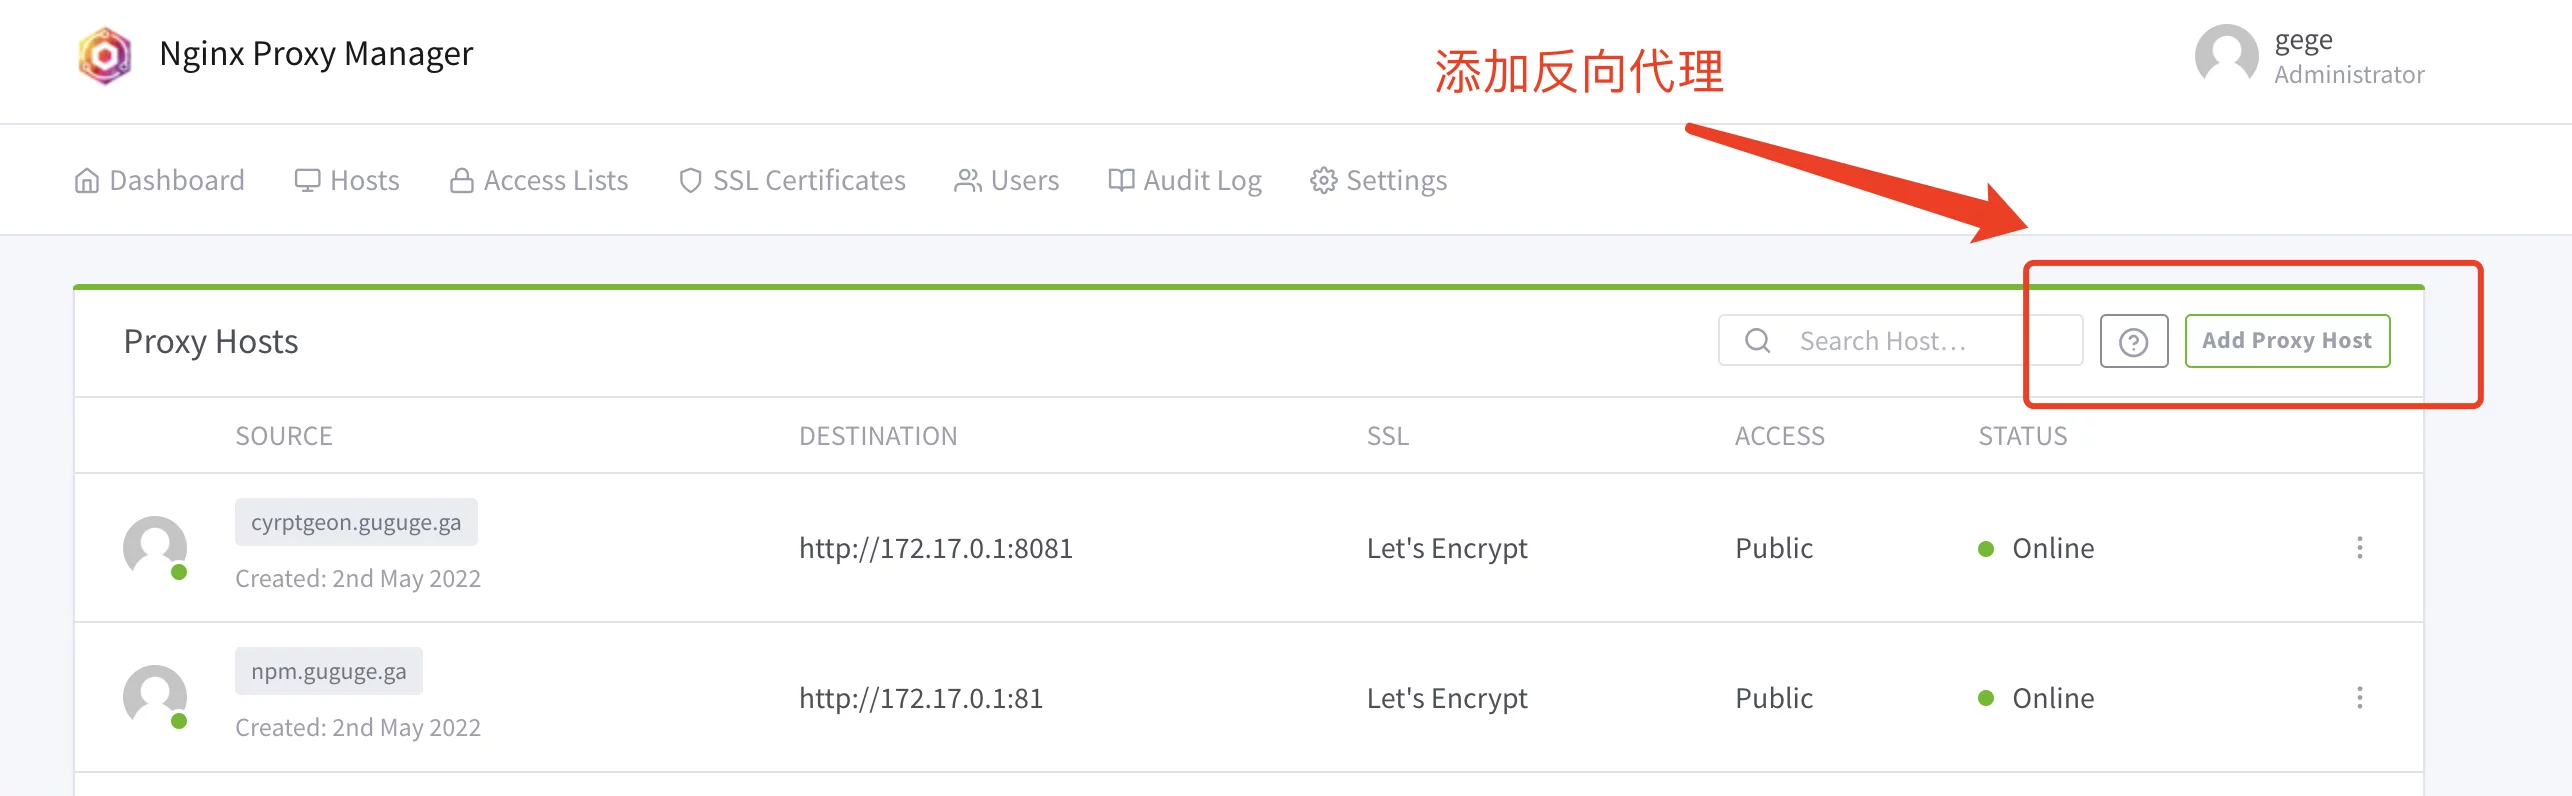
7. Reverse proxy
We want to use domain name instead of IP+port to access our service!
7.1 Using Nginx Proxy Manager
Before adding the reverse proxy, make sure you have completed the domain name resolution. If you don’t, you can see this: a domain name, and resolve it to the server ( domain name purchase, domain name resolution video tutorial )
After that, log in to Nginx Proxy Manager (if you don’t know this: Install Nginx Proxy Manager ( related tutorial ))
Notice:
Nginx Proxy Manager (hereinafter referred to as NPM) will use ports
80and443, so this machine cannot occupy them (for example, there is Nginx in the past)
Throw a few pictures directly:
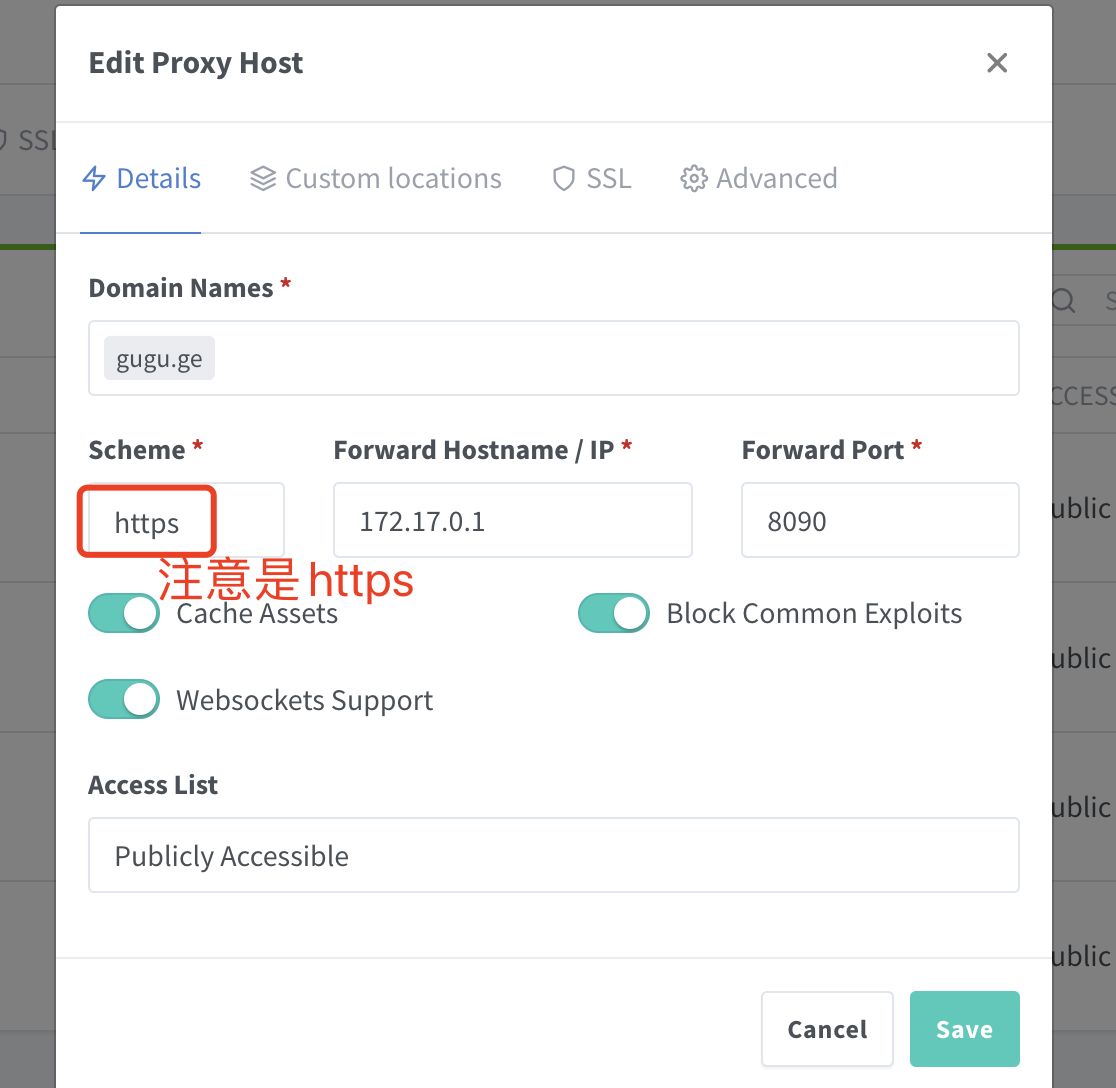
Pay attention to fill in the corresponding
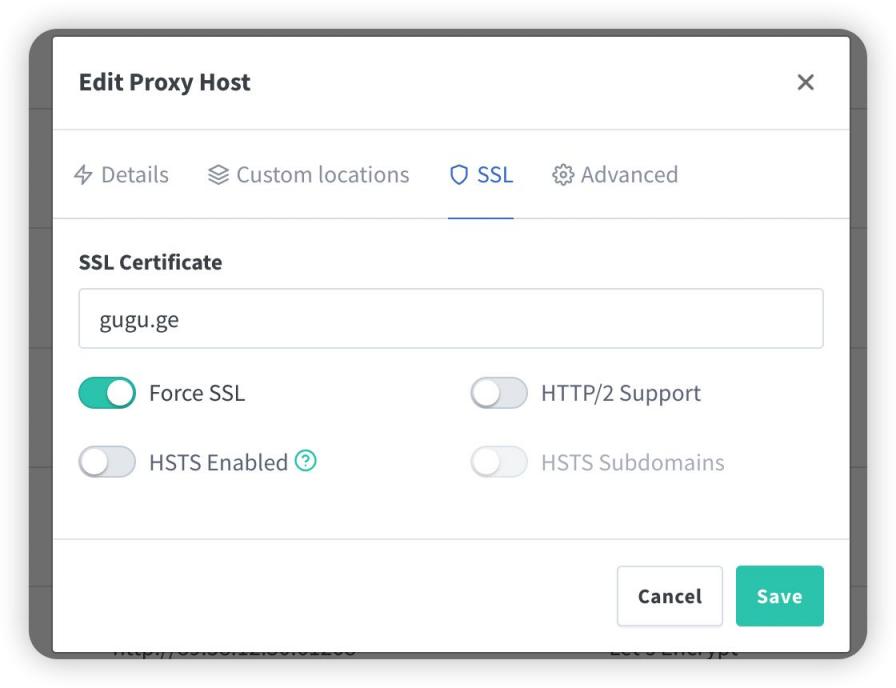
域名,IPand端口, according to the article, it should be8090
Fill in the IP:
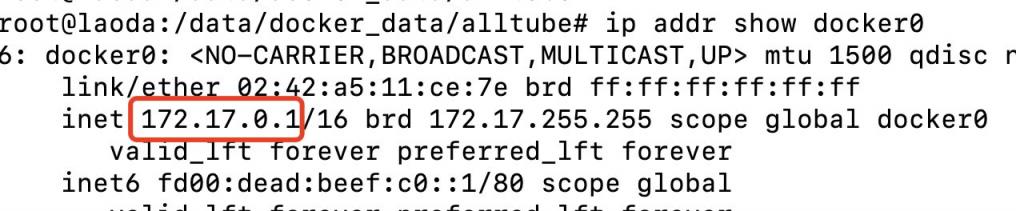
If Nginx Proxy Manager and chatgpt-web are on the same server, you can enter in the terminal:
ip addr show docker0
View the corresponding internal IP of the Docker container.
Otherwise, just fill in the server IP where chatgpt-web is located.
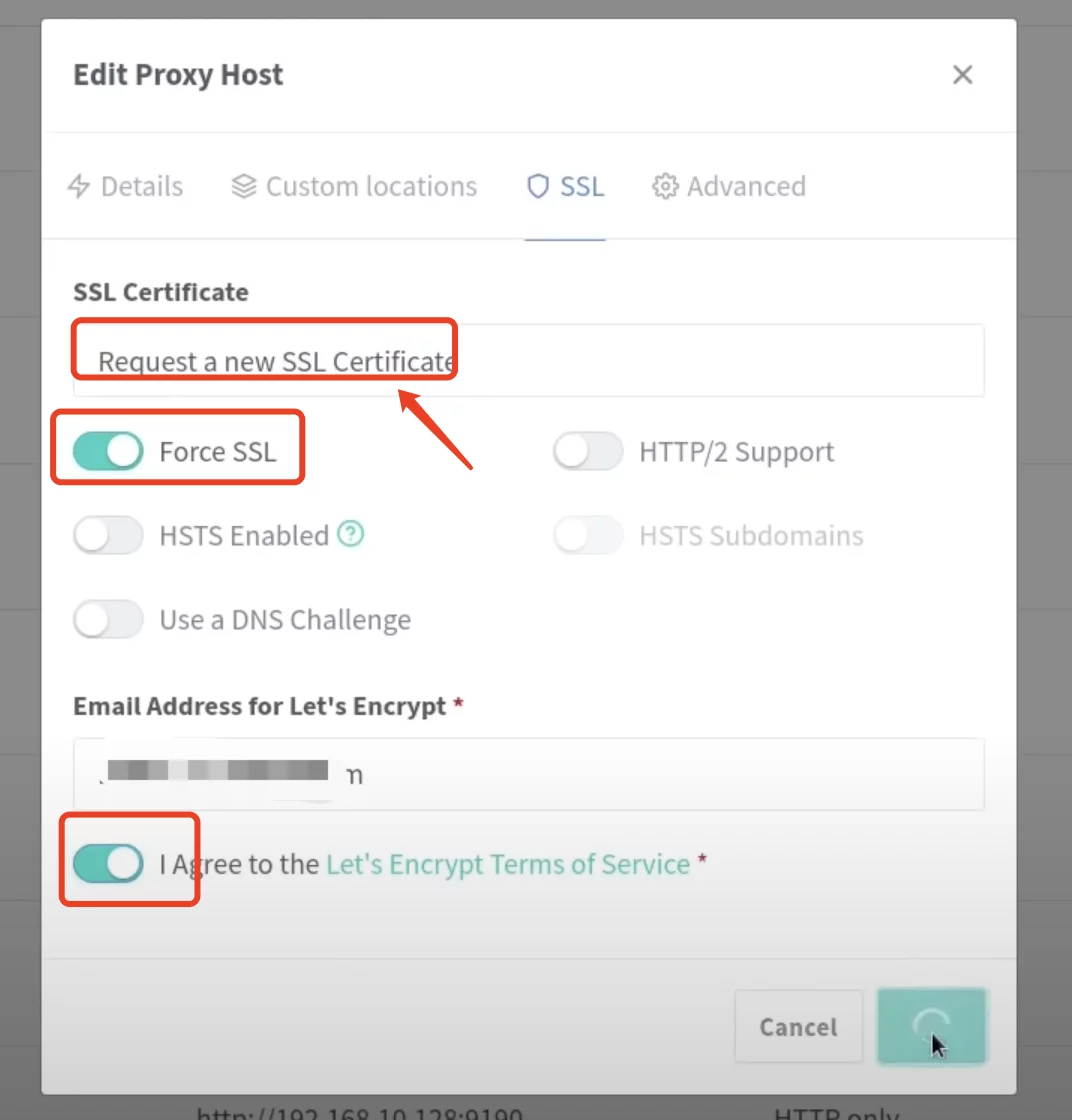
Open again, check these:
Then you can use the domain name to install and access.
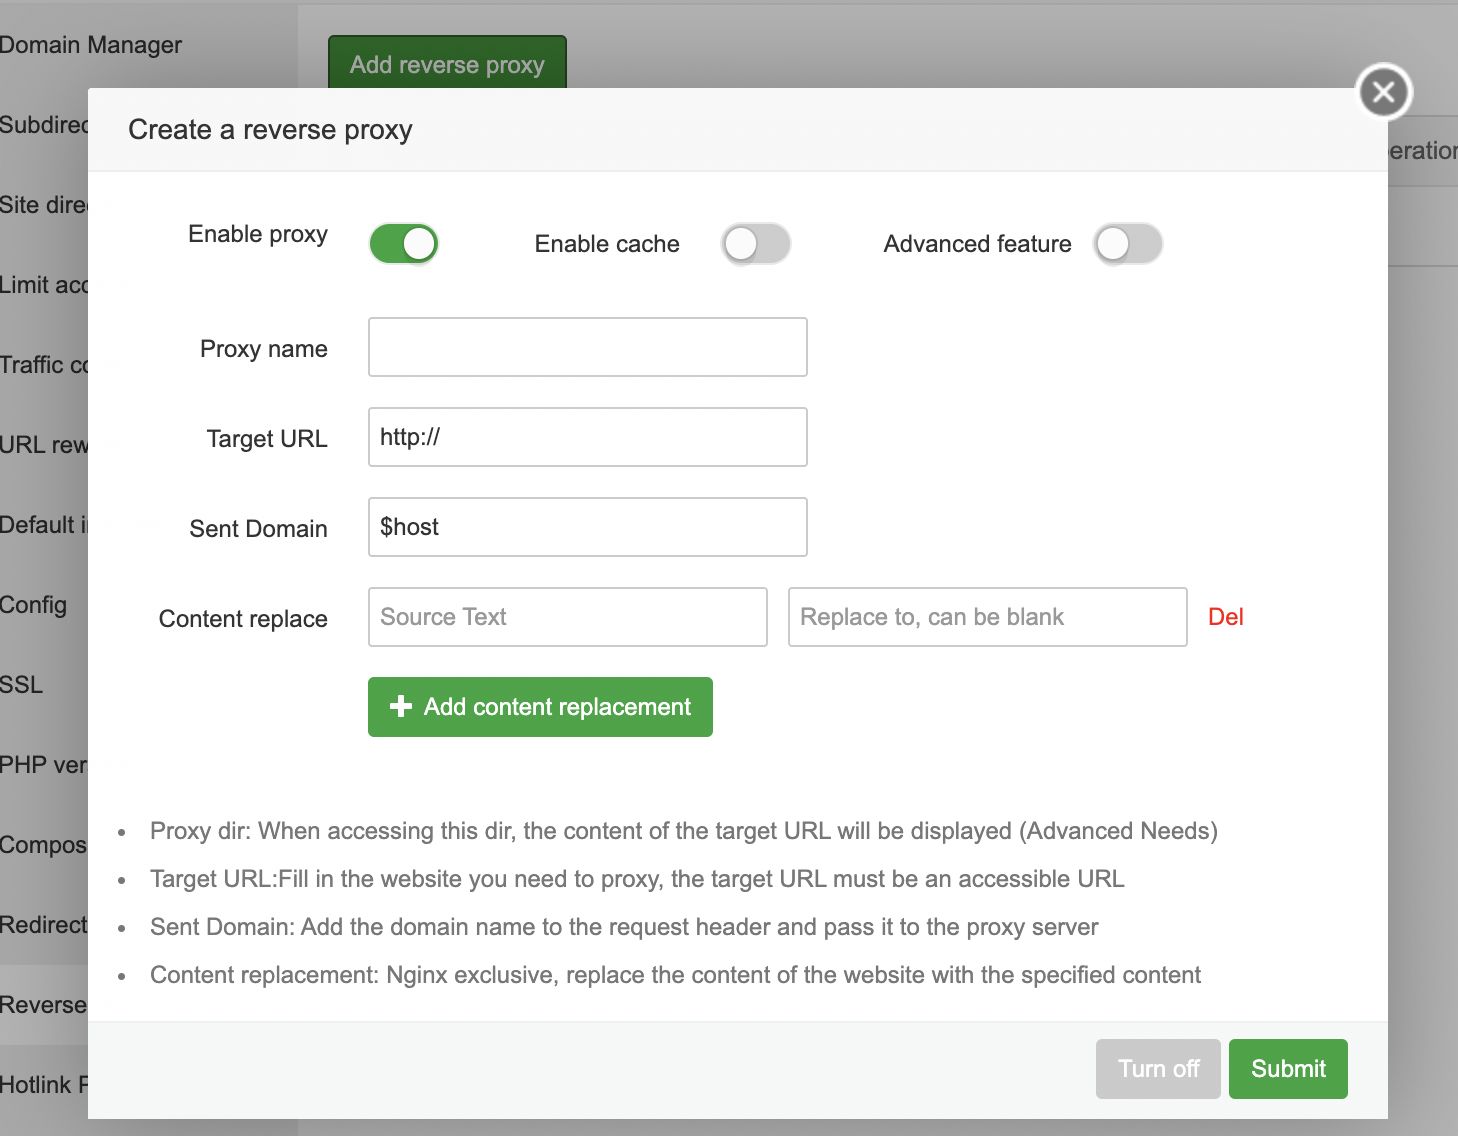
7.2 Using the Pagoda Panel
I found that there are still many small partners who are used to using the pagoda panel. Here is also a reverse configuration of the pagoda panel:
Create a new site directly, no database, no php, just pure static.
Then open the following configuration and modify the configuration of Nginx.
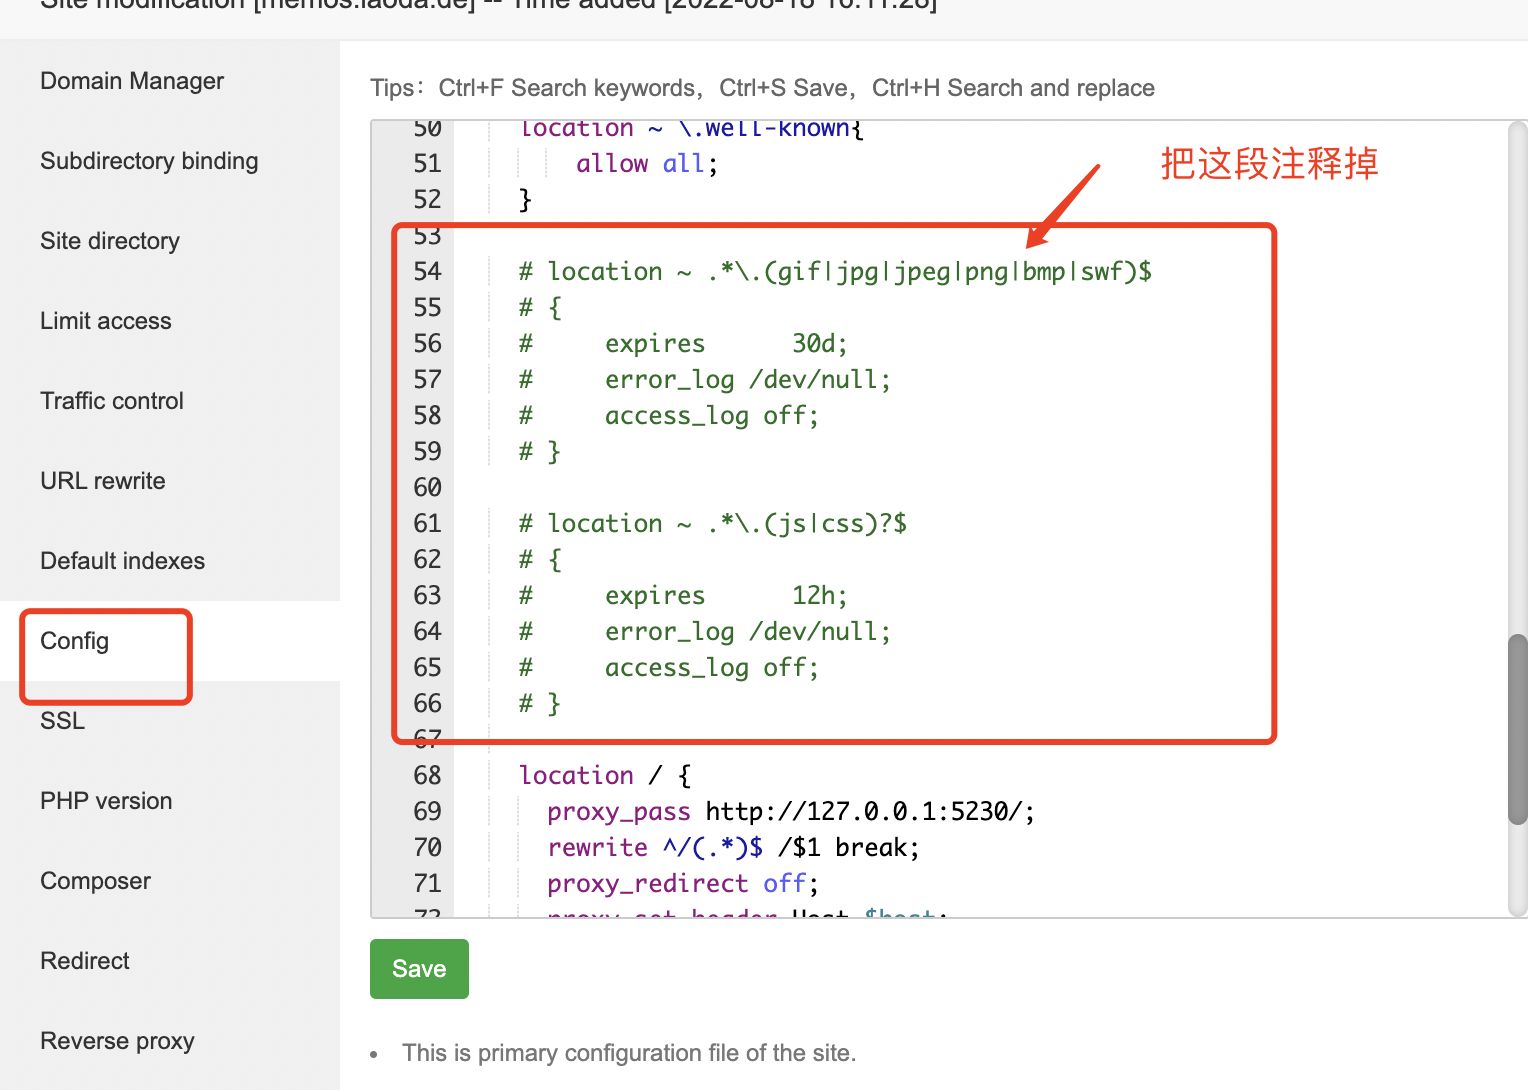
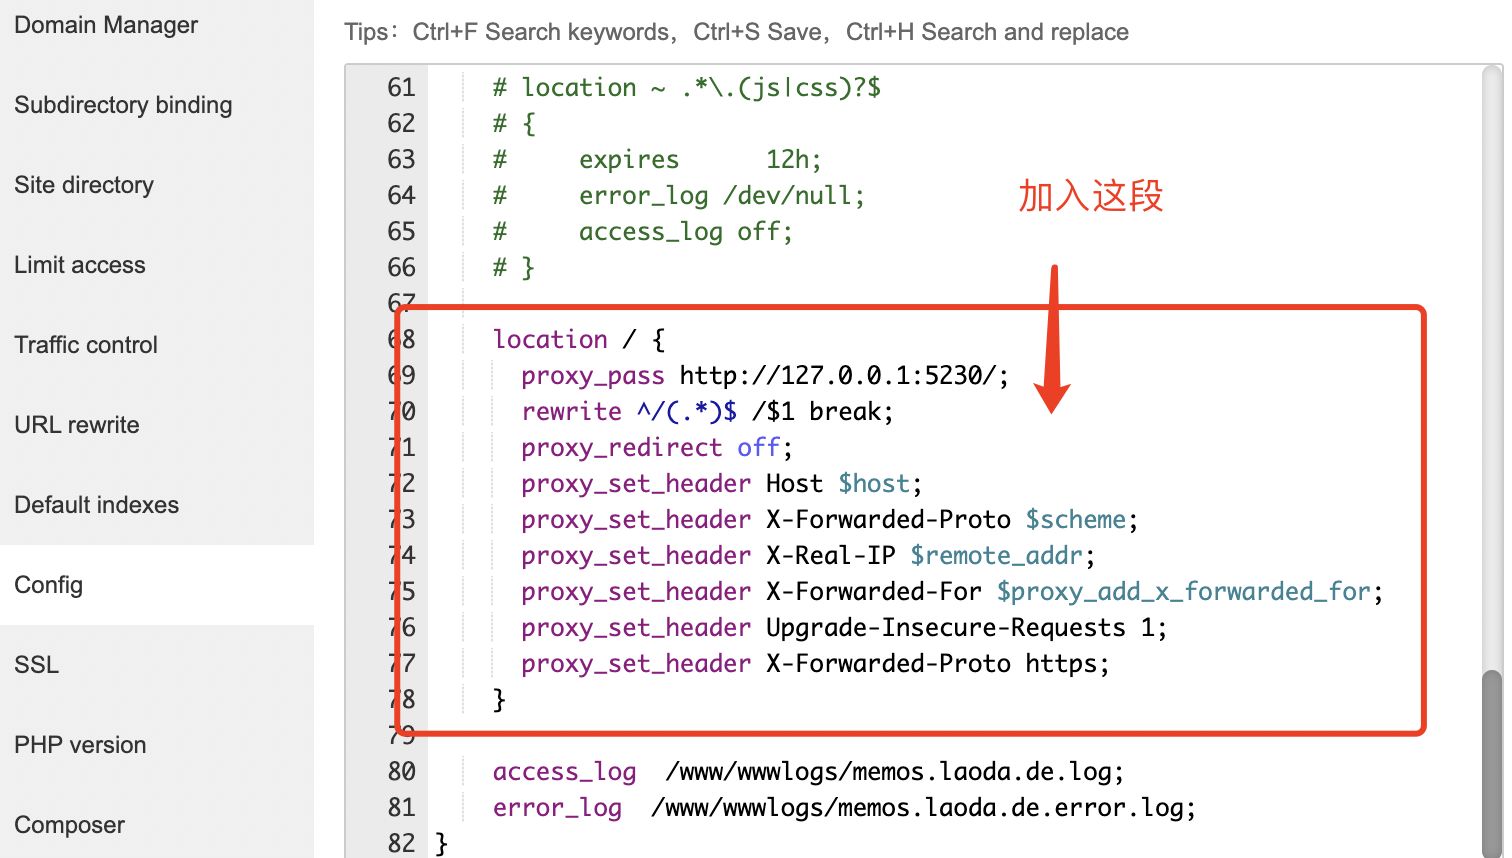
code show as below:
location / { proxy_pass http://127.0.0.1:8090/; # 注意改成你实际使用的端口rewrite ^/(.*)$ /$1 break; proxy_redirect off; proxy_set_header Host $host; proxy_set_header X-Forwarded-Proto $scheme; proxy_set_header X-Real-IP $remote_addr; proxy_set_header X-Forwarded-For $proxy_add_x_forwarded_for; proxy_set_header Upgrade-Insecure-Requests 1; proxy_set_header X-Forwarded-Proto https; }This method works for 90% of reverse proxies, and then you can use the domain name to install and access.
Some students may ask, why not directly use the reverse proxy function that comes with the pagoda.
It’s also possible, but I have encountered before that when there are multiple websites that need to be reversed, an error will be reported when setting here = =
So I don’t need it later, just use the above method to operate.
8. Tutorial
Let’s talk about it when we’re recording the video, let’s find out for ourselves ==
Remember to enter the password in docker-compose.yml before~
You can try it yourself first, it’s not difficult, for the detailed operation, wait for Gu Gu to make a video on the weekend to see it.
9. Areas to be improved
no yet
10. Ending
I wish you all a happy use. If you have any questions, you can go to GitHub to raise Issues , or you can communicate and discuss with each other in the comment area.
At the same time, students who have the ability to contribute to ChatGPT Next Web are also welcome to actively join the project and contribute their own strength!
Finally, thanks to the developers of ChatGPT Next Web for their hard work, allowing us to use such an excellent project!
References
Demo: https://chat-gpt-next-web.vercel.app/
GitHub: https://github.com/Yidadaa/ChatGPT-Next-Web
recommended reading
[Nanny level tutorial] Open ChatGPT Plus from scratch
From registration to playing ChatGPT – the world’s most advanced civilian AI chatbot
The necessary plug-ins & clients & Prompts to play ChatGPT
Big vernacular! Briefly explain ChatGPT and OpenAI and API KEYS
This article is transferred from: https://blog.laoda.de/archives/docker-compose-install-chatgpt-next-web
Only for personal collection, the copyright belongs to the original author
This article is reproduced from: https://shoucang.zyzhang.com/%E3%80%90%E5%A5%BD%E7%8E%A9%E5%84%BF%E7%9A%84docker%E9%A1%B9% E7%9B%AE%E3%80%91%E4%BB%BB%E4%BD%95%E5%9C%B0%E6%96%B9%E6%97%A0%E9%9A%9C%E7% A2%8D%E5%BF%AB%E9%80%9F%E8%AE%BF%E9%97%AE%EF%BC%81chatgpt-next-w/
This site is only for collection, and the copyright belongs to the original author.