Original link: https://www.zhangxinxu.com/wordpress/2023/09/js-copy-image-clipboard/
by zhangxinxu from https://www.zhangxinxu.com/wordpress/?p=11015xinspace-xinlife
This article welcomes sharing and aggregation. It is not necessary to reprint the full text. Respect copyright. The circle is only so big. If you need it urgently, you can contact us for authorization.
1. There must be a reason
Why do you suddenly want to know how to use JS to copy images to the clipboard?
Because I got a PNG/JP online compression tool last week, at the beginning, the only way to obtain images was to download them locally.
But many times, I hope that this kind of compressed image can be uploaded directly without having to transfer it locally.
At this point, it would be nice to have a copy function.
Just click a button to copy the compressed image to the clipboard, and then go to the upload page to upload it. How convenient and easy.
So, I went to find out more and learned a lot.
Share it with everyone here.
First, let’s start simple.
2. Native image copy API
The browser provides an instance object named ClipboardItem, which can construct a clipboard copy object.
For example, copy a piece of text (the code is taken from the MDN documentation ):
 function setClipboard(text) {

  const type = "text/plain";

  const blob = new Blob([text], { type });

  const data = [new ClipboardItem({ [type]: blob })];


  navigator.clipboard.write(data).then(() => {

    /* success */

  }, () => {

    /* failure */

  });

}
Pictures are no problem either.
I specially wrote a method to copy images, and the parameter is the IMG element object in the page.
 const doCopyImg2Clipboard = async (image, success = () => {}, failure = () => {}) => {

    if (!image || !image.src) {

        return;

    }


    //The address of the image to be copied const src = image.src;

    // Request this address and return the blob data of the image const response = await fetch(src);


    // Need to be blob data format const blob = response.blob();


    // Use the clipboard API to copy const data = [new ClipboardItem({

        [blob.type || 'image/' + src.split('.').slice(-1)[0].replace('jpg', 'jpeg')]: blob

    })];


    navigator.clipboard.write(data).then(success, failure);

}
If you already have image data (such as locally uploaded, dragged or pasted images), the fetch step can be skipped.
So, when the page has the following HTML code (a picture, a button):
 <button id="button" type="primary">Copy image</button>

<img id="image" src="./mybook.jpg">
You can use a simple click event to trigger the copy of the image.
For example:
 // Click the button to copy button.addEventListener('click', () => {

    doCopyImg2Clipboard(image, function () {

        new LightTip('copy successfully', 'success');

    }, function (err) {

        new LightTip('Copy failed:' + err, 'error');

    });

});
However, the result of the above code is failure!
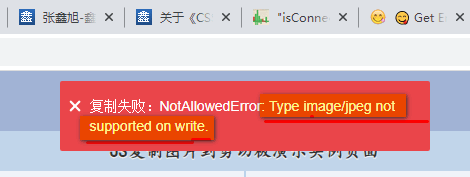
As can be seen from the above error message, the browser does not support writing image information in jpg format to the clipboard.
What about PNG?
If we convert the JPG format of the image to PNG format and try again, for example:
 <button id="button" type="primary">Copy image</button>

<img id="image" src="./mybook.png">
Then you can copy successfully!
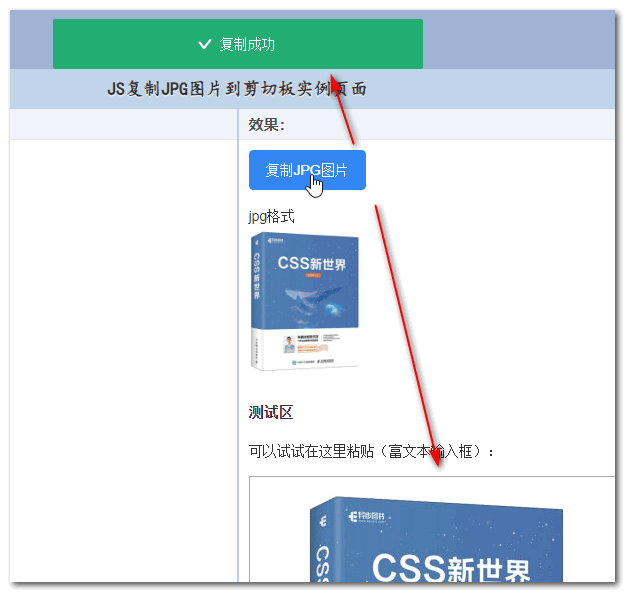
Seeing is believing, you can click here: Copying JPG and PNG images to the clipboard is successful demo
For example, if we click the button on the right side of the demo, the prompt will be that the copy is successful, as shown in the screenshot below.
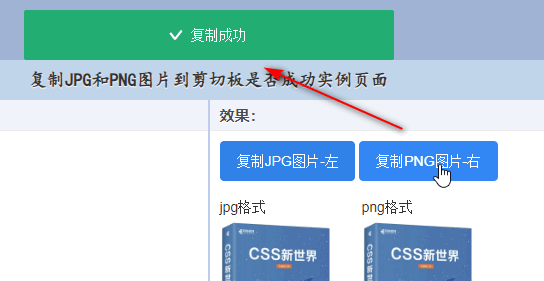
At this point, the PNG image information is already in the clipboard.
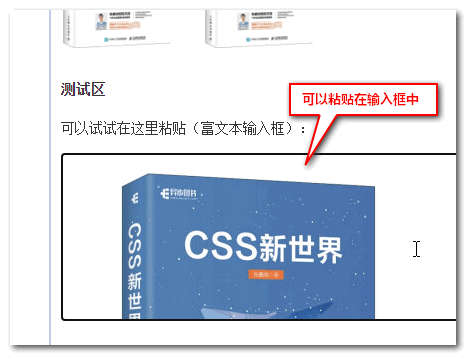
We can find a rich text input box or an online document editor for testing.
For example, in the input box provided on the demo page, if we execute Ctrl+V, you can see that the image appears, as shown in the figure below.
OK, well, here comes the next question. Some pictures on the page are in JPG format. I have to copy them. Is there any way?
3. Solutions to JPG/WebP images
If you want to make images in JPG or webp format also support clipboard copying, it is very simple, just convert them to PNG lossless images.
For example, draw on canvas, and then use the toBlob() method of canvas to rotate it.
Therefore, we can further enhance the copy code provided above.
The complete JS code is shown below.
 const doCopyImg2Clipboard = async (image, success = () => {}, failure = () => {}) => {

    if (!image || !image.src) {

        return;

    }


    // Original image size const { naturalWidth, naturalHeight } = image;


    if (!naturalWidth) {

        failure('The picture has not been loaded successfully');


        return;

    }


    //Draw pictures onto canvas const canvas = document.createElement('canvas');

    canvas.width = naturalWidth;

    canvas.height = naturalHeight;

    // canvas drawing context const context = canvas.getContext('2d');

    // Image drawing context.drawImage(image, 0, 0, naturalWidth, naturalHeight);

    // Convert to Blob data canvas.toBlob(blob => {

        // Use the clipboard API to copy const data = [new ClipboardItem({

            ['image/png']: blob

        })];


        navigator.clipboard.write(data).then(success, failure);

    });

}
At this point, both JPG images and WebP images can be copied to the clipboard.
 doCopyImg2Clipboard(image, function () {

    console.log('Copy successful');

});
There is a demo page to experience, you can click here: JS copy JPG image to clipboard demo
However, although the image is copied, after it is converted into a PNG, the size of the JPG image that was originally suitable will become very large.
The picture is compressed.
So, what should you do if you want to keep the original size of the JPG when copying it?
4. If you want to keep the original image size?
The solution is not to copy the blob binary data, but to copy the base64 string representing the image data.
Then process it again where you upload or paste it.
Convert image to base64 and copy to clipboard
No beeping, just look at the code and use the FileReader object to convert blob data to base64.
 const doCopyImgBase64Clipboard = (image, success = () => {}, failure = () => {}) => {

    if (!image || !image.src) {

        return;

    }


    //The address of the image to be copied const src = image.src;

    // Request this address and return the blob data of the image fetch(src).then(response => response.blob()).then(blob => {

        // Convert blob data to base64

        const reader = new FileReader();

        reader.onload = function() {

            navigator.clipboard.writeText(this.result).then(success, failure);

        };

        reader.readAsDataURL(blob);

    });

}
in:
- image
- Represents the IMG element object in the page.
- success
- callback indicating success
- failure
- callback indicating failure
At this point, you can click the button to copy with one click.
Processing of base64 images
In this scenario, copying is not the most difficult thing, because there are very mature solutions for text copying. For example, I previously made a gitee project of “Minimal Text Content Clipboard Copying” . The advantage is that it comes with successful copying. interactive prompts.
You can also use the industry-famous clipboard.js: https://github.com/zenorocha/clipboard.js
The difficulty lies in the processing of base64 text when pasting, because processing pasted text is not a scenario that is often encountered, and most front-ends lack corresponding processing experience.
Here, two examples are used to demonstrate the processing of preview and upload.
1. Preview
Base64 itself can be used as the URL address of the image, so previewing is relatively simple. Just create an image DOM element and insert it into the page.
So how to get the content pasted in the clipboard? If there is a corresponding API, the code indicates:
 // Paste in the input box input.addEventListener('paste', event => {

    var paste = event.clipboardData?.getData('text') || '';

});
 // Paste document.addEventListener('paste', event => {

    var paste = event.clipboardData?.getData('text') || '';

});
At this time, it is only necessary to determine that paste content matches the base64 image format.
Take pasting a base64 image in the input box as an example. For the complete interactive JavaScript code, see:
 // Paste the monitoring processing of base64 content input.addEventListener('paste', event => {

    var clipboardData = event.clipboardData;


    var paste = clipboardData?.getData('text') || '';


    if (!/^data:image\/[az]+;base64,/.test(paste)) {

        return;

    }


    event.preventDefault();


    // I am the range const selection = document.getSelection();

    // I am a selection const range = selection.getRangeAt(0);

    //Delete the selection content,

    range.deleteContents();

    // And replace it with an image const imgNode = document.createElement('img');

    imgNode.src = paste;

    range.insertNode(imgNode);

    //The cursor is positioned behind the image range.setStartAfter(imgNode);

});
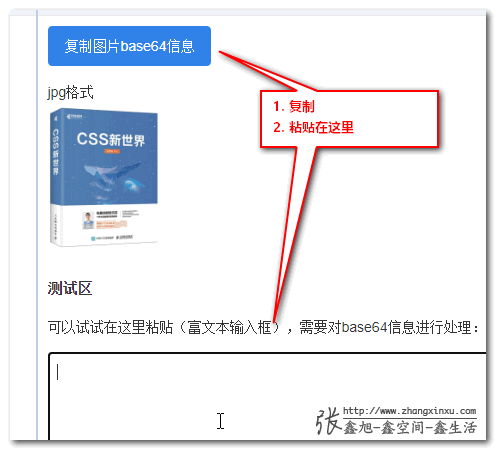
Seeing is believing, you can click here: JS copy image base64 information to clipboard demo
Clicking the button will copy the base64 information of the image. At this time, paste it into the test input box on the page. You will find that the image is not displayed, but the string content. This is because of the above JS parsing code.
2. Upload
There are two solutions for uploading base64 image addresses. One is back-end judgment and processing, that is, if the post is a binary data stream, how to process it, and if the post is a string data stream, how to process it.
Another method is to process it on the front end, convert the base64 string in the clipboard into blob file data and then upload it, so that it is easier on the back end.
The following code shows how to handle it:
 // base64 to blob

const b64toBlob = (b64Data, contentType='', sliceSize=512) => {

  const byteCharacters = atob(b64Data);

  const byteArrays = [];


  for (let offset = 0; offset < byteCharacters.length; offset += sliceSize) {

    const slice = byteCharacters.slice(offset, offset + sliceSize);


    const byteNumbers = new Array(slice.length);

    for (let i = 0; i < slice.length; i++) {

      byteNumbers[i] = slice.charCodeAt(i);

    }


    const byteArray = new Uint8Array(byteNumbers);

    byteArrays.push(byteArray);

  }


  const blob = new Blob(byteArrays, {type: contentType});

  return blob;

}


// Paste base64 upload document.addEventListener('paste', function (event) {

    var clipboardData = event.clipboardData;


    var paste = clipboardData?.getData('text') || '';


    if (!paste.startsWith('data:image')) {

        return;

    }


    // Core data var base64 = paste.split('base64,')[1];

    // Type var type = paste.split(';base64')[0].replace('data:', '');

    // Get blob data var blob = b64toBlob(base64, type);

    //Set a file name, otherwise it is undefined

    blob.name = new Date().toLocaleString().replaceAll('/', '-').replace(/\s/g, '_').replaceAll(':', '') + '.' + (type.split('/')[1] || 'png');


    // The blob at this time is the file data that needs to be uploaded...

});
Therefore, the entire process can be completed.
The front-end compresses the image, JS copies the compressed base64 character information, and then JS parses the base64 and uploads it.
Conclusion
From time to time, find a need for yourself, not just business development. You may encounter scenes that you don’t usually encounter and accumulate different experiences.
If you encounter similar needs next time in business development, you can get started in minutes and be one step ahead in development efficiency.
You can also write an article and complete the KPI that you have set for yourself, which requires the output of one technical article per week on average.
Isn’t it wonderful to get more for one effort?
Oh, that’s all the content of this article.
I hope the content inside can be helpful to everyone’s work and study.
If you think it is good, please forward it and like it.


This article is an original article. You are welcome to share it. Please do not reprint it in full. If you really like it, you can add it to your collection and it will never expire. Knowledge points will be updated and errors corrected in a timely manner to provide a better reading experience.
URL of this article: https://www.zhangxinxu.com/wordpress/?p=11015
(End of this article)
This article is reproduced from: https://www.zhangxinxu.com/wordpress/2023/09/js-copy-image-clipboard/
This site is only for collection, and the copyright belongs to the original author.