Original link: https://editor.leonh.space/2023/passenger/
Passenger is the app server responsible for scheduling web apps behind the web server. For how to understand the relationship between web server, app server, and app, we can take a look at the architecture diagram in the Passenger file below:
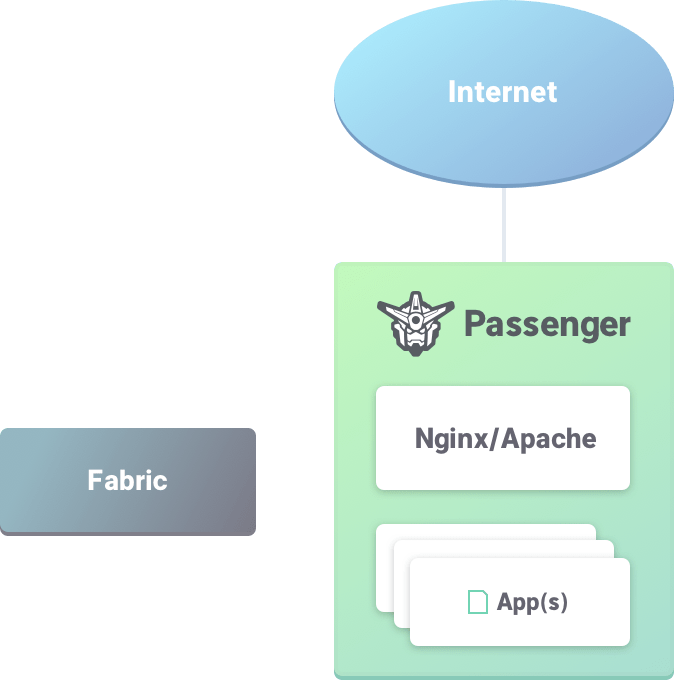
Images courtesy of Phusion Holding BV and other contributors
App Server
Why is the role of app server needed? For a Rails app, only the Puma or Webrick pre-built with Rails will be used as the web server during the development stage, but in the formal environment, there must be a full-time web server at the front to negotiate with the client, that is, everyone Know the role of Caddy or Nginx or Apache, the web server is pretty good at handling the HTTP(S) protocol with the client, the problem is that it doesn’t know how to work with a Rails app, in the PHP world, we have PHP-FPM As a communication bridge between PHP and the web server, under the correct configuration settings, the web server knows which requests can be responded to the client by itself, and which requests must be sent to PHP-FPM for processing and response before forwarding Responding to the client, in a similar situation in the Ruby world, Passanger plays a role similar to PHP-FPM. In addition to serving as a communication bridge between the web server and Rails app, Passanger is also responsible for scheduling the resources of the Rais app and other Peripheral measures such as monitoring, such a role is the app server, in addition to the previous example of PHP-FPM, Tomcat in the Java world is also similar to this role.
Three modes of Passenger
After understanding the role of app server, let’s talk about how Passenger works with Nginx / Apache.
We know that both Nginx and Apache have the concept of modules, and third-party modules can be attached to expand functions. Passenger is attached to the web server in the form of modules, as shown in the following figure:
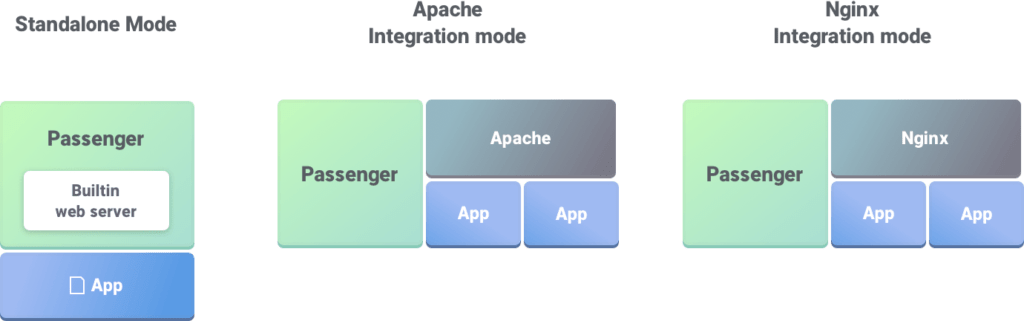
Images courtesy of Phusion Holding BV and other contributors
In addition to the Nginx/Apache integration mode, another standalone mode is quite special. It also works with Nginx. The difference is that Passenger is used as the main configuration setting object. The situation is relatively simple. The following chapters will also use the standalone mode As an example, after going through the standalone mode, go to the more complex integration mode.
Passenger and Web Framework
As mentioned above, Passenger operates as a web server module, so how does Passenger act as a Rails app server? In the world of Ruby, there is a standard interface Rack for communicating with the web server. As long as the app server and web framework follow the standard interface of Rack to implement, then both parties can communicate through this interface. For example, Rails is a Rack interface with implementation Of course, Passenger is also an app server that implements the Rack interface.
Although Passenger and Rails have been talked about before, Passenger can not only be used as an app server for Ruby, because its main program is developed in C++, but it only implements the Rack interface at the beginning, so there is an impression that Passenger is only used for Ruby , in fact, the current Passenger also implements the Python WSGI standard, which means that Passenger can also be used as the app server of the Python web framework. Not only that, Passenger 6 adds the feature of General Language Support , using a method similar to reverse proxy, which is claimed to be able to All languages are supported (crazy), but how well it works in practice has yet to be verified.
Installation of Passenger Standalone
The installation method of Passenger can be roughly divided into two ways:
- OS package (DEB or RPM)
- Ruby suite (gem)
Which way to go depends on whether the following app is Ruby. If it is a Ruby app, most of them will be installed and configured by gem. This article does not intend to use Ruby app as an example, so it will be installed by OS suite. However, as mentioned above, the core program of Passenger is developed in C++, but some peripheral tools must still rely on Ruby, so Ruby must be installed in the operating system first. Here we take an Ubuntu 18.04 LTS that has already installed Ruby as an example. Note that there may also be Passenger in the pre-installed package library of Ubuntu, but the version is too old, we will not use it, and use the package library maintained by Passenger itself . Follow Passenger’s documentation, first install the key of Passenger’s APT package repository:
$ sudo apt install dirmngr gnupg $ sudo apt-key adv --keyserver hkp://keyserver.ubuntu.com:80 --recv-keys 561F9B9CAC40B2F7 $ sudo apt install apt-transport-https ca-certificates
Add Passenger’s APT library:
$ sudo sh -c ' echo deb https://oss-binaries.phusionpassenger.com/apt/passenger bionic main > /etc/apt/sources.list.d/passenger.list '
Update the APT package repository index and install Passenger:
$ sudo apt update $ sudo apt install passenger
Finally, run Passenger’s checker:
$ passenger-config validate-install
It’s that simple.
For operating systems other than Windows, you can refer to Passenger’s documentation to follow up and learn by yourself. Windows is not natively supported by Passenger, so you can only understand it, or try to use WSL as a learning and testing environment, it’s as simple as that. (?!)
Using Passenger Standalone
The use will be divided into two parts, one is the collocation configuration setting between Passenger and web app; the other is the command line operation of Passenger itself.
We have been talking about Ruby before, and here we are going to take Passenger + Masonite as an example. Masonite is a low-performance Python WSGI web framework . Through the previous introduction, we can understand that Passenger and Masonite can be implemented according to the WSGI standard interface of both parties. communicate.
In a typical Masonite app, you should see the following directory structure:
. ├── ./app ├── ./bootstrap ├── ./config ├── ./craft ├── ./databases ├── ./LICENSE ├── ./__pycache__ ├── ./README.md ├── ./requirements.txt ├── ./resources ├── ./routes ├── ./storage ├── ./tests └── ./wsgi.py
Look at the bottom line, the wsgi.py in the project root directory is the WSGI implementation interface of Masonite, take a look at the content:
 """First Entry For The WSGI Server."""
from masonite.app import App
from bootstrap.start import app from config import application, providers
"""Instantiate Container And Perform Important Bindings Some Service providers need important bindings like the WSGI application and the application configuration file before they boot. """
container = App ()
container. bind (' WSGI ', app) container. bind (' Application ', application) container. bind (' Container ', container)
container. bind (' ProvidersConfig ', providers) container. bind (' Providers ', []) container. bind (' WSGIProviders ', [])
"""Bind all service providers Let's register everything into the Service Container. Once everything is in the container we can run through all the boot methods. For reasons some providers don't need to execute with every request and should only run once when the server is started. Providers will be ran once if the wsgi attribute on a provider is False. """
for provider in container. make (' ProvidersConfig ').PROVIDERS: located_provider = provider () located_provider. load_app (container). register ()    if located_provider.wsgi: container. make (' WSGIProviders '). append (located_provider)    else : container. make (' Providers '). append (located_provider)
for provider in container. make (' Providers '): container. resolve (provider.boot)
"""Get the application from the container Some providers may change the WSGI Server like wrapping the WSGI server in a Whitenoise container for an example. Let's get a WSGI instance from the container and pass it to the application variable. This will allow WSGI servers to pick it up from the command line """
application = container. make (' WSGI ')
After deducting the annotations, there are actually not many lines, just jump directly to the last line application = container.make('WSGI') , which defines an application . According to the design of WSGI, the WSGI server (Passenger) will send the client request to application , application is responsible for accepting requests and responding with HTTP status and content.
According to the above description, we have to let Passenger know how to call application . According to Passenger’s design, Passenger will execute the passenger_wsgi.py file when it starts, so we manually add passenger_wsgi.py in the root directory of the Masonite project and write the following content:
from wsgi import application
Let Passenger know to call the application from wsgi.py.
Run Passenger:
$ passenger start
The output is as follows:
 =============== Phusion Passenger Standalone web server started =============== PID file: /home/leon/Git/MasoniteDemo1/passenger.3000.pid Log file: /home/leon/Git/MasoniteDemo1/passenger.3000.log Environment: development Accessible via: http://0.0.0.0:3000/
You can stop Phusion Passenger Standalone by pressing Ctrl-C. Problems? Check https://www.phusionpassenger.com/library/admin/standalone/troubleshooting/ ===============================================================================
From the message given by Passenger, we can know that the port number is 3000, open a browser to verify:
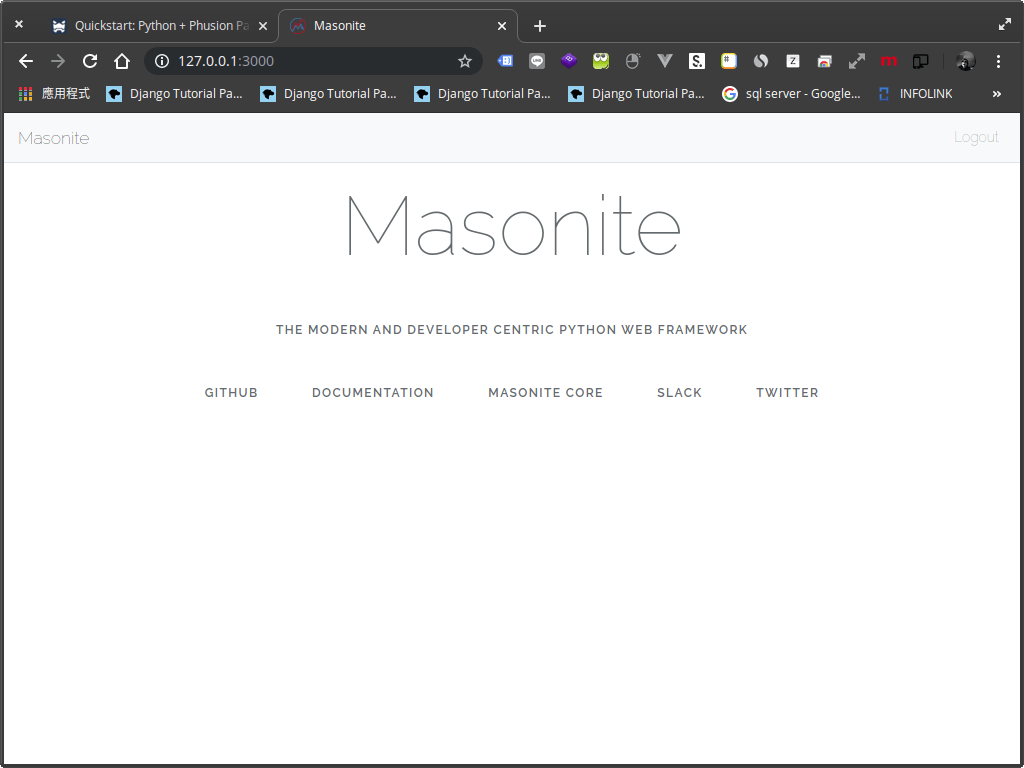
Hey! I saw it successfully Laravel Masonite’s splash screen.
Press CTRL-C to stop Passenger, or open another terminal and execute passenger stop to stop Passenger.
Passengerfile.json
Passenger has many settings. In addition to the parameter setting of passenger command, the more formal way should be to set it through the Passengerfile.json configuration file. When the passenger starts, it will read the Passengerfile.json settings by itself. There are as many setting items as there are stars, please refer to the documentation of Passenger .
in conclusion
This article introduces the role and architecture of the app server, as well as the integration between Passenger and Masonite, but in fact, the above introductions are only applicable to the development environment, and there are still many topics to be completed in the formal environment, including the virtual environment setting of Python The integration with Passenger, the security and performance settings of Passenger, and the integration of Passenger and web server are not covered. I will have the opportunity to share our experience one by one in the future.
This article is transferred from: https://editor.leonh.space/2023/passenger/
This site is only for collection, and the copyright belongs to the original author.