Original link: https://huhuhang.com/post/apps/macos-cli

This article is inspired by Advanced macOS Command-Line Tools , the author screens some of the more commonly used commands, and provides usage scenarios and cases.
Everyone has their own reasons for buying a Mac, and I like the Mac because it offers a minimalist form factor, easy-to-use macOS system, exclusive macOS applications, and a Unix-based terminal. And today, what I want to introduce is some useful built-in command line tools in the macOS terminal.
You may have seen the appearance of the terminal in film and television works. The hackers in the movie always input some incomprehensible commands under a black background, and then they can realize various advanced operations. It often looks “cool”, but this way of operating has existed in the early stages of computer development. At that time, computers did not have a graphical user interface (GUI), and users could only interact with computers by entering commands.

Today, with the development of computers, GUIs have become mainstream, but the terminal is still a very useful tool. It allows users to control and configure the system in a more advanced and fast way, and execute various commands and scripts provided by the operating system to achieve specific functions and tasks. For example: create, copy, move, delete files and directories, view and modify file permissions, manage network connections, system services and processes, etc.
The Terminal App is provided by default in macOS, and you can find it from the Launchpad launch pad. Apple also thoughtfully provided a terminal user manual , from which you can learn some terminal usage and configuration methods.
Next, I will share some useful macOS built-in command line tools that can be used through the terminal to enhance your Mac experience.
Useful macOS built-in commands
Prevent system hibernation: caffeinate
There are a few apps on the Mac that keep the system awake, which can be useful for long-running tasks like file downloads, data syncs, and more.
Some of these applications even charge a fee. In fact, you don’t need to at all, because macOS itself provides a caffeinate command, which can keep your Mac awake.
When using the caffeinate command, you can pass -s parameter to keep the system awake, and the -u parameter to only prevent the system from going to sleep without locking the screen. You can also specify the time to stay awake with -t <seconds> parameter. For example:

caffeinate -s
After executing the above command in Terminal, your Mac will stay awake until you press Control + C to terminate the caffeinate command.
If you want your Mac to stay awake for 1 hour, then you can execute the following command:
caffeinate -t 3600
The above 3600 represents 3600 seconds, which is 1 hour.
You can also view the help documentation for the caffeinate command through man caffeinate command. The other commands introduced next can also use man command to view the help documents, so I won’t repeat them later.
Copy file content: pbcopy
What would you do if you wanted to copy the entire contents of a text file?
I think most people will open this text file, then press Command + A to select all the text, then press Command + C to copy the text, and finally close the text file.
Although this method can achieve the goal, it is more cumbersome. Actually you can use pbcopy command to achieve the same effect.
The pbcopy command is used to transfer text content between the clipboard and the terminal. It can copy the text output by the terminal to the clipboard, and the pbpaste command can paste the contents of the clipboard to the terminal.
For example, we have a text file hello.txt , which is located in the current user’s home directory, you can use the following command to copy its entire content:
cat ~/hello.txt | pbcopy
In the above command, cat command is used to output the entire content of the file, and the | symbol is used to use the output of cat command as the input of the pbcopy command. This will copy the entire contents of the hello.txt file to the clipboard.
Then, you can paste it anywhere.
Network quality monitoring: networkQuality
Usually if you need to test the quality and latency of the network, you may use some third-party tools, such as Speedtest .
But in fact, we have an easier way to test the network quality, that is to use the networkQuality command.
You can execute this command directly in the terminal:
networkQuality
After execution, the command will output the quality and delay information of the current network, as follows:
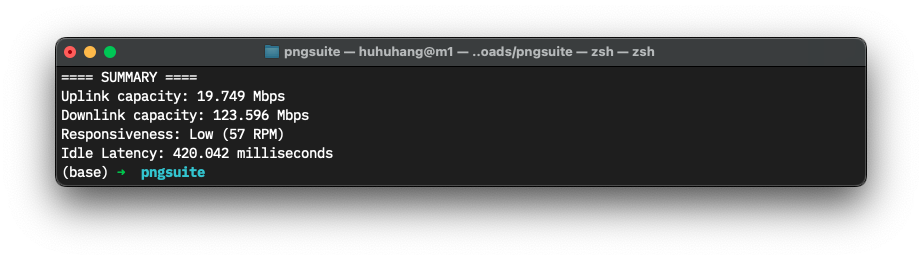
In the above output, Uplink capacity and Downlink capacity represent uplink and downlink bandwidth respectively, Responsiveness represents the response speed of the network, and Idle Latency represents the delay of the network.
The tool will use Apple’s CDN server to test network quality, and you can learn more about it through Apple’s official documentation .
Image processing tool: sips
sips is a very powerful image processing tool, which can be used to adjust image size, resolution, convert image format, add metadata, etc.
For example, we have an image image.png , which is located in the current user’s home directory, you can use the following command to convert it to JPEG format:
sips -s format jpeg ~/image.png --out ~/image.jpg
In the above command, -s format jpeg is used to specify the format of the output image, --out ~/image.jpg is used to specify the output file path.
sips provides a series of useful parameters, such as -s formatOptions parameter can be used to specify format options, such as JPEG compression quality. Example:
sips -s format jpeg -s formatOptions 80 ~/image.png --out ~/image.jpg
In the above command, -s formatOptions 80 is used to specify the compression quality of JPEG as 80.
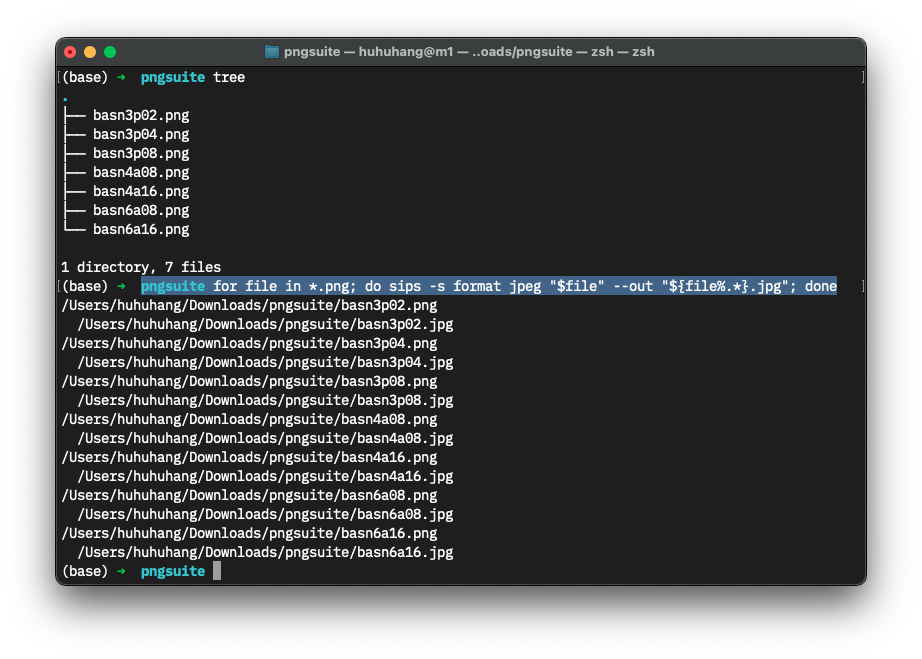
If you want to batch convert all images in a certain directory (for example ~/images ), then you can use the following command:
 cd ~/images
for file in *.png ; do sips -s format jpeg " $file " --out " ${ file %.* } .jpg" ; done
In the above command, for loop is used to traverse all the PNG images in the directory, "${file%.*}.jpg" is used to replace the extension of the PNG image with JPG.
Since sips supports too many custom parameters, it is even more powerful than many third-party image format conversion tools, so I won’t introduce them one by one here. At the end of the article, I will share how Xiaobai can use unfamiliar command line tools more efficiently.
File conversion tool: textutil
Similar to sips, textutil is a very powerful file conversion tool that can be used to convert text files, HTML files, RTF files, Microsoft files, iWork files, etc.
For example, we have an RTF file hello.rtf , which is located in the current user’s home directory, you can use the following command to convert it to a plain text file:
textutil -convert txt ~/hello.rtf
In the above command, -convert txt is used to specify that the format of the output file is plain text.
textutil provides a series of practical parameters, such as -encoding parameter can be used to specify the encoding format of the output file. Example:
textutil -convert txt -encoding UTF-8 ~/hello.rtf
In the above command, -encoding UTF-8 is used to specify that the encoding format of the output file is UTF-8.
Similarly, you can combine shell scripts to batch convert all RTF files under a certain directory (such as ~/documents ), for example:
 cd ~/documents
for file in *.rtf ; do textutil -convert txt -encoding UTF-8 " $file " ; done
Open from the terminal: open
If you want to open a file or directory in the terminal, you can use the open command. This is a very useful command for those who are used to operating in the terminal.
For example, we have a text file hello.txt , which is located in the home directory of the current user, you can use the following command to open it in the terminal:
open ~/hello.txt
In the above commands, the open command is used to open a file, directory or URL on macOS. It will automatically select the appropriate application to open based on the file type.
If you want to open the current directory in the terminal, then you can use the following command:
open.
In the above command, . represents the current directory. You will find that the Finder will be opened automatically after execution.
You can even open web pages with open , for example:
open https://sspai.com
Quick file search: mdfind
If you need to search on Mac, you will most likely use Spotlight or the search box in the upper right corner of Finder. However, you may not know that there is also a very powerful search tool in the terminal, it is mdfind .
For example, if we want to search for all PNG images in the current user’s home directory, then you can use the following command:
mdfind -name "*.png"
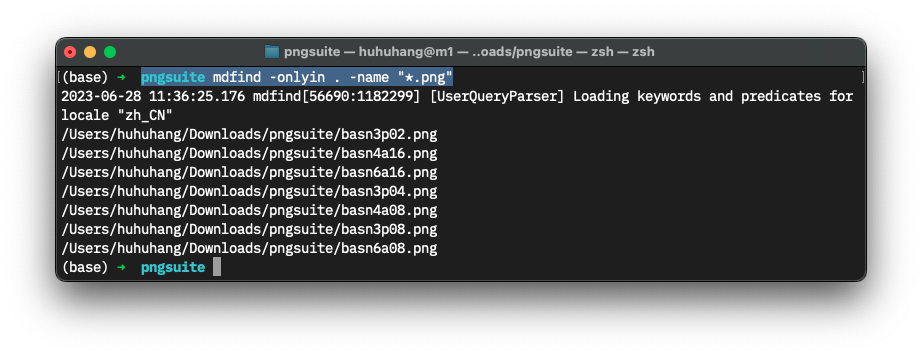
Path searches can be specified, for example:
mdfind -only in ~/documents -name "*.png"
You can even search file contents, for example:
mdfind -only in ~/documents -name "*.txt" -literal "hello"
In the above command, -literal "hello" is used to specify the search content as hello .
We can also specify type searches, for example:
mdfind kind:image -name "hello"
In the above command, kind:image is used to specify the search type as image. That is, among all pictures, the file name contains hello .
Because mdfind supports wildcards, it is more powerful in operation flexibility than the search tool in the graphical interface. In addition, its search speed is also very fast, which is a very practical command for users with a large number of files.
Screenshot: screencapture
You may use shortcut keys or third-party apps to take screenshots, but you may not know that there is also a very powerful screenshot tool in the terminal, which is screencapture .
For example, we want to capture the entire screen, then you can use the following command:
 screencapture screenshot.jpg
open screenshot.jpg
In the above command, screencapture command is used to capture a screenshot on macOS and save it as a file. The open command is used to open a file in the terminal.
If you want to take a screenshot of a window, you can use the following command:
 screencapture -i screenshot.png
open screenshot.png
You may ask, this seems more convenient than not having a shortcut key. Of course, for daily use, the way of shortcut keys is more convenient. However, if you need more control options, or for script automation, screencapture becomes very useful.
When we introduce command-line tools, we do not mean to abandon the graphical interface, but hope that you can understand that there are many practical tools in the terminal, which can help you complete your work better.
Update software and system: softwareupdate
There are also some command-line tools for system configuration and administration on the Mac, such as softwareupdate . It can be used to update software and systems.
For example, we want to list the available updates, then you can use the following command:
softwareupdate -l
To perform an update, you can use the following command:
softwareupdate -i -a
What should I do if there are too many parameters to understand?
In this article, we just introduced some commonly used, or my own commonly used command line tools. In fact, there are many command-line tools in macOS, you can check it out through this list .
Many people should ask, with so many command line tools and so many parameters, how can I remember them? Especially for many users who do not know Linux commands, or have no programming experience, these command line tools can be daunting.
Faced with such a problem, I suggest that you can solve it in the following ways:
- Read the help documentation for command-line tools, such as
mancommand. You don’t need to fully understand this process, just have a general understanding of what this tool can do. - Solve real needs with ChatGPT.

Due to the emergence of ChatGPT, we can solve actual needs through dialogue. For example, you can describe your needs clearly, and then let ChatGPT help you complete the operation.
In the process of describing the requirements, it is necessary to pay attention to:
- Be as detailed as possible, such as which path you want to operate under, how to operate, etc.;
- Give some examples, such as what it was like before the operation, and what kind of effect you want after the operation, so that ChatGPT can better understand your needs.
summary
The command-line tools built into macOS provide rich functionality and flexibility, enabling users to manage and operate the system more efficiently. These tools are used in a wide variety of scenarios, ranging from routine tasks to system maintenance.
Each command-line tool has its unique role and usage scenarios, and we can choose the appropriate tool according to our needs. At the same time, these tools provide a wealth of parameter options, users can customize and adjust according to specific needs. For users and developers with a certain technical foundation, these command-line tools are powerful tools for improving efficiency and solving problems.
This article introduces only a small part of macOS built-in command line tools, there are many other useful tools waiting for you to discover and explore. I hope this article has provided you with some useful information and inspiration to help you get the most out of your Mac.
This article is transferred from: https://huhuhang.com/post/apps/macos-cli
This site is only for collection, and the copyright belongs to the original author.