Original link: https://mianao.info/2022/08/25/363507
Introducing Home Assistant
Official website: https://www.home-assistant.io/
Home Assistant was born in 2013. It is an open source smart home system developed based on Python. Its main function is to connect different brands of smart home devices for interconnection.
This open source project has been in development for almost ten years, and other similar projects in the same period have been blown away. At present, Home Assistant is updated very frequently, and several versions are released every month.
Before, I only had a few WiFi sockets, and the manufacturers were different. It was not necessary to use HA. Now I want to change all the light switches in my house to ZigBee, and some sockets to ZigBee to control.
So I bought the SOFFON ZigBee USB Dongle Plus (93 yuan) as the coordinator, the Jingyuzu four-piece set (99 yuan), and the Tuya ZigBee zero-fire switch (60 yuan) for testing.
Simply put ZigBee, there are three devices in the network, a coordinator, multiple routers, and multiple terminals. For example, in my test equipment, the USB dongle is the coordinator, the socket, and the switch, which is always powered on. The device is a router , other battery devices are terminals. Now the protocol that supports ZigBee version 3.0 can be interoperable with products from different manufacturers, so I can continue to buy ZigBee products from different manufacturers in the future.
Why not use WiFi? Mainly because more WiFi devices have higher requirements for routers, and some places in the home may be dead ends of WiFi, while ZigBee is an ad hoc network, and there are routes in the network. It is basically impossible to connect to the Internet at home. equipment, and there is no hindrance to the wireless router without upgrading. The most important thing is that ZigBee devices do not rely on the cloud, and WiFi products need localkey when they join HA. Now it is getting more and more difficult to obtain. My Tuya WiFi socket needs to apply for a key on the manufacturer’s developer website. Currently, it can be extended for half a year. I don’t know if it can be used after half a year. It is not necessary to pay monthly.
So for friends who plan to build a smart home network, I recommend using ZigBee.
I’ve been testing it for about two months after installation on an x86 device, and I’ve got some understanding. The following content is based on the above hardware. I added my own understanding after searching during the test process. If there is any error, please leave a message to point out.
Home Assistant installation
Only two installation methods are recommended: docker and independent hardware OS.
The last blog mentioned that I picked up a tasteless x86 device, so I installed HAOS directly. It’s very simple, I’ll write roughly:
- download OS;
Go here to find the latest version for your hardware: https://github.com/home-assistant/operating-system/releases/ - Write system files to the boot disk, Balena Etcher is recommended;
If you plan to use the U disk to start, write to the U disk;
If there is built-in storage, start it with WePE first and then write it; - Connect the device to the network cable and start it up;
- Find a computer in the local area network, open the browser and enter:
homeassistant.local:8123orIP:8123; - You can see the fresh HAOS, log in;
Whether it is official or online, there are a lot of installation tutorials: https://www.home-assistant.io/installation/ , I won’t go into details.
Glossary
It is very simple to install the system, but it is still very troublesome to use. First of all, you must understand some terms in the system and various tutorials. Although I have not listed many, it should be enough to get started:
Core (core), Container (container), Supervised (supervision), OS (operating system)
These four words should be the first to come across. I think it doesn’t matter if I understand them or not. Anyway, they are all related to system installation.
Choose the container method, you can install Docker on systems such as NAS or openwrt.
Choose a new independent hardware device, then directly download the HAOS img file and write it to the hard disk to start it. This is the easiest and recommended.
Integrations <br />There is also a word called Component components. Integration and components are actually the same thing and should be called in different periods. There are more than 1,000 official integrations, and these integrations are used to support devices from different smart home manufacturers to achieve various functions;
Custom Component custom components, developed by some masters themselves, are used to implement functions or devices that are not officially supported;
These integrations are based on Python development, Core, integration, and configuration files form a complete HAOS;
Device device
Device refers to the physical device of the Internet of Things in our smart home;
Entity
Entity, this is hard to understand. I don’t think an entity should be a device? Actually not, a device can have multiple entities, such as a switch, off is an entity, on is an entity, and power has another entity. Also, the integration of only software functions can also be an entity. So I think an entity should refer to the smallest unit of a system that implements a function.
Each entity has a Unique ID, which cannot be changed by the user, otherwise data inconsistency will result.
Area
Area, refers to the bedroom, kitchen, living room and so on.
Scene scene
Scene, easy to understand, is the scene used. Many smart homes have this, such as home theater scenes. When executed, the curtains will be automatically drawn, the ceiling lights will be turned off, the projection and speakers will be turned on.
Scripts
Scripts, my understanding is to create an entity by itself, this entity can be associated with several devices, perform different operations, and can add delay waiting or conditional judgment. This entity can be added to automation.
Automations
Automations is an if statement that executes actions after setting various conditions. This is still different from the script.
The automation of HA is quite powerful, and it should be said that it is the soul of smart home.
blueprint
blueprint, reusable automation, can be shared and used directly from the community, it is also said to be a tasteless feature.
Add-on <br /> is also called a plug-in, which is different from the English name Plus-in, but for users, isn’t it just a plug-in? There is also a plugin store.
In fact, why it is officially called an add-in, I think it may be because the operating mechanism is different. Add-ons are run as Docker containers to achieve various functions.
Lovelace
The front-end interface can be understood as a theme.
Mosquitto broker
An add-in, an open source broker tool that implements the MQTT protocol. It is mainly used with Zigbee2MQTT.
Samba share
Add-in, share the Home Assistant configuration file in the LAN through SMB, and create or modify the config file directly in the system.
Terminal & SSh
Add-in, the main function is the web interface terminal.
Zigbee2MQTT
Add-in, referred to as Z2M. It is a bridge tool that converts ZigBee protocol into MQTT, and hardware devices can be used as gateways to control all ZigBee smart home products.
Recommended equipment:
Some USB dongles based on TI CC2652 chip, I bought SONOFF ZigBee 3.0 Dongle Plus;
There are also some other similar USB Coordinators on Xianyu;
If you have strong hands-on ability, you can directly buy ebyte’s CC2652 module and weld on your own drawing board. There are public tutorials on the Internet;
Official list of supported devices: https://www.zigbee2mqtt.io/guide/adapters/#recommended
ZHA
Namely Zigbee Home Automation. ZHA is the Zigbee integration that comes with Home Assistant. Like Zigbee2MQTT, ZHA uses the Zigbee device as a gateway to control all ZigBee smart home devices.
Compared with Zigbee2MQTT, ZHA is a self-contained component. You don’t need to install any software. When you plug in the hardware, the hardware option will pop up and you can eat it; however, ZHA does not support ZigBee devices as rich as Z2M.
Recommended equipment:
The same is some USB dongles based on TI CC2652 chip;
Official supported device list: https://www.home-assistant.io/integrations/zha/
ESPHome
The WiFi module of the ESP8266/ESP32 is connected to the HA to control the device.
Node-RED
Node-RED is a programming tool for connecting hardware devices, APIs, and online services together in new and interesting ways. It is also a tool for executing automation in essence, but it is said that it is difficult to get started, so I will not participate.
HomeBridge
HA and HB are two completely independent systems, each of which can operate independently. The main purpose of HB is to build a bridge by simulating the iOS HomeKit API, so that smart devices that do not support HomkeKit can access HomeKit. After the bridge is completed, we can manage it through the iOS home, or access the HA automation management.
The HomeKit integration can now be installed directly, I don’t have an iPhone or related home equipment, so I can’t test it.
HACS (Home Assistant Community Store)
An unofficial custom component store with themed interfaces and device-enabled components.
Installation requires high network requirements. As long as you can traverse the Internet, you can follow the official steps.
hacs.xyz/docs/configuration/basic
Some reference sites:
How to play smart home 1: https://deepzz.com/post/homeassistant-concept.html
How to play smart home 2: https://deepzz.com/post/homeassistant-introduce.html
Hassbian Forum: https://bbs.hassbian.com/
Home Assistant common add-on installation
Recommended add-ons to install:
Samba share
Terminal & SSh
Mosquitto broker
Zigbee2MQTT
Needless to say the first two, just click install in the add-on store and you’re done.
After Samba share is installed, you can SMB access HA files, such as the config folder, which is used to store all configuration files:
├── automations.yaml # 自动化├── blueprints # 蓝图│ └── automation │ └── homeassistant │ ├── motion_light.yaml │ └── notify_leaving_zone.yaml ├── configuration.yaml # 主配置文件├── deps # 相关依赖├── groups.yaml # 分组├── home-assistant_v2.db # sqlite3数据库├── scenes.yaml # 场景├── scripts.yaml # 脚本├── secrets.yaml # 密钥└── tts # 文字转语音记录
Focus on the last two.
Mosquitto broker installation:
- Configuration -> Add-ons, click to enter;
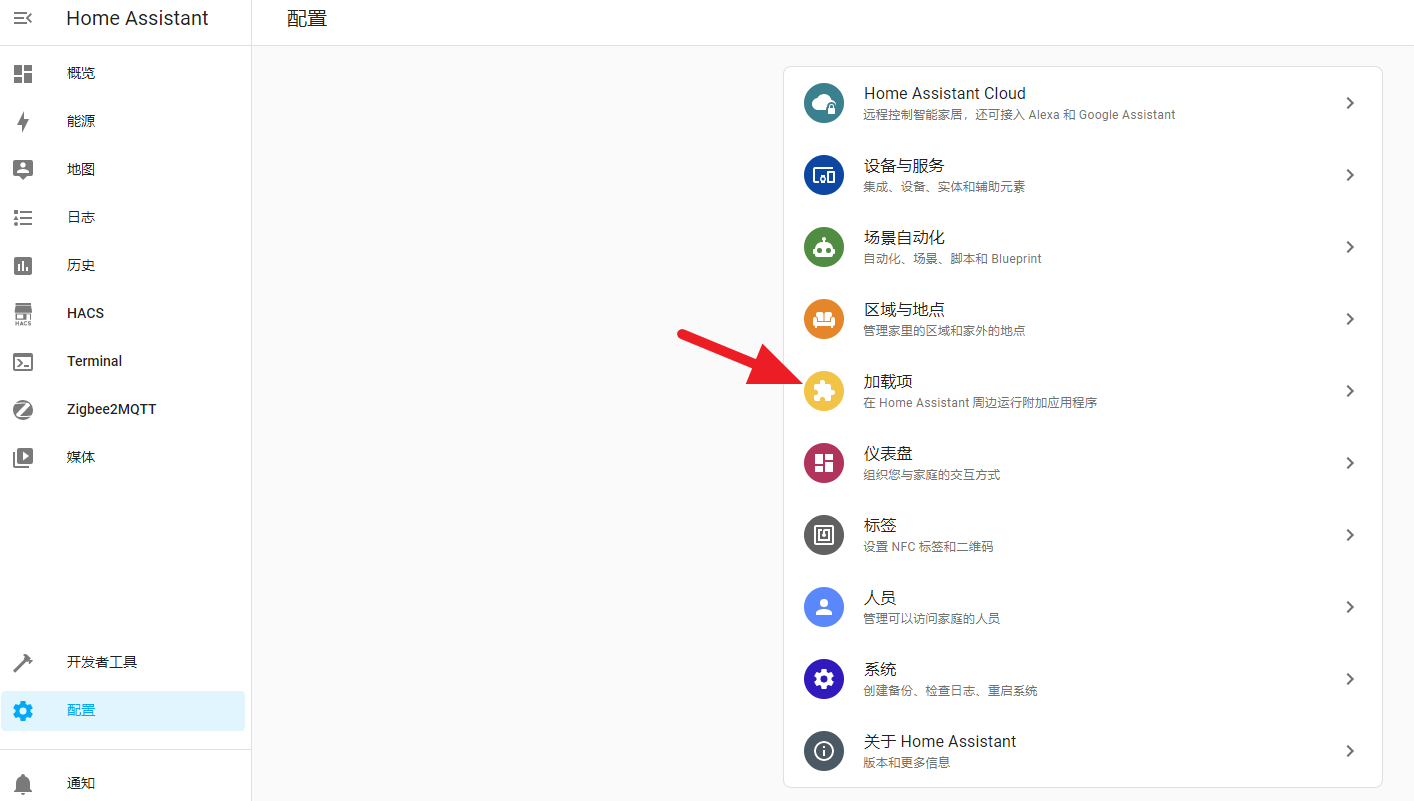
- load store;
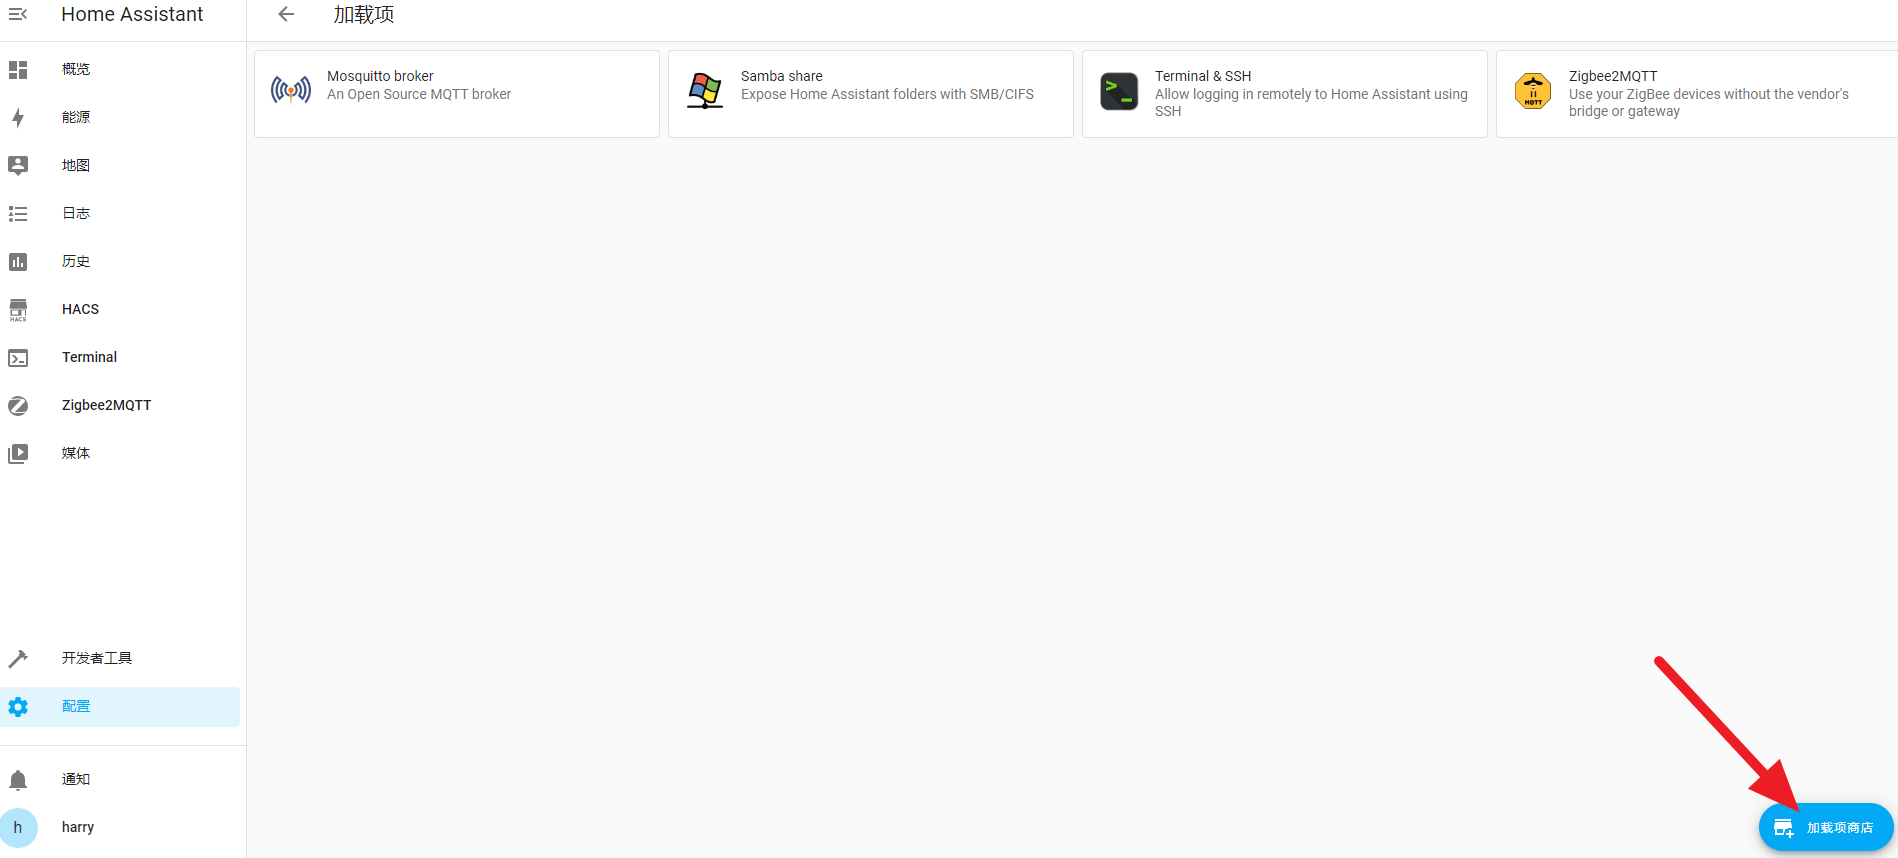
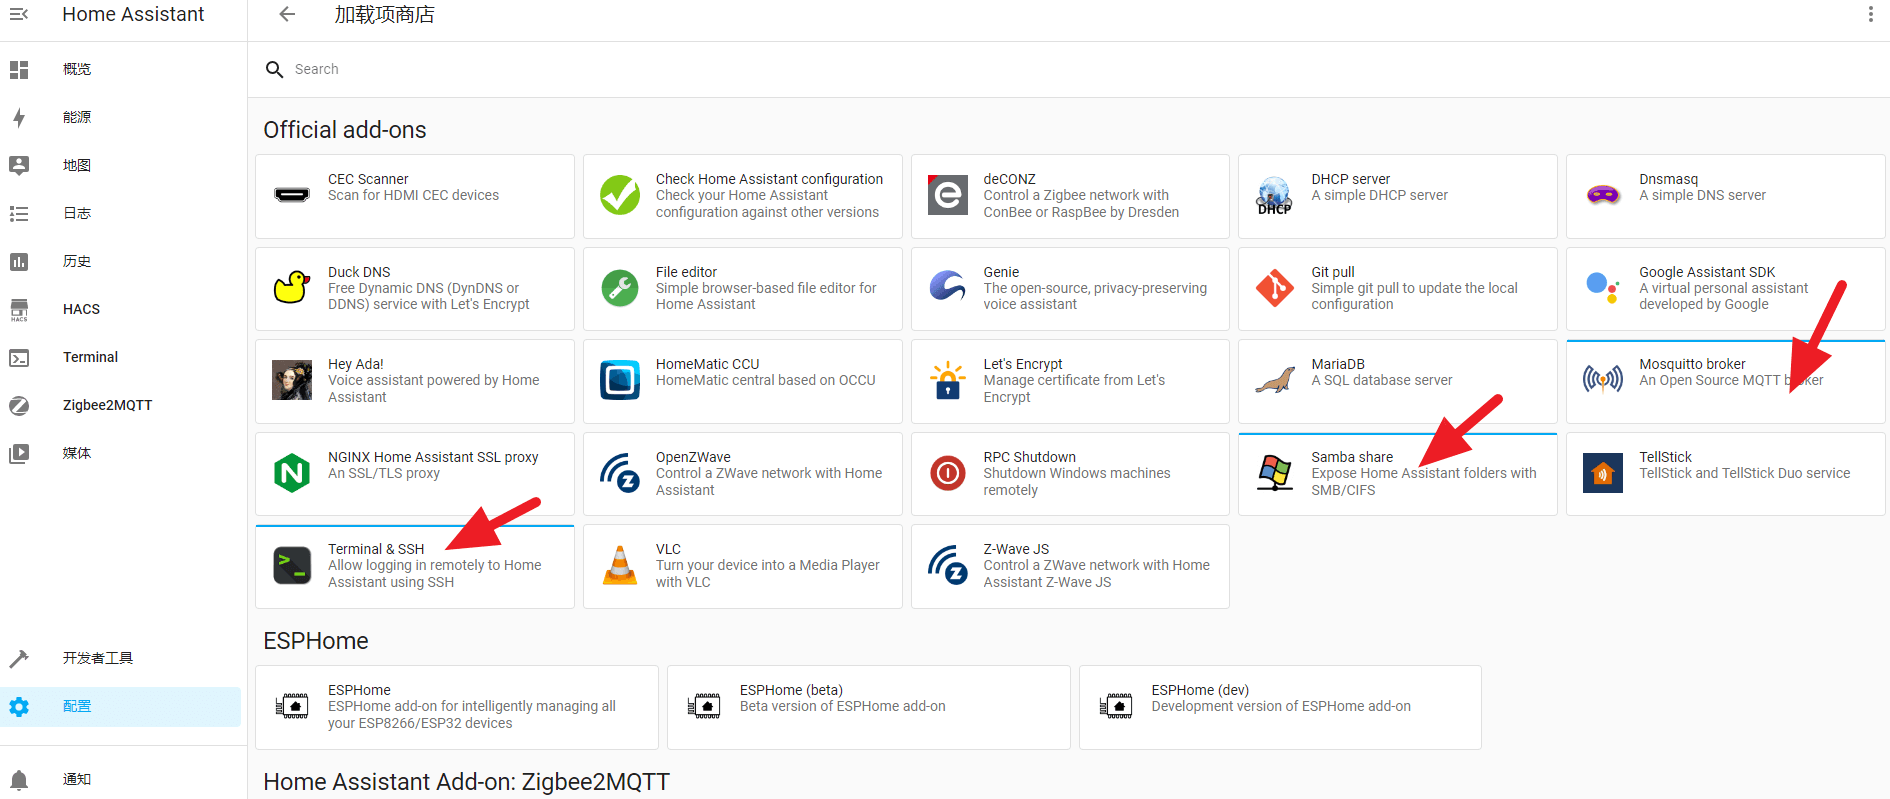
- Find Mosquitto broker and click to install;
- Information: Self-start, guardian, and automatic update are all selected;
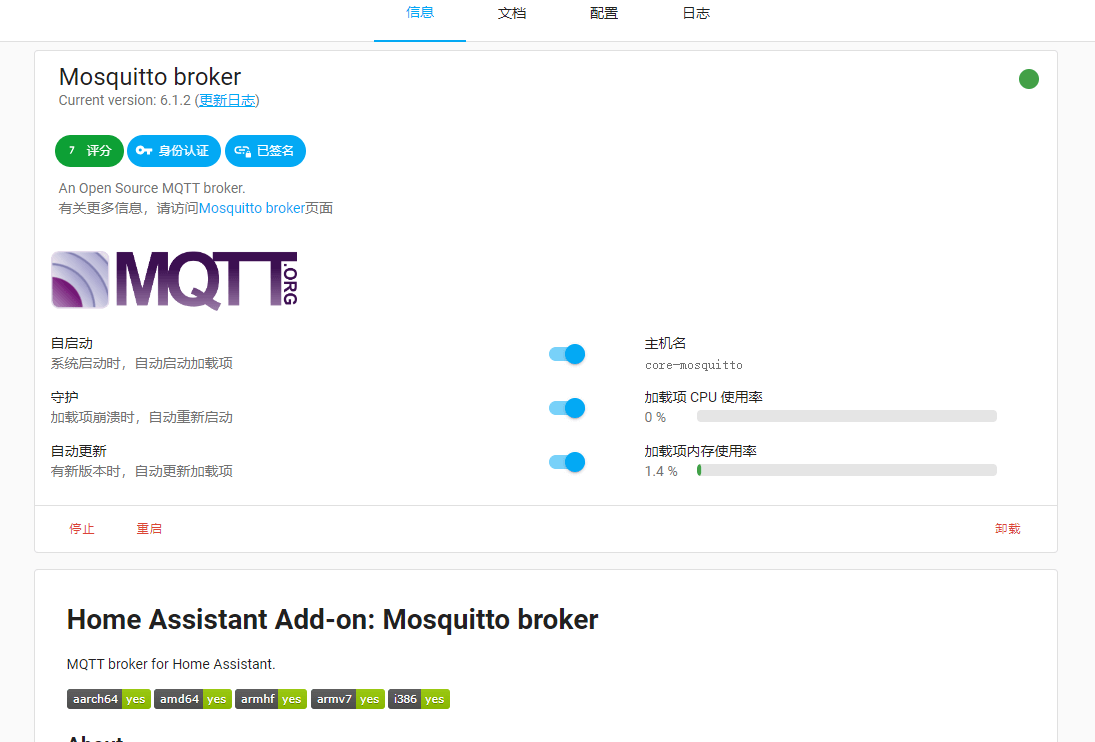
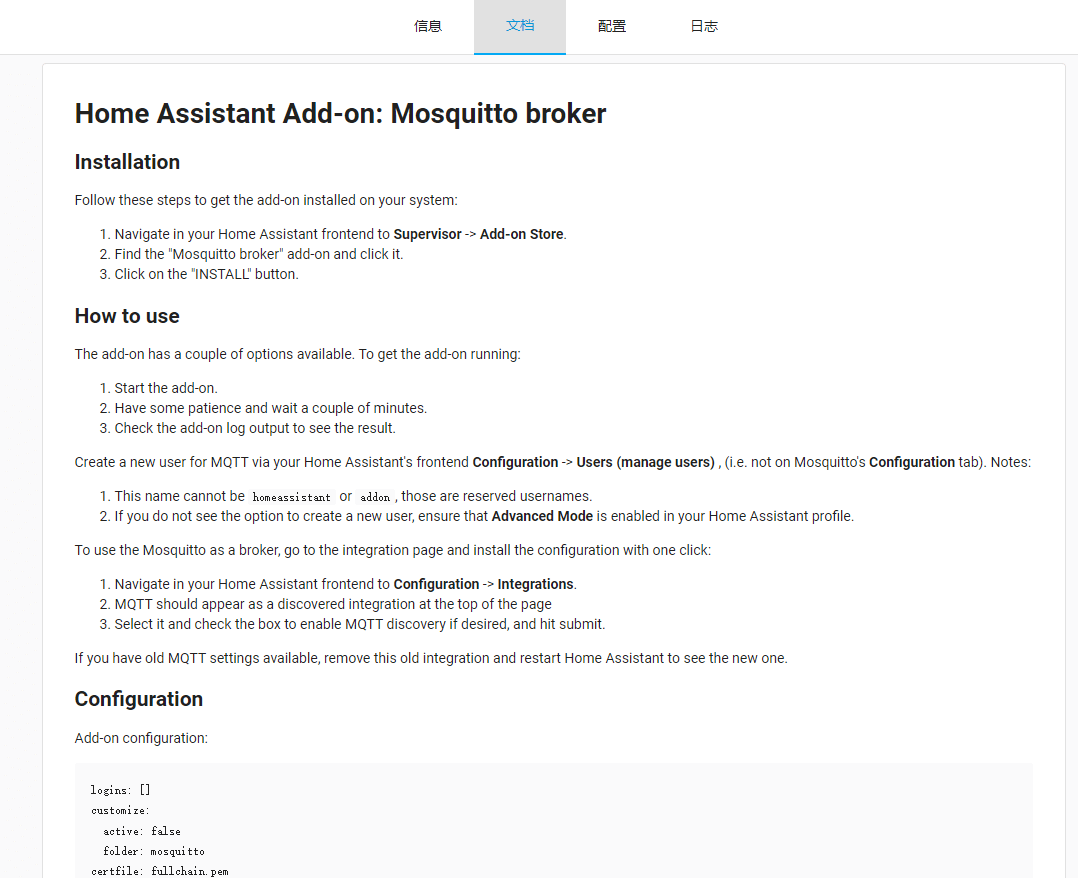
- installation and setup instructions;
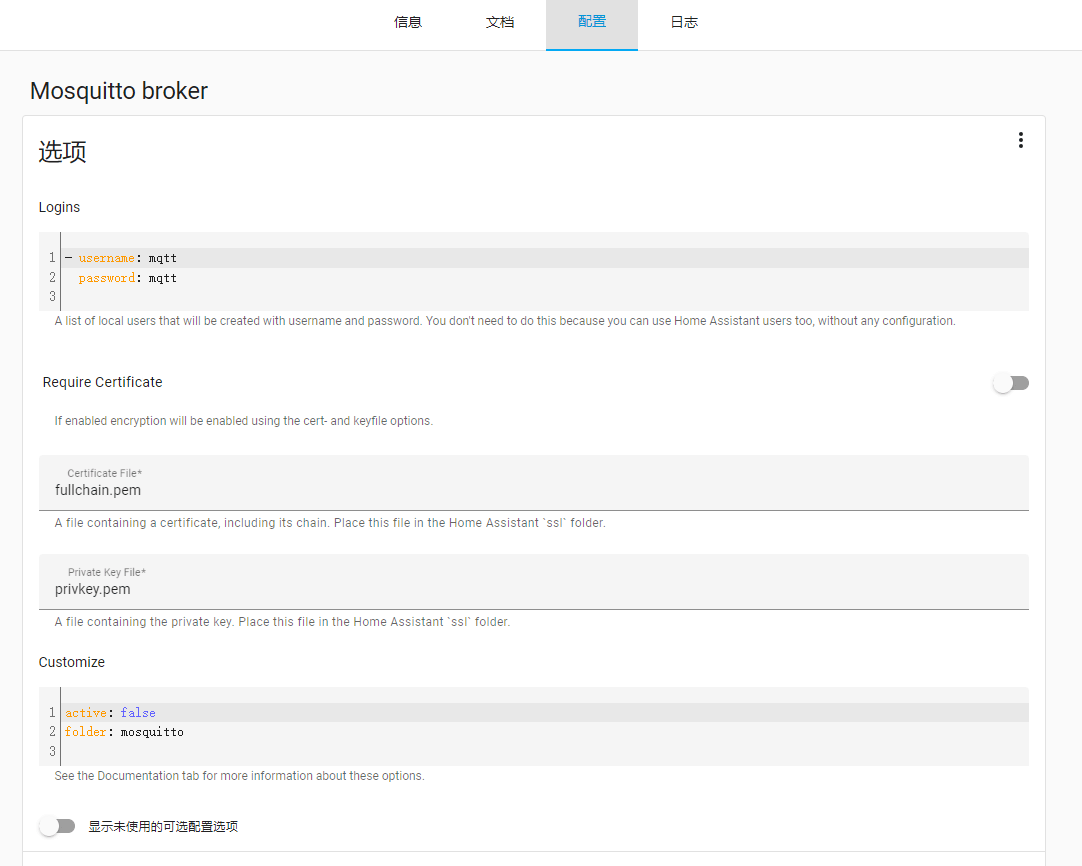
- configure;
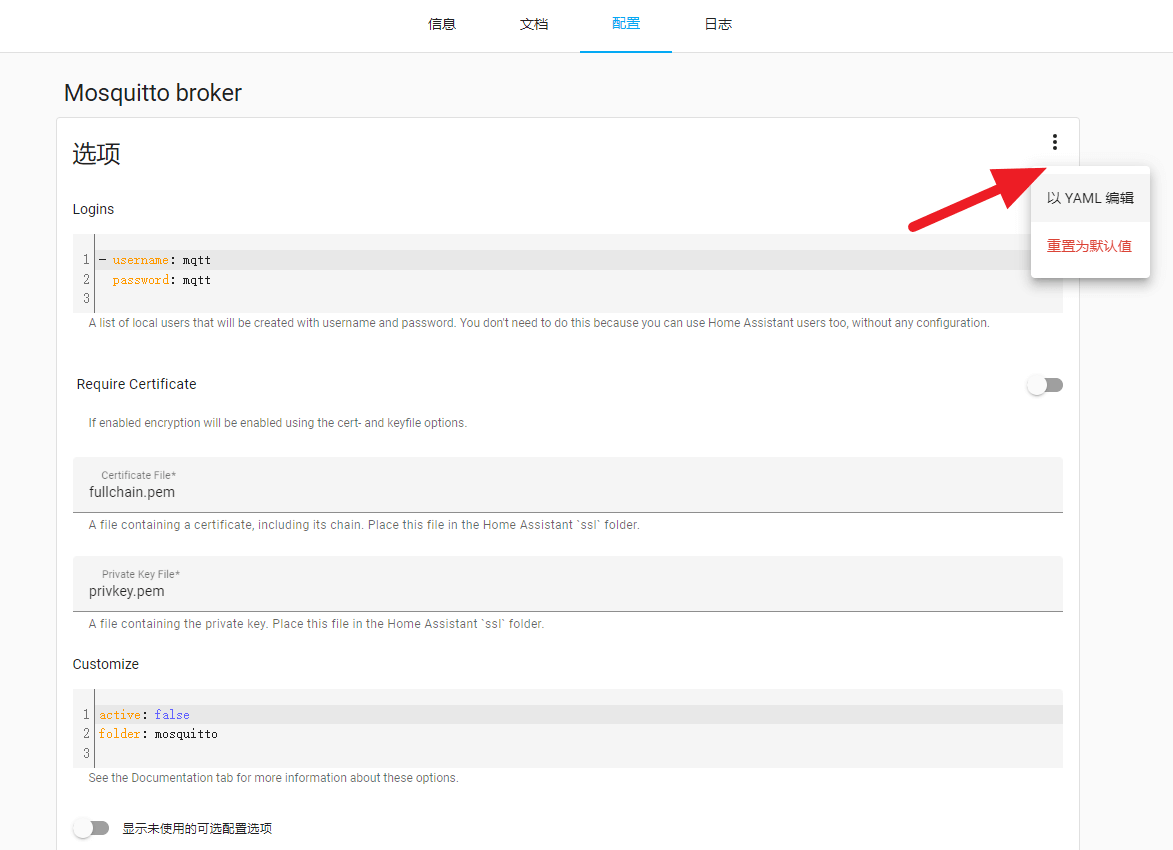
- It can also be edited directly in YAML;
-
my configuration;
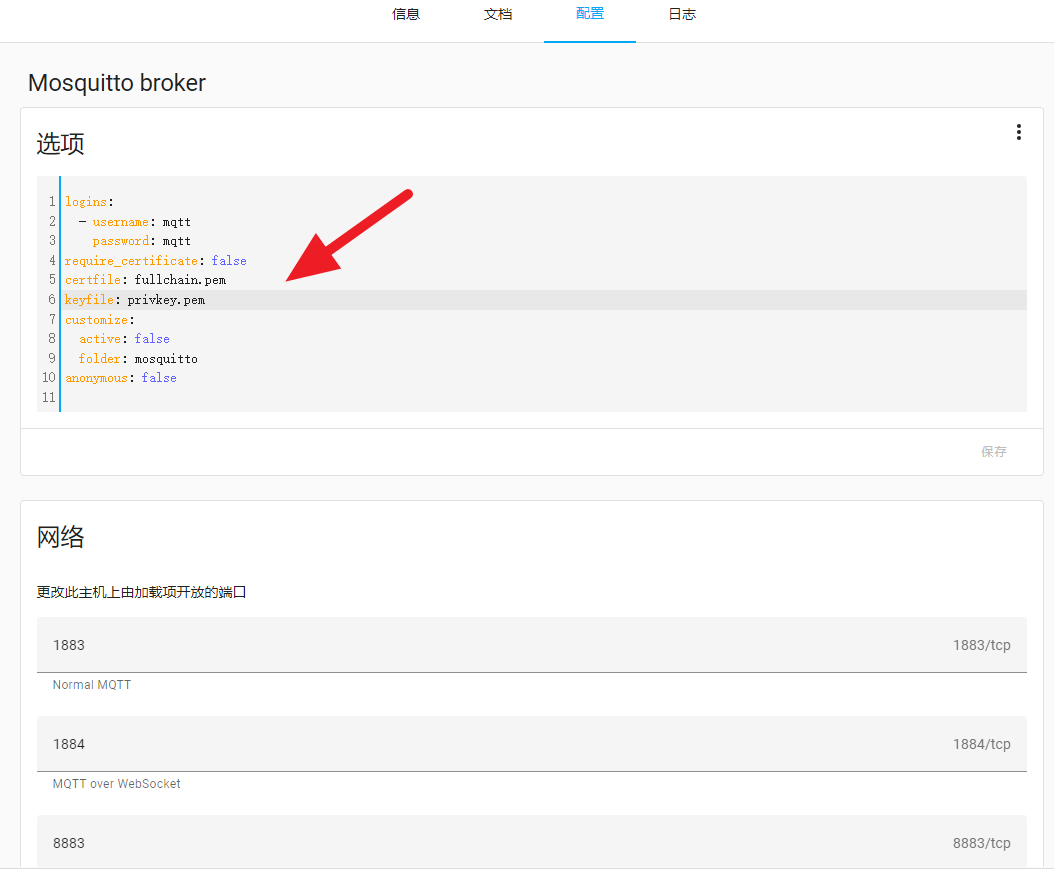
logins: - username: mqtt #设置用户名和密码password: mqtt require_certificate: false certfile: fullchain.pem keyfile: privkey.pem customize: active: false folder: mosquitto anonymous: false - After the configuration is complete, go back to
配置->集成, and you can see the Mosquitto broker;
The MQTT service actually comes with a component that can be searched and installed directly, but it is recommended to install it as an add-in. I think it is more flexible, and it runs based on the container, which will not affect other components.
Zigbee2MQTT installation <br />Why do I use Zigbee2MQTT instead of the built-in ZHA, because ZHA does not support several devices of Jingyu very well, and I will not change the code, it is easy to use Zigbee2MQTT.
- The same is to go to the add-in store and add a warehouse;

- Enter:
https://github.com/zigbee2mqtt/hassio-zigbee2mqttadd;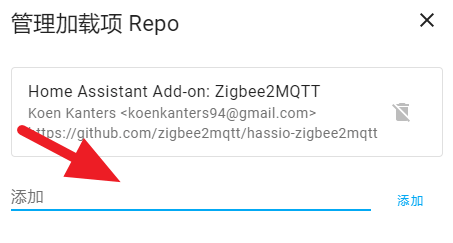
- Search for
Zigbee2MQTTinstallation, and there is aZigbee2MQTT Edgethat belongs to the development early adopter version, see what you need; - post-installation information;
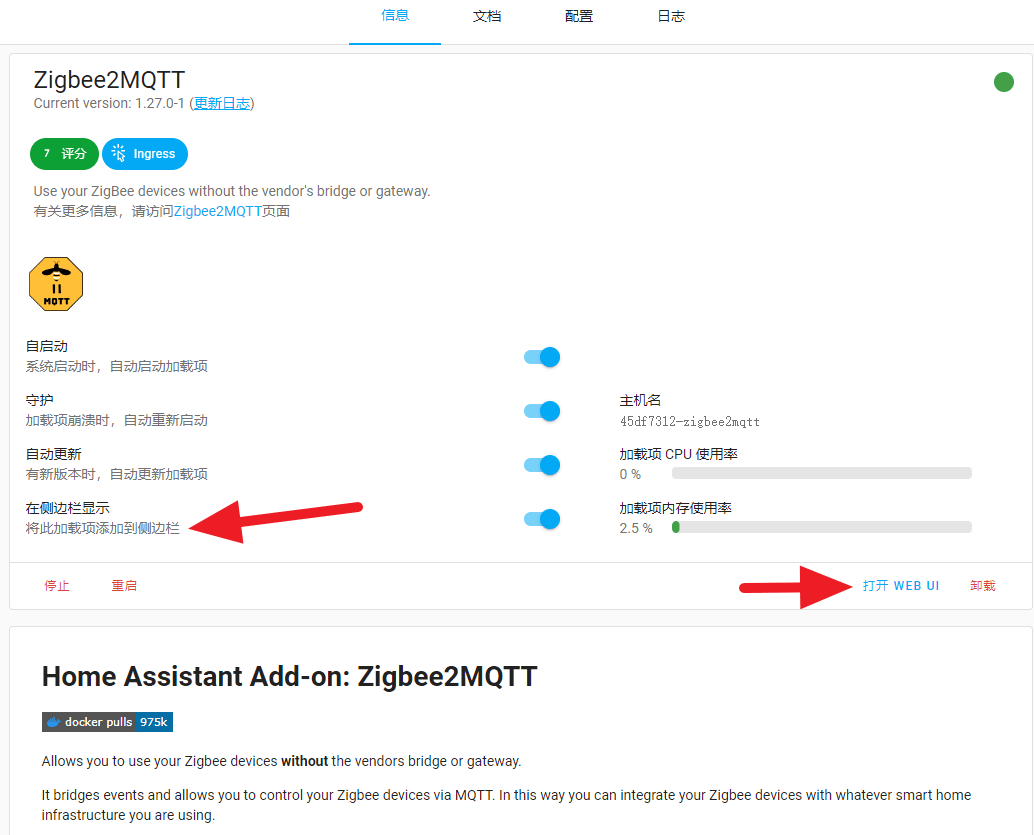
- configure;
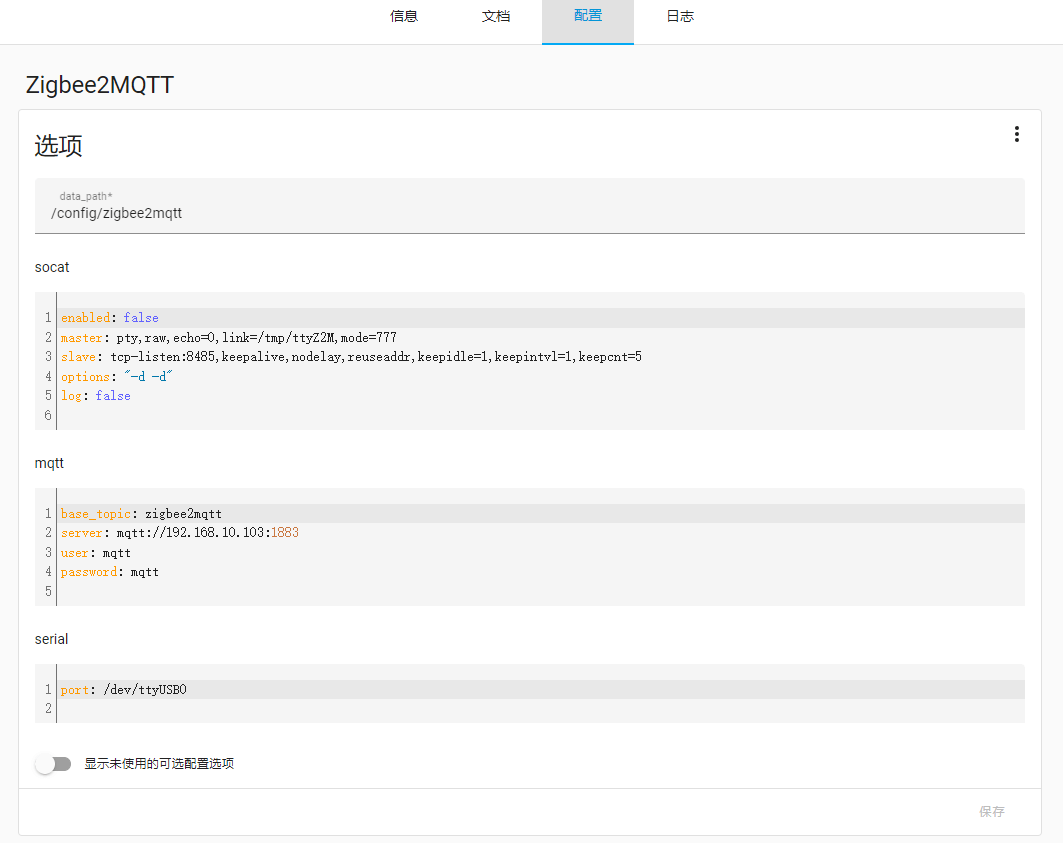
-
The same can be edited in
YAML, my configuration;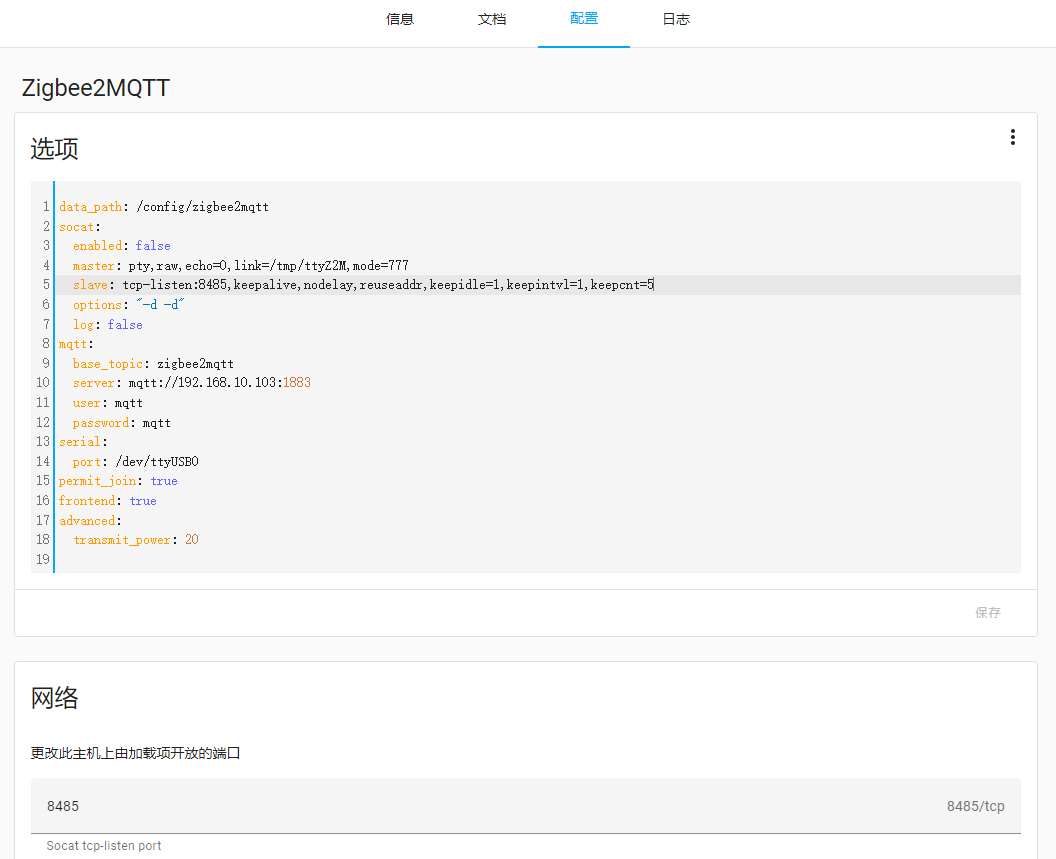
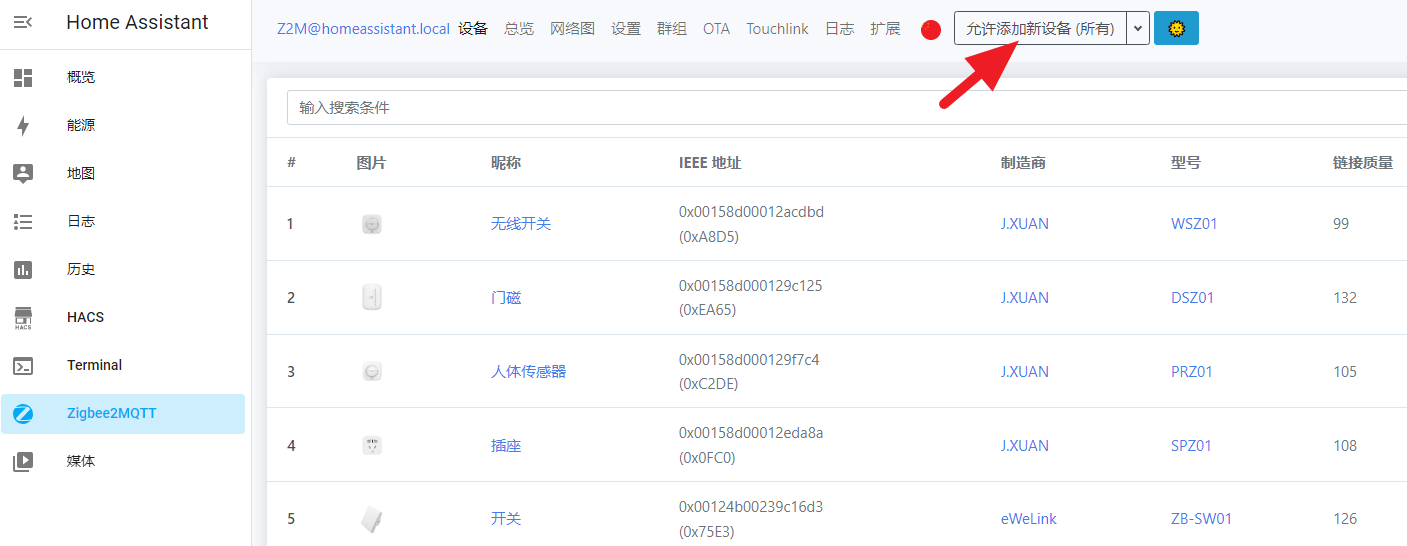
data_path: /config/zigbee2mqtt socat: enabled: false master: pty,raw,echo=0,link=/tmp/ttyZ2M,mode=777 slave: tcp-listen:8485,keepalive,nodelay,reuseaddr,keepidle=1,keepintvl=1,keepcnt=5 options: "-d -d" log: false mqtt: base_topic: zigbee2mqtt server: mqtt://192.168.10.103:1883 #实际MQTT 的IP 地址和MQTT 的端口user: mqtt #上面Mosquitto broker 里设置的用户名和密码password: mqtt serial: port: /dev/ttyUSB0 #这个要根据实际插入的USB 设备设置,可在终端里面cd /dev 查看permit_join: true frontend: true advanced: transmit_power: 20 #设置ZigBee 无线发射功率,默认5,CC2652P 最大可以设置20 dBmAs for how to add ZigBee devices and see the next breakdown.
personal impression
I have been working on electronic hardware for more than ten years, and I still have a little research on software, but I didn’t expect HomeAssistant to be so easy to use after nearly ten years of development. It took a long time to get started.
The system installation is very simple, but as a smart home management software, shouldn’t the first step after opening it be to add devices? And my first feeling was overwhelm. There are too many terms that are too confusing. For example, I don’t know why the entity and device should be separated. It’s different for developers, but for users, I only care about the device, I only control the device, and you don’t put anything else. Come to the front.
The fact that the protocols of major smart home manufacturers cannot communicate with each other is a fact that cannot be changed. HomeAssistant basically supports the integration of major manufacturers, but some additions are more troublesome. Of course, this is also related to the barriers deliberately created by those manufacturers. Maybe this is the case with open source software. If there is a good product manager, it will be useful if a domestic company can do localization.
At present, HomeAssistant is still a toy for a few people, and friends who want to enter the pit need a certain amount of perseverance.
This article is reproduced from: https://mianao.info/2022/08/25/363507
This site is for inclusion only, and the copyright belongs to the original author.