Original link: https://hellodk.cn/post/1141
foreword
Before last year, when I wrote a blog, I didn’t have the awareness of compressing pictures. Sometimes the pictures loaded in the article were too many, and some pictures were too large, which would lead to a bad browsing experience. Later, after getting used to the squoosh project, every time I write an article, I will compress the pictures, mainly because squoosh is too good, and it is still freeware.
Last year, I made a squoosh docker image, and I can easily use docker locally to start a compressed image service, but at that time, I compressed each image one by one, because I adjusted the quality of each image, for It is a very suitable size for local storage. My self-built image bed runs locally and is stored in the local ssd, so it is normal to have this idea before. But the demand for a large number of image compression this time made me understand the meaning of batching—although it may not reach the perfect balance between image quality and storage size after image compression, a compromise should be made between blogging (image quality) and local storage Afterwards, it brings a great sense of pleasurable ease, and it’s well worth it.
Last year’s squoosh article made a squoosh docker image here, writing blog textures and directly compressing files locally, which is safe and efficient
Friendly reminder: Squoosh officially provides web services, the address is at https://squoosh.app , but there is no Copy npx command function, I don’t know if it was there before.
text
Next, I will talk about how to use squoosh-cli to compress images in batches. The reason why I recommend running the squoosh-cli command in a self-built docker container is because the container is a Linux environment, and the command line is friendly, unlike cmd and powershell, which may require Various escaping, quotes, and wildcard issues.
First, you can delete the previously created squoosh container. No volume was added before. This time we need to add a volume mapping.
Create a folder to save the squoosh file on the linux running the squoosh container. The path should preferably be mounted on the resource manager through protocols such as squoosh.
# mkdir -p /home/dk/squooshfiles
Start the squoosh container below, the command is as follows
docker run -d --name squoosh \ --restart unless-stopped \ -p 7701:8080 \ -v /home/dk/squooshfiles:/app/squooshfiles \ dko0/squoosh:1.12.0
Parse:
- This will automatically create the directory
/app/squooshfilesin the container - The modification of
/home/dk/squooshfileslocally and the modification of/app/squooshfilesin the container will be fully synchronized, so please create a completely independent squooshfiles directory, which is only used for squoosh to compress pictures in batches - I didn’t update the image on docker hub, just use the previous one, just execute one more command to install the squoosh cli package, as mentioned below
Then enter the container to install the squoosh-cli npm package, execute docker exec -it squoosh ash and enter
# npm i -g @squoosh/cli
I tried to install this in the local win environment before, but the local node version is already 18, and this package cannot be installed because the node version is too new, so I simply installed it on this container. One container for multiple purposes – users can operate on the webpage when compressing a single image, and open the terminal to enter the container for operation when compressing multiple images.
After the installation is complete, execute squoosh-cli --help to get command line help.
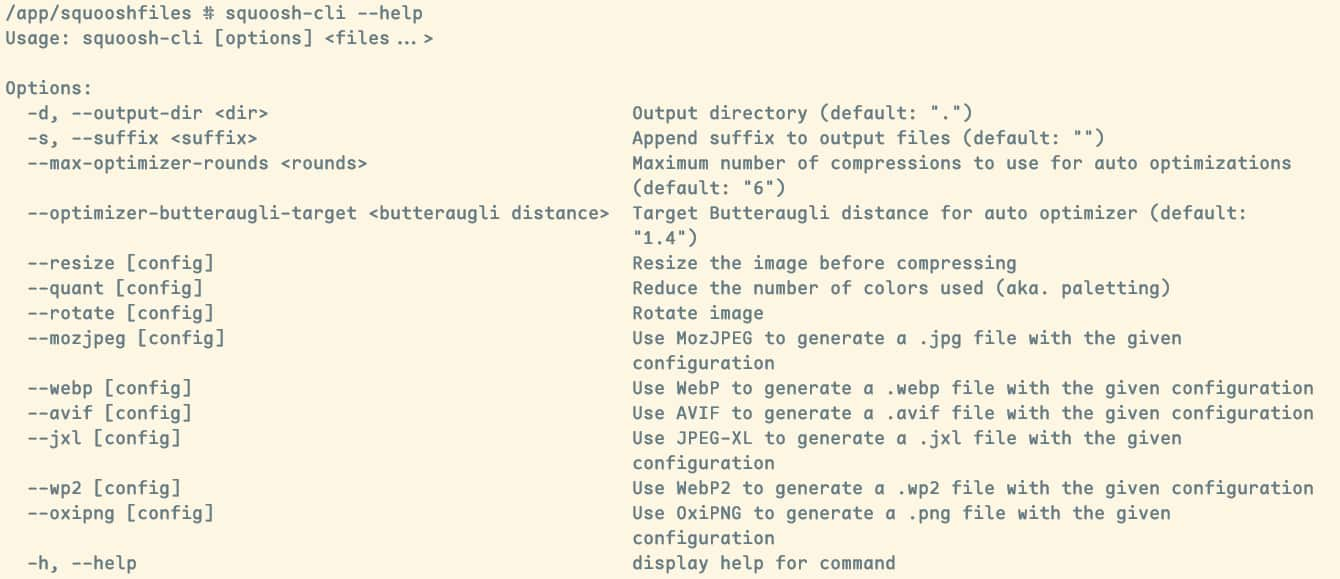
The most useful thing about squoosh-cli is the batch. Another powerful point is that it can also directly copy and use the configuration on the webpage. Unfortunately, the official service provided by https://squoosh.app does not have Copy npx command function, so I feel This container image was created just right, and it just met this requirement after it was built.
An npx command is similar to the following, which records the current compression algorithm and detailed compression configuration
npx @squoosh/cli --mozjpeg \ '{"quality":40,"baseline":false,"arithmetic":false,"progressive":true,"optimize_coding":true,"smoothing":0,"color_space":3,"quant_table":3,"trellis_multipass":false,"trellis_opt_zero":false,"trellis_opt_table":false,"trellis_loops":1,"auto_subsample":true,"chroma_subsample":2,"separate_chroma_quality":false,"chroma_quality":75}'
An important episode to solve the error TypeError: Cannot read properties of undefined (reading ‘writeText’)
This is because Chrome restricts the API usage of non-secure websites, and blocks navigator.clipboard api usage permission on non-secure websites, so the npx command cannot be copied. Let’s solve this problem.
open chrome, type chrome://flags/ in address bar, then find item Insecure origins treated as secure , type http://10.10.10.5:7701 then enable it and relaunch your chrome.
Sites that Chrome considers safe here
- must https
- or localhost
- or 127.0.0.1
So it is necessary for us to add a whitelist, which is easy to operate.
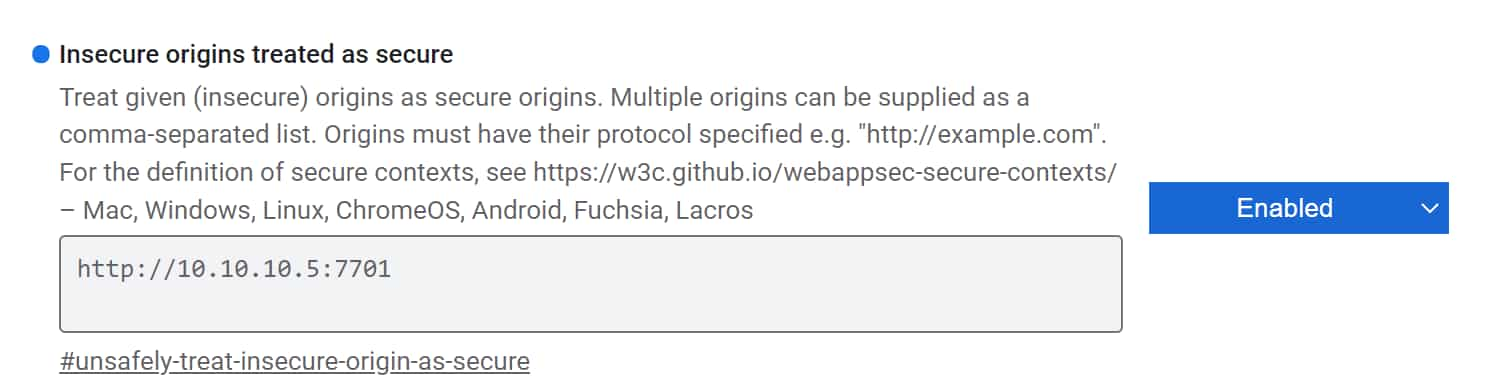
ps:
http://10.10.10.5:7701is the operating environment address of my squoosh. If there are multiple addresses that need to be “whitelisted”, just use English commas to separate them.
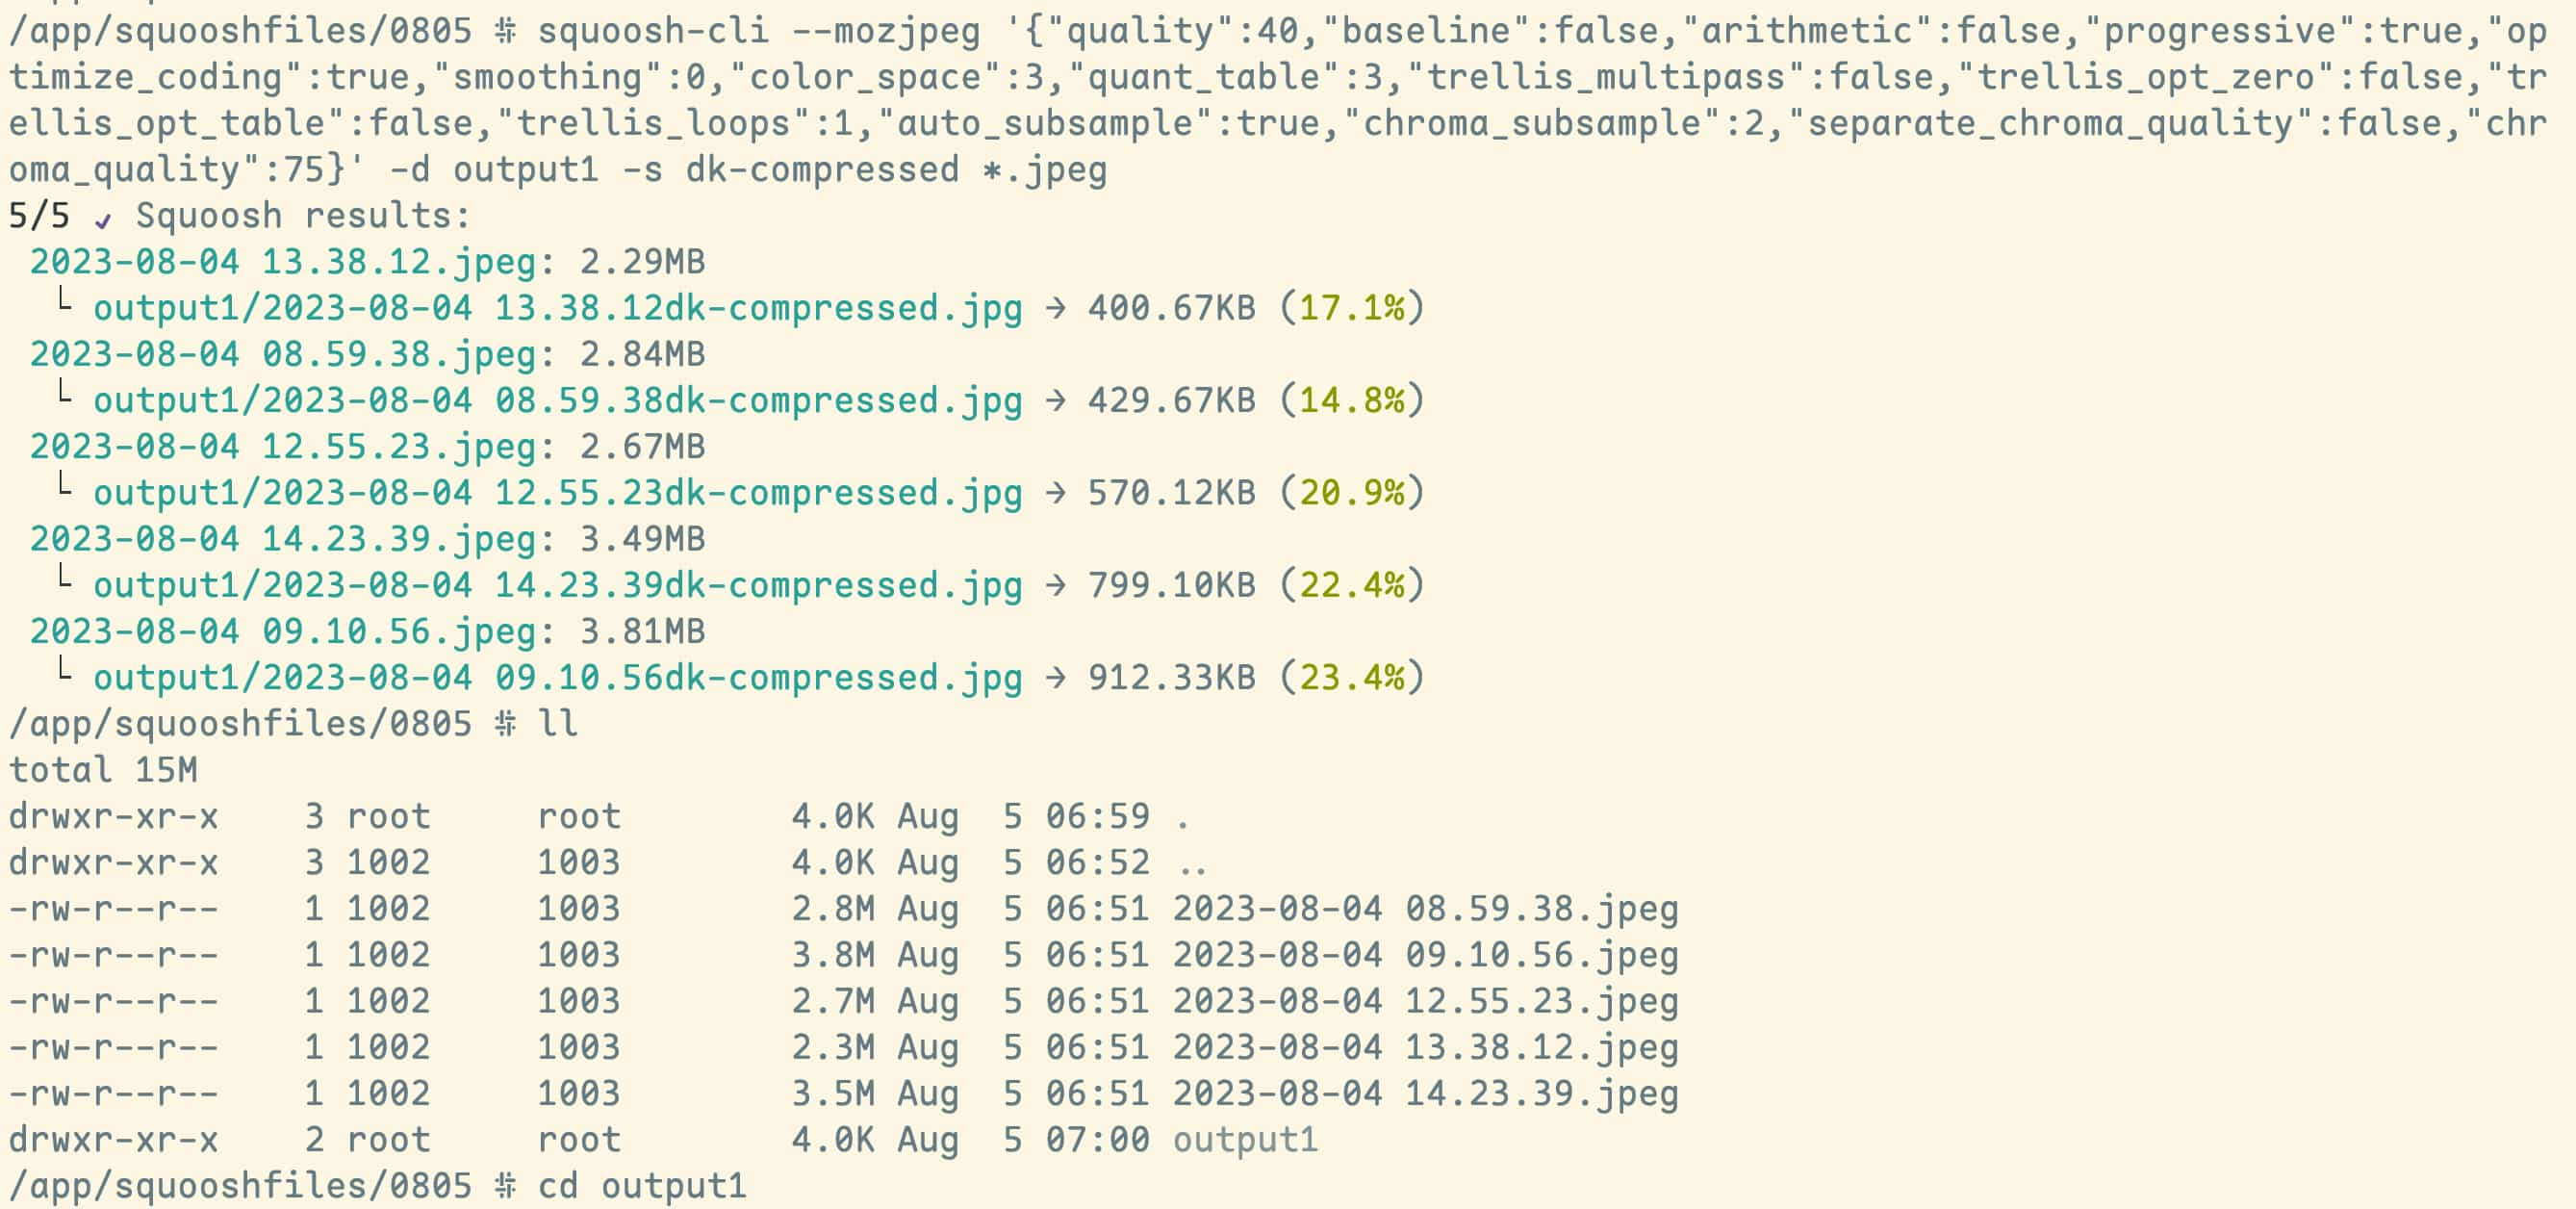
Create a directory 0805 in /home/dk/squooshfiles , and then copy the photos to be compressed in batches, and the next step is to compress them in batches.
Use squoosh-cli to replace npx @squoosh/cli in the command copied from npx, and then execute
# squoosh-cli --mozjpeg \ '{"quality":40,"baseline":false,"arithmetic":false,"progressive":true,"optimize_coding":true,"smoothing":0,"color_space":3,"quant_table":3,"trellis_multipass":false,"trellis_opt_zero":false,"trellis_opt_table":false,"trellis_loops":1,"auto_subsample":true,"chroma_subsample":2,"separate_chroma_quality":false,"chroma_quality":75}' \ -d output1 \ -s dk-compressed \ *.jpeg
explain
- mozjpeg is the most commonly used compression algorithm, and generally speaking, it is the most recommended. (The specific algorithms have not yet been studied
- quality is the compression quality, you can directly preview the compressed effect on the web page
- -d set the output directory
- -s Set an output filename suffix, the default is an empty string
- For the last files, simple wildcards can be used, such as
*.jpegonly compresses all jpeg extension images in the current directory
Batch compression succeeded.
It is very convenient to preview after mounting through samba4 locally in win.
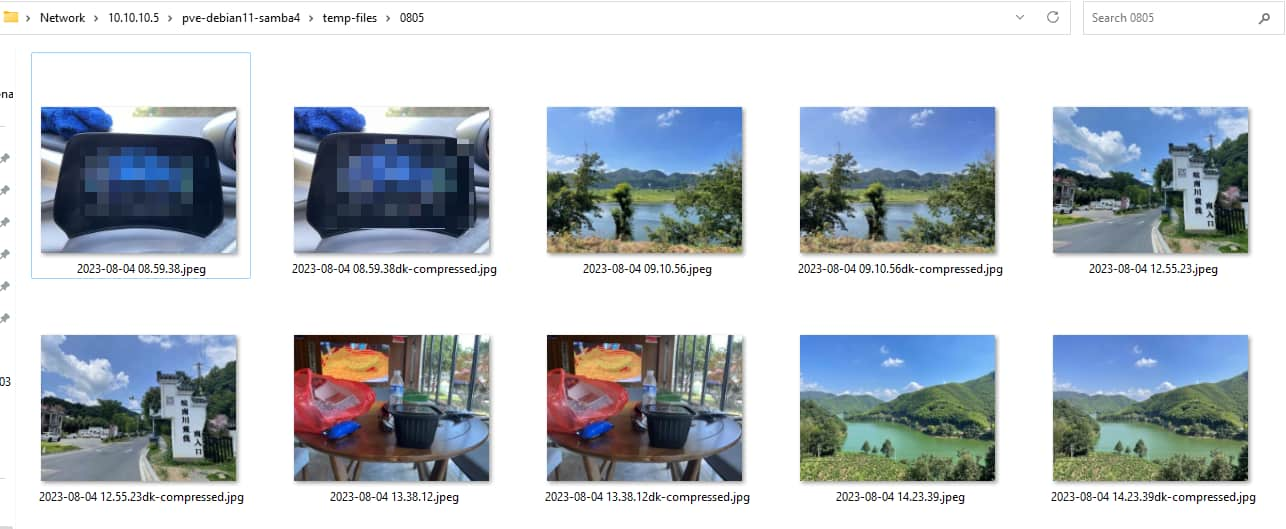
Copy the picture from the output1 path, and compare the original picture with the effect of lossy compression, very good
Finally, thanks to the squoosh project, it is a powerful tool for blogging and image compression. It is completely free and open source, and I highly recommend it to all bloggers.
- squoosh cli npm package: https://www.npmjs.com/package/@squoosh/cli
- squoosh cli: https://github.com/GoogleChromeLabs/squoosh/tree/dev/cli
This article is transferred from: https://hellodk.cn/post/1141
This site is only for collection, and the copyright belongs to the original author.