Original link: https://wzyboy.im/post/1476.html
I’ve been using Terraform quite a bit recently, not only in a corporate environment, but also in my own personal environment. When I told my friends about it, they disagreed, and even thought that existing tools like Ansible could also do Terraform’s work. This article is an introduction and explanation to Terraform and its necessity.
1. The necessity of Terraform
increasingly complex configurations
Terraform is an IaC (Infrastrucutre as Code) tool. Why is IaC necessary? Because the configuration of cloud services (PaaS) is becoming more and more complex. Take a common AWS S3 bucket as an example, what are the configurable items? Just access control (who/cannot access what), there are several layers:
- IAM policy is used to control which AWS services or IAM users can access the bucket or objects in it;
- ACL policy (both bucket ACL and object ACL) is relatively old, used to set simple access control (public/private) and is no longer recommended, but CloudFront still relies on it;
- Bucket policy is relatively new and is used to set more detailed access control (IP address whitelist, etc.), and is currently the main access control scheme promoted by AWS;
- Block public access (both bucket level and account level) is used to control whether the bucket allows the creation of new public ACL/policy, and whether to ignore the existing public ACL/policy;
- CORS configuration is used to set which CORS headers are returned when accessed from a browser;
- Access points also have their own policies for controlling which operations are allowed when accessing through access points.
There are more common settings:
- Server access logging is used to set the bucket to which access logs are recorded;
- Event notifications are used to set which SQS/SNS/Lambda will be notified when new events (if files are added/deleted);
- Lifecycle rules are used to set when objects are dumped to cheap storage and when they are deleted;
- Replication rules are used to set how objects are replicated to S3 in other regions;
- …
When you set up your first bucket, these settings are done with a mouse click on the AWS Console web page, which may not feel great, but when you have dozens, or even hundreds of buckets, these settings change Gotta die. Especially when you need to apply different settings to different buckets, it’s an absolute nightmare to just click and copy/paste/modify various JSONs on that awkward admin web page.
Not only S3, but many other common components also have nested/embedded sub-items configuration (such as IAM and ELB), and maintenance only by mouse clicks can only be applied to small workshops. If the number is large, the probability of management errors will skyrocket. Using code It is imperative to manage various resources.
Configure Drifting
Of course, a slightly larger project or company generally does not rely entirely on mouse clicks to manage various components on PaaS. For repetitive tasks, definitely take the time to write some code to make it faster and cooler. But not all codes can be counted as good IaC, general code can not handle drifting problem, in military terminology, it is just shoot and ignore .
When I was working in a startup company with about 20 people, I once wrote such an Ansible Playbook, which was specially used to open an EC2 machine. The general operation is:
- Execute a local Play, and check the rationality first according to the incoming parameters (such as whether the machine name conforms to the specification);
- Query Route 53 Private Zone to check whether the hostname is already occupied;
- Create EC2 instance(s);
- Register the correspondence between hostname and instance address in Route 53 Private Zone;
- Add the new instance to a temporary group in the in-memory inventory;
- Execute a new Play targeting this temporary group and install the necessary software for its OS.
Later modified, this Playbook was also used to boot machines on platforms other than AWS. However, this process has an important problem: the subsequent state of these machines cannot be tracked and difficult to replace. Just imagine: after a machine has been used for a period of time, due to business requirements, the configuration of some machines has been changed, security groups have been modified, and EBS volumes have been added. At this time, the state of the machine is different from that defined in the Playbook. Of course, this does not affect normal use, but what if you need to modify or even rebuild some machines in batches for some reasons? for example:
- Several security groups are specified when the machine is turned on, but if one day, some machines want to add/delete security groups, how to find these machines to ensure that they are changed without any leakage?
- Due to upstream (such as AWS Marketplace) updates, some machines must be booted with a new AMI, how can I restart a batch with the new AMI without error, and also ensure that the configurations such as ELB and Elastic IP remain unchanged, and also Will the EBS storing the data be taken back as it is?
This inconsistency of the actual resource (maybe a file in the OS, or a machine in AWS) and the definition is called drifting . When managing files, Ansible can of course handle drifting properly – run the Playbook again, compare the file content of the specified path with the file in the definition, find inconsistencies, and overwrite the drifting problem (this A feature that does not hurt to run the same Playbook multiple times is called idempotence . But in the above example of opening EC2, once the machine is finished, it is out of Ansible’s control, and running the Playbook again will only More machines will be fired instead of checking that the previous ones are consistent with the definition (non-idempotent).
Code in IaC is not arbitrary code, but code that has the ability to manage the entire life cycle of basic resources . Ideally, this code should be declarative (“Please make sure the number of machines is 10, no more, no less”) rather than imperative (“Please open 10 machines”). Ansible can manage declaratively the configuration management in the OS, but it can only do imperative management for the infrastructure.
Only a declarative IaC like Terraform can handle drifting properly.
Single source of truth
When you have fully converted to IaC, you can practice the philosophy of single source of truth . Revoke all personnel’s permission to change PaaS (you can leave a read-only permission), all infrastructures are defined by declarative code, and VCS such as Git is used for version management. Changing the configuration of the production environment (such as firewall rules) is no longer a one-person operation, with a group of people standing behind and watching , but through PR / code review, or even through the administrative approval process, and finally merge PR, Make the configuration take effect. If something is really broken, a git revert will solve the problem. For resources such as DNS records, it is a blessing to be able to roll back at any time through the version history!
IaC can not only be used to manage resources on PaaS, this set of models can also be used to manage other virtual resources, such as the concept of “who are the users in a certain user group”. In a company that uses GitHub.com for code hosting, a new employee may use his personal GitHub.com account to join the company’s GitHub Orgnization and have access to some repo. When an employee leaves, they may need to revoke their GitHub.com account’s access to the private repo, but allow them to continue contributing to the company’s open-source public repo. If you use IaC to manage GitHub Orgnization, you can clearly define which employees have access to which repo. These IaC codes are the single source of truth, and both the development team and HR can get the information they want from it. The grant/revoke of various system permissions when employees join/leave can also be done with PR / code review / merge PR.
2. Introduction to Terraform
basic use
Terraform is an open source IaC tool from HashiCorp. Its ontology is a single-file CLI tool written in Golang. It uses a language called HCL to define the expected state of resources, and then calls the API of the cloud platform according to these definitions to perform CRUD operations on the resources, so that the The resource conforms to the state defined in the HCL file.
For example, here is an example of defining “1 EC2 in the us-west-2 region of AWS”. I added some notes:
# 配置AWS API 所需信息。区域是必须指定的,鉴权则是按AWS SDK 标准的来。推荐用`aws configure` 在本机配置access key / secret key。 provider "aws" { region = "us-west-2" } # 定义一个SSH 公钥。 resource "aws_key_pair" "main" { public_key = "ssh-ed25519 AAAAC3NzaC1lZDI1NTE5AAAAIDB3eYUem12rVaP+2ijbGqFqTM4bfnYcYmHjDq7j6IjT" } # 定义一个EC2 实例。 resource "aws_instance" "main" { # https://cloud-images.ubuntu.com/locator/ec2/ ami = "ami-0ee02425a4c7e78bb" instance_type = "t4g.nano" # 引用上面定义的SSH 公钥。注意HCL 不在意定义和引用的先后顺序,甚至不在意它们是否在同一个文件里。 key_name = aws_key_pair.main.id # 引用下面定义的security group。 vpc_security_group_ids = [aws_security_group.open.id] # 指定root EBS 类型为非默认的gp3。如果不指定则是AWS API 默认的gp2。 root_block_device { volume_type = "gp3" } tags = { Name = "my-frist-instance" } } # 定义一个双向全开的security group。 resource "aws_security_group" "open" { ingress { from_port = 0 to_port = 0 protocol = "all" cidr_blocks = ["0.0.0.0/0"] } egress { from_port = 0 to_port = 0 protocol = "all" cidr_blocks = ["0.0.0.0/0"] } } # 定义一个Elastic IP 并attach 到EC2 实例上。 resource "aws_eip" "main" { instance = aws_instance.main.id } # 在屏幕上打印一些EC2 实例的信息,方便查看。 output "instance" { value = { arn = aws_instance.main.arn public_ip = aws_eip.main.public_ip private_ip = aws_instance.main.private_ip } }
Save the above content as main.tf in an empty directory (it is recommended to use Git to manage this directory), and then execute terraform init to initialize the workspace. Terraform will create a .terraform directory and .terraform.lock.hcl file in the directory to store some internal data. After initialization, run terraform apply , Terraform will compare the differences between the resources defined in the file and the resources in AWS, and print a CRUD plan on the screen, telling you what it is going to do:
Terraform will perform the following actions: # aws_eip.main will be created + resource "aws_eip" "main" { [...] } # aws_instance.main will be created + resource "aws_instance" "main" { [...] } # aws_key_pair.main will be created + resource "aws_key_pair" "main" { [...] } # aws_security_group.open will be created + resource "aws_security_group" "open" { [...] } [...] Plan: 4 to add, 0 to change, 0 to destroy. [...] Do you want to perform these actions? Terraform will perform the actions described above. Only 'yes' will be accepted to approve. Enter a value: yes [...] Apply complete! Resources: 4 added, 0 changed, 0 destroyed. Outputs: instance = { "arn" = "arn:aws:ec2:us-west-2:283712780869:instance/i-090478061ea9a8050" "private_ip" = "172.31.52.119" "public_ip" = "35.85.129.248" }
At this time, if you open the AWS Console, you can see that this instance, along with the related resources (key + security group + Elastic IP), have been created:

Since we didn’t specify the name property of aws_key_pair and aws_security_group , Terraform even generated the names for us automatically. No more baldness thinking about names!
Every time terraform apply is executed, Terraform will compare the differences between the resources defined in the file and the resources in AWS, and then give a CRUD plan, and executing this plan can align the resources in AWS with the resources defined in the file. . As mentioned above, when using Terraform to manage resources, Terraform’s file definition should be used as a single source of truth. All CRUD operations on resources should be done by modifying the Terraform definition, rather than bypassing Terraform directly. But if someone really bypasses Terraform and directly modifies the resources in AWS, the changes will be ruthlessly overwritten the next time terraform apply .
status file
Terraform uses state files to track resources. After executing terraform apply , a terraform.tfstate file will be generated in the current directory, which is the state file of Terraform. Although this file is actually JSON, it should not be edited directly. If you are the only person who will modify these resources, then such a local state file is enough, and you can even include this state file in Git version management. But if you want to collaborate in a team, it is recommended to use shared storage to save state files.
Terraform supports many storage backends , such as S3, etcd, PosgresSQL, Artifactory, etc. can be used to store state files. Some time ago I stumbled across GitLab that also provides a Terraform state store over HTTP . In this way, the file and state can exist together.
Terraform Cloud / Enterprise
Some of the above storage backends support locking to prevent problems with simultaneous operations by multiple people. But for larger teams, Terraform Cloud/Enterprise is the right choice. Terraform Cloud provides more and richer features than pure state file storage:
- Beautiful web UI;
- Integration with VCS / CI, such as automatically do a CRUD plan when there is a new PR;
- Team members can review/comment the plan, and everyone decides whether to apply;
- Easily check the content and change history in the status file;
- Record the log of each
terraform apply; - By configuring the policy, certain CRUD operations are prohibited, such as the creation of a fully open security group (charging function);
- According to the CRUD plan, estimate how this plan will change the billing of cloud platforms such as AWS (charge function).
Terraform Cloud looks like this:
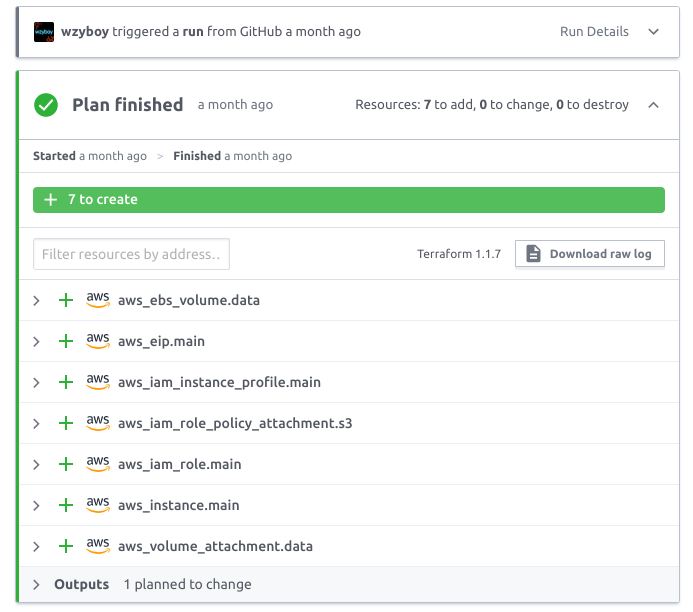
When Terraform Cloud is integrated with VCS, HCL editors no longer even need to install the Terraform CLI. Modify files directly with any editor (even GitHub’s web editor), submit PR, and Terraform Cloud will do terraform apply . This means that DevOps can “decentralize”, allowing developers to make changes to the infra by submitting a PR (without giving them access to the infra).
Friends are quite critical of Terraform’s default storage of state files locally, and feel that it is troublesome to manage. I said to him: Terraform itself, like Git, is an open source tool that can be used completely natively. But for team collaboration and convenience, people will use hosting platforms such as GitHub/GitLab/BitBucket, and use some additional features provided by the platform. Terraform itself is also an open source tool that can be used locally, while Terraform Cloud/Enterprise is a collaboration platform for Terraform that adds some additional features to Terraform. Terraform’s state files are small and can be easily migrated; if HashiCorp / Terraform Cloud goes out of business, users can easily migrate state files to other storage backends without the risk of data being locked.
3. Terraform learning and practice
The above example is just a simple EC2 instance, nothing too complicated is used, but as a language, HCL naturally has concepts such as loops ( for , for_each ), judgments , and modules . HashiCorp provides a complete set of interactive Terraform tutorials to learn.
By rationally utilizing the characteristics of programming languages, we can manage many resources with very little code, such as encapsulating a set of services or components into a module, and by passing in different variables, we can easily copy multiple environments (dev, staging, QA, UAT, beta, production), or multi-region deployments. The architecture of each environment/area is the same/similar, but with different naming, permissions, machine configuration, etc.
I practiced this idea in a side project with Reorx , writing Terraform code with modularity and multiple environments in mind. Different environments are placed in different AWS accounts (of course, these AWS accounts are also created with Terraform), and the environments are completely isolated. However, since these environments are derived from the same set of HCL definitions, if there is anything that needs to be modified, just change one place to make multiple environments take effect together. I even use CSV to store data in places that may need to be modified frequently, so that even small partners who are completely unfamiliar with Terraform can submit PR modifications.
The code of the module can be directly referenced in the same repo with a relative path, or published to a code hosting website such as GitHub or Terraform Registry. For some common requirements, there may already be modules written by others. For example, setting up a non-default VPC in a new region of a new AWS account is a more troublesome thing, because it involves the specification and calculation of CIDR (in case of peering in the future), subnet routing table and NAT, etc. terraform-aws-modules/vpc will take care of a lot of things for you. With the cidrsubnets() function, you only need to provide a CIDR, and the rest will be built automatically:
locals { name = "main" cidr_block = "10.18.0.0/16" subnets = cidrsubnets(local.cidr_block, 4, 4, 4, 4, 4, 4) subnet_groups = chunklist(local.subnets, 3) } module "vpc" { source = "../../modules/vpc" name = local.name cidr = local.cidr_block azs = ["${var.region}a", "${var.region}b", "${var.region}c"] private_subnets = local.subnet_groups[0] public_subnets = local.subnet_groups[1] enable_nat_gateway = false single_nat_gateway = true }
Terraform also helps to practice the principle of least privilege . To be honest, once I encountered a service that wanted to read and write a certain S3 bucket, I would directly give it to AmazonS3FullAccess or AmazonS3ReadOnlyAccess , because I was too lazy to use that webpage JSON editor to set which bucket is allowed. With Terraform, you can use HCL to define these IAM policies, precisely control permissions, and then Terraform converts the HCL to JSON (with syntax checking) and submits it to the AWS API. Of course, these things are all modular, and it is easy to build 100 buckets with 200 corresponding read-only/read-write IAM roles.
4. Friends of Terraform
As mentioned above, Terraform and Ansible are not substitutes for each other, and they can even work together. Tools from HashiCorp follow the philosophy of immutable infrastructure. Unless it is a database, which is really impossible, other resources should be regarded as ready to be deleted and rebuilt. If something is broken / deleted by mistake, a terraform apply can be resurrected with full blood.
So what about programs running on EC2? The easy way is to use user_data to have EC2 automatically install and start the application when it starts up. But if the application is large or the environment initialization time is long, a better approach is to make the application into an AMI, and then start directly with this AMI.
Stuffing an application directly into an AMI might not sound like a good idea at first, but that’s mostly because the process of making a (hand-rubbing) AMI is a pain. HashiCorp also has a set of tools called Packer . Packer and Terraform both use HCL, but Packer defines how to generate a pipeline for a VM image. The input to this pipeline may be an ISO, an existing VM image, or even a running VM; Packer uses these images to install the necessary software with tools you define, such as Ansible / Chef / Shell, and do Security reinforcement, etc., and finally generate a VM image in the specified format and store it in the specified place. Of course, it is also written for HCL, and the definition of Packer can also be used for various loops and judgments. For example, input N versions of Ubuntu and M versions of Java, and output N × M final images.
Just as Dockerfile is used to define how to generate Docker image, Packer HCL is used to define how to generate VM image. With the help of Packer, Terraform can do IaC more fully.
The address of this article: https://wzyboy.im/post/1476.html . Please indicate the source.
This article is reprinted from: https://wzyboy.im/post/1476.html
This site is for inclusion only, and the copyright belongs to the original author.