surroundings
- windows 10 64bit
- python 3.8
- pytorch1.7.1 + cu101
video here
Youtube
Bilibili
Introduction
Earlier, we introduced target tracking based on YOLOv5 and DeepSort . Recently, Dashen added target tracking on the basis of YOLOv7 , which was just released. The tracking part uses StrongSORT OSNet Project address: https://github.com /mikel-brostrom/Yolov7_StrongSORT_OSNet .
Source code download
First go to download the source code, the author has released the official version v1.0 , we will use it
# 使用参数-b下载特定tag的源码,--recurse-submodules参数是为了递归下载根目录下的子项目,这里有yolov7 ,它是从官方的仓库fork而来,还有deep-person-reid,这种方式也是开源项目中非常常见的依赖管理模式git clone --recurse-submodules https://github.com/mikel-brostrom/Yolov7_StrongSORT_OSNet.git -b v1.0
It is not recommended to download the zip package directly. Many novices will encounter this problem, and then come to ask, why are there missing modules when running the program? This is because the project contains sub-projects, and the sub-project is often a link, which is not directly placed in this project for management and maintenance, so the downloaded zip does not contain the source code of the sub-project.
If you cannot clone due to network reasons, you can refer to the following operations
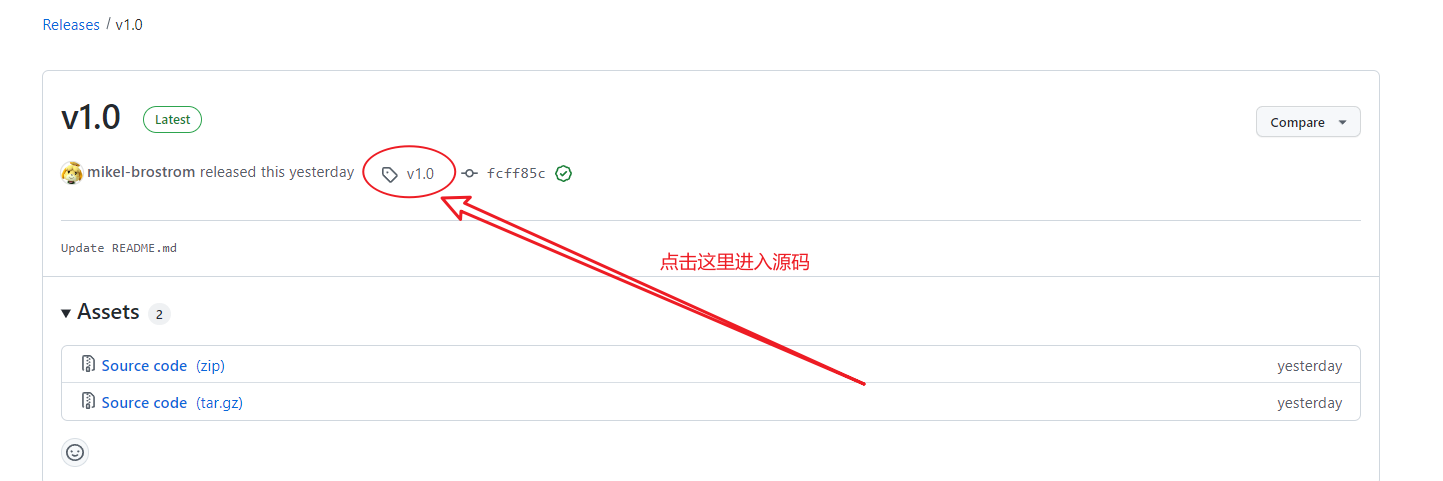
Find the corresponding tag , such as the current v1.0 version, and then click to enter the source code of the corresponding version
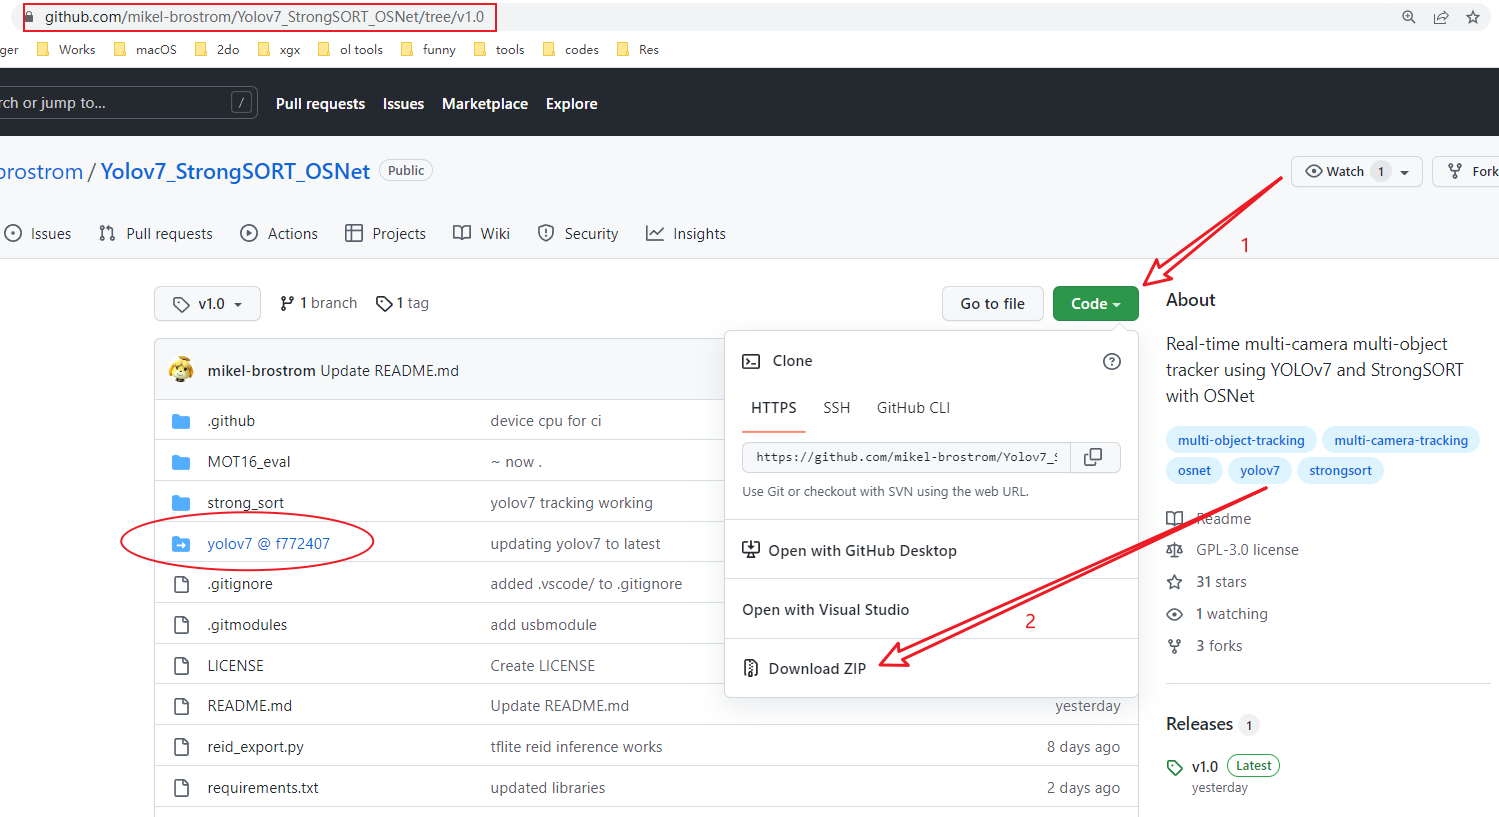
Then download the zip archive
As for the sub-project in the source code, notice that its project name is followed by a commit id , we can directly click into it, download the zip archive and decompress it. If there are multiple sub-projects, operate multiple times in sequence
Install project dependencies
Install the dependencies below
# 安装gpu版本的pytorch1.7.1,cuda10.1 pip install torch==1.7.1+cu101 torchvision==0.8.2+cu101 torchaudio==0.7.2 -f https://download.pytorch.org/whl/torch_stable.html
In addition, comment out the torch and torchvision in the requirements.txt file, and then execute the installation of other dependencies
pip install -r requirements.txt
practice
The environment is ready, then find a video to run around to see the effect, and execute
python track.py --source test.mp4 --strong-sort-weights osnet_x0_25_market1501.pt
Here is the source can be a video file, camera ID or network video ( rtsp , http , https are supported), the parameter --strong-sort-weights refers to the reid re-identification model used, the model can go to https://kaiyangzhou.github .io/deep-person-reid/MODEL_ZOO download, the model suffix here is pth , which can be renamed directly to pt
During the execution of the program, it will automatically download two model files, one is yolov7 , the other is the reid model you specified, one is stored on github , and after downloading, it is placed in the weights folder in the source directory; the other It is stored in the google network disk, and after downloading, it is placed in the root directory of the source code.

The complete list of track.py parameters is as follows, except --strong-sort-weights and --config- strongsort , the rest are command line parameters supported by yolov7
(pytorch1.7) PS D:\Github\Yolov7_StrongSORT_OSNet> python .\track.py -h strong_sort/deep/reid\torchreid\metrics\rank.py:11: UserWarning: Cython evaluation (very fast so highly recommended) is unavailable, now use python evaluation. warnings.warn( usage: track.py [-h] [--yolo-weights YOLO_WEIGHTS [YOLO_WEIGHTS ...]] [--strong-sort-weights STRONG_SORT_WEIGHTS] [--config- strongsort CONFIG_STRONGSORT] [--source SOURCE] [--imgsz IMGSZ [IMGSZ ...]] [--conf-thres CONF_THRES] [--iou-thres IOU_THRES] [--max-det MAX_DET] [--device DEVICE] [--show-vid] [--save-txt] [--save-conf] [--save-crop] [--save-vid] [--nosave] [--classes CLASSES [CLASSES ...]] [--agnostic-nms] [--augment] [--visualize] [--update] [--project PROJECT] [--name NAME] [--exist-ok] [--line-thickness LINE_THICKNESS] [--hide-labels] [--hide-conf] [--hide-class] [--half] [--dnn] optional arguments: -h, --help show this help message and exit --yolo-weights YOLO_WEIGHTS [YOLO_WEIGHTS ...] model.pt path(s) --strong-sort-weights STRONG_SORT_WEIGHTS --config- strongsort CONFIG_STRONGSORT --source SOURCE file/dir/URL/glob, 0 for webcam --imgsz IMGSZ [IMGSZ ...], --img IMGSZ [IMGSZ ...], --img-size IMGSZ [IMGSZ ...] inference size h,w --conf-thres CONF_THRES --classes CLASSES [CLASSES ...] filter by class: --classes 0, or --classes 0 2 3 --agnostic-nms class-agnostic NMS --augment augmented inference --visualize visualize features --update update all models --project PROJECT save results to project/name --name NAME save results to project/name --exist-ok existing project/name ok, do not increment --line-thickness LINE_THICKNESS bounding box thickness (pixels) --hide-labels hide labels --hide-conf hide confidences --hide-class hide IDs --half use FP16 half-precision inference --dnn use OpenCV DNN for ONNX inference
Here are a few more commonly used parameters, display the result and parameter --show-vid during detection; save the result and parameter --save-vid ; if the model contains multiple targets, but actually only want to detect a certain target, follow the Parameter --classes , its value is the id of the target
Q & A
The following are some common errors and solutions
AttributeError: partially initialized module 'cv2' has no attribute 'gapi_wip_gst_GStreamerPipeline' (most likely due to a circular import)
Upgrade opencv-python , execute pip install -U opencv-python
(pytorch1.7) PS D:\Github\Yolov7_StrongSORT_OSNet> python track.py --source test.mp4 --strong-sort-weights osnet_x0_25_market1501.pt strong_sort/deep/reid\torchreid\metrics\rank.py:11: UserWarning: Cython evaluation (very fast so highly recommended) is unavailable, now use python evaluation. warnings.warn( Fusing layers... RepConv.fuse_repvgg_block RepConv.fuse_repvgg_block RepConv.fuse_repvgg_block Model: osnet_x0_25 ** The following layers are discarded due to unmatched keys or layer size: ['classifier.weight', 'classifier.bias'] (1, 256, 128, 3) video 1/1 (1/7501) D:\Github\Yolov7_StrongSORT_OSNet\test.mp4: Traceback (most recent call last): File "track.py", line 332, in <module> main(opt) File "track.py", line 327, in main run(**vars(opt)) File "D:\Tools\anaconda3\envs\pytorch1.7\lib\site-packages\torch\autograd\grad_mode.py", line 26, in decorate_context return func(*args, **kwargs) File "track.py", line 149, in run for frame_idx, (path, im, im0s, vid_cap) in enumerate(dataset): File "D:\Github\Yolov7_StrongSORT_OSNet\ yolov7 \utils\datasets.py", line 191, in __next__ img = letterbox(img0, self.img_size, stride=self.stride)[0] File "D:\Github\Yolov7_StrongSORT_OSNet\ yolov7 \utils\datasets.py", line 1000, in letterbox dw, dh = np.mod(dw, stride), np.mod(dh, stride) # wh padding File "D:\Tools\anaconda3\envs\pytorch1.7\lib\site-packages\torch\tensor.py", line 630, in __array__ return self.numpy() TypeError: can't convert cuda:0 device type tensor to numpy. Use Tensor.cpu() to copy the tensor to host memory first.
Modify the track.py section in loadImages and replace the original
dataset = LoadImages(source, img_size=imgsz, stride=stride)
change to
dataset = LoadImages(source, img_size=imgsz, stride=stride.cpu().numpy())
You can refer to the official issue
download
The complete project of the v1.0 version used in this article is placed in the network disk, which is convenient for everyone to download
Link: https://pan.baidu.com/s/1di_ju3JeoZDpnX3IuSBLlw
Extraction code: y3ib
References
- https://github.com/mikel-brostrom/Yolov7_StrongSORT_OSNet
- https://github.com/mikel-brostrom/yolov7
- https://github.com/WongKinYiu/yolov7
- https://xugaoxiang.com/2019/12/18/windows-10-cuda-cudnn/
This article is reprinted from https://xugaoxiang.com/2022/08/16/yolov7-strongsort-osnet/
This site is for inclusion only, and the copyright belongs to the original author.